Connecting Microsoft Intune with AssetLoom
Learn how to connect Microsoft Intune with AssetLoom to sync device information, automate asset discovery, and keep your IT inventory up to date.
To connect Microsoft Intune with AssetLoom, you’ll first need to create the credentials AssetLoom uses to authenticate with your Microsoft environment (including Client ID, Client Secret, OAuth 2.0 Token Endpoint). This involves registering an application in Microsoft Entra ID, giving that application the required Microsoft Graph permissions so we can collect the credentials.
Once everything is ready, you’ll enter the application credentials into AssetLoom to complete the connection.
Make sure:
- Your organization has an active Microsoft Intune environment. Microsoft Graph’s Intune APIs require an active Intune license for the tenant.
- You have permission to create an app registration in Microsoft Entra ID.
- An administrator is available to grant consent for the required Microsoft Graph application permissions. Application permissions operate without a signed-in user and require administrator consent.
1. Register an application in Microsoft Entra ID
Before the integration can access Microsoft Intune data, it needs an application identity in your Microsoft environment. Registering an application in Microsoft Entra ID creates this identity and allows you to control which Microsoft Graph permissions AssetLoom can use.
To register an application in Microsoft Entra ID, follow these steps:
- Sign in to the Microsoft Entra admin center.
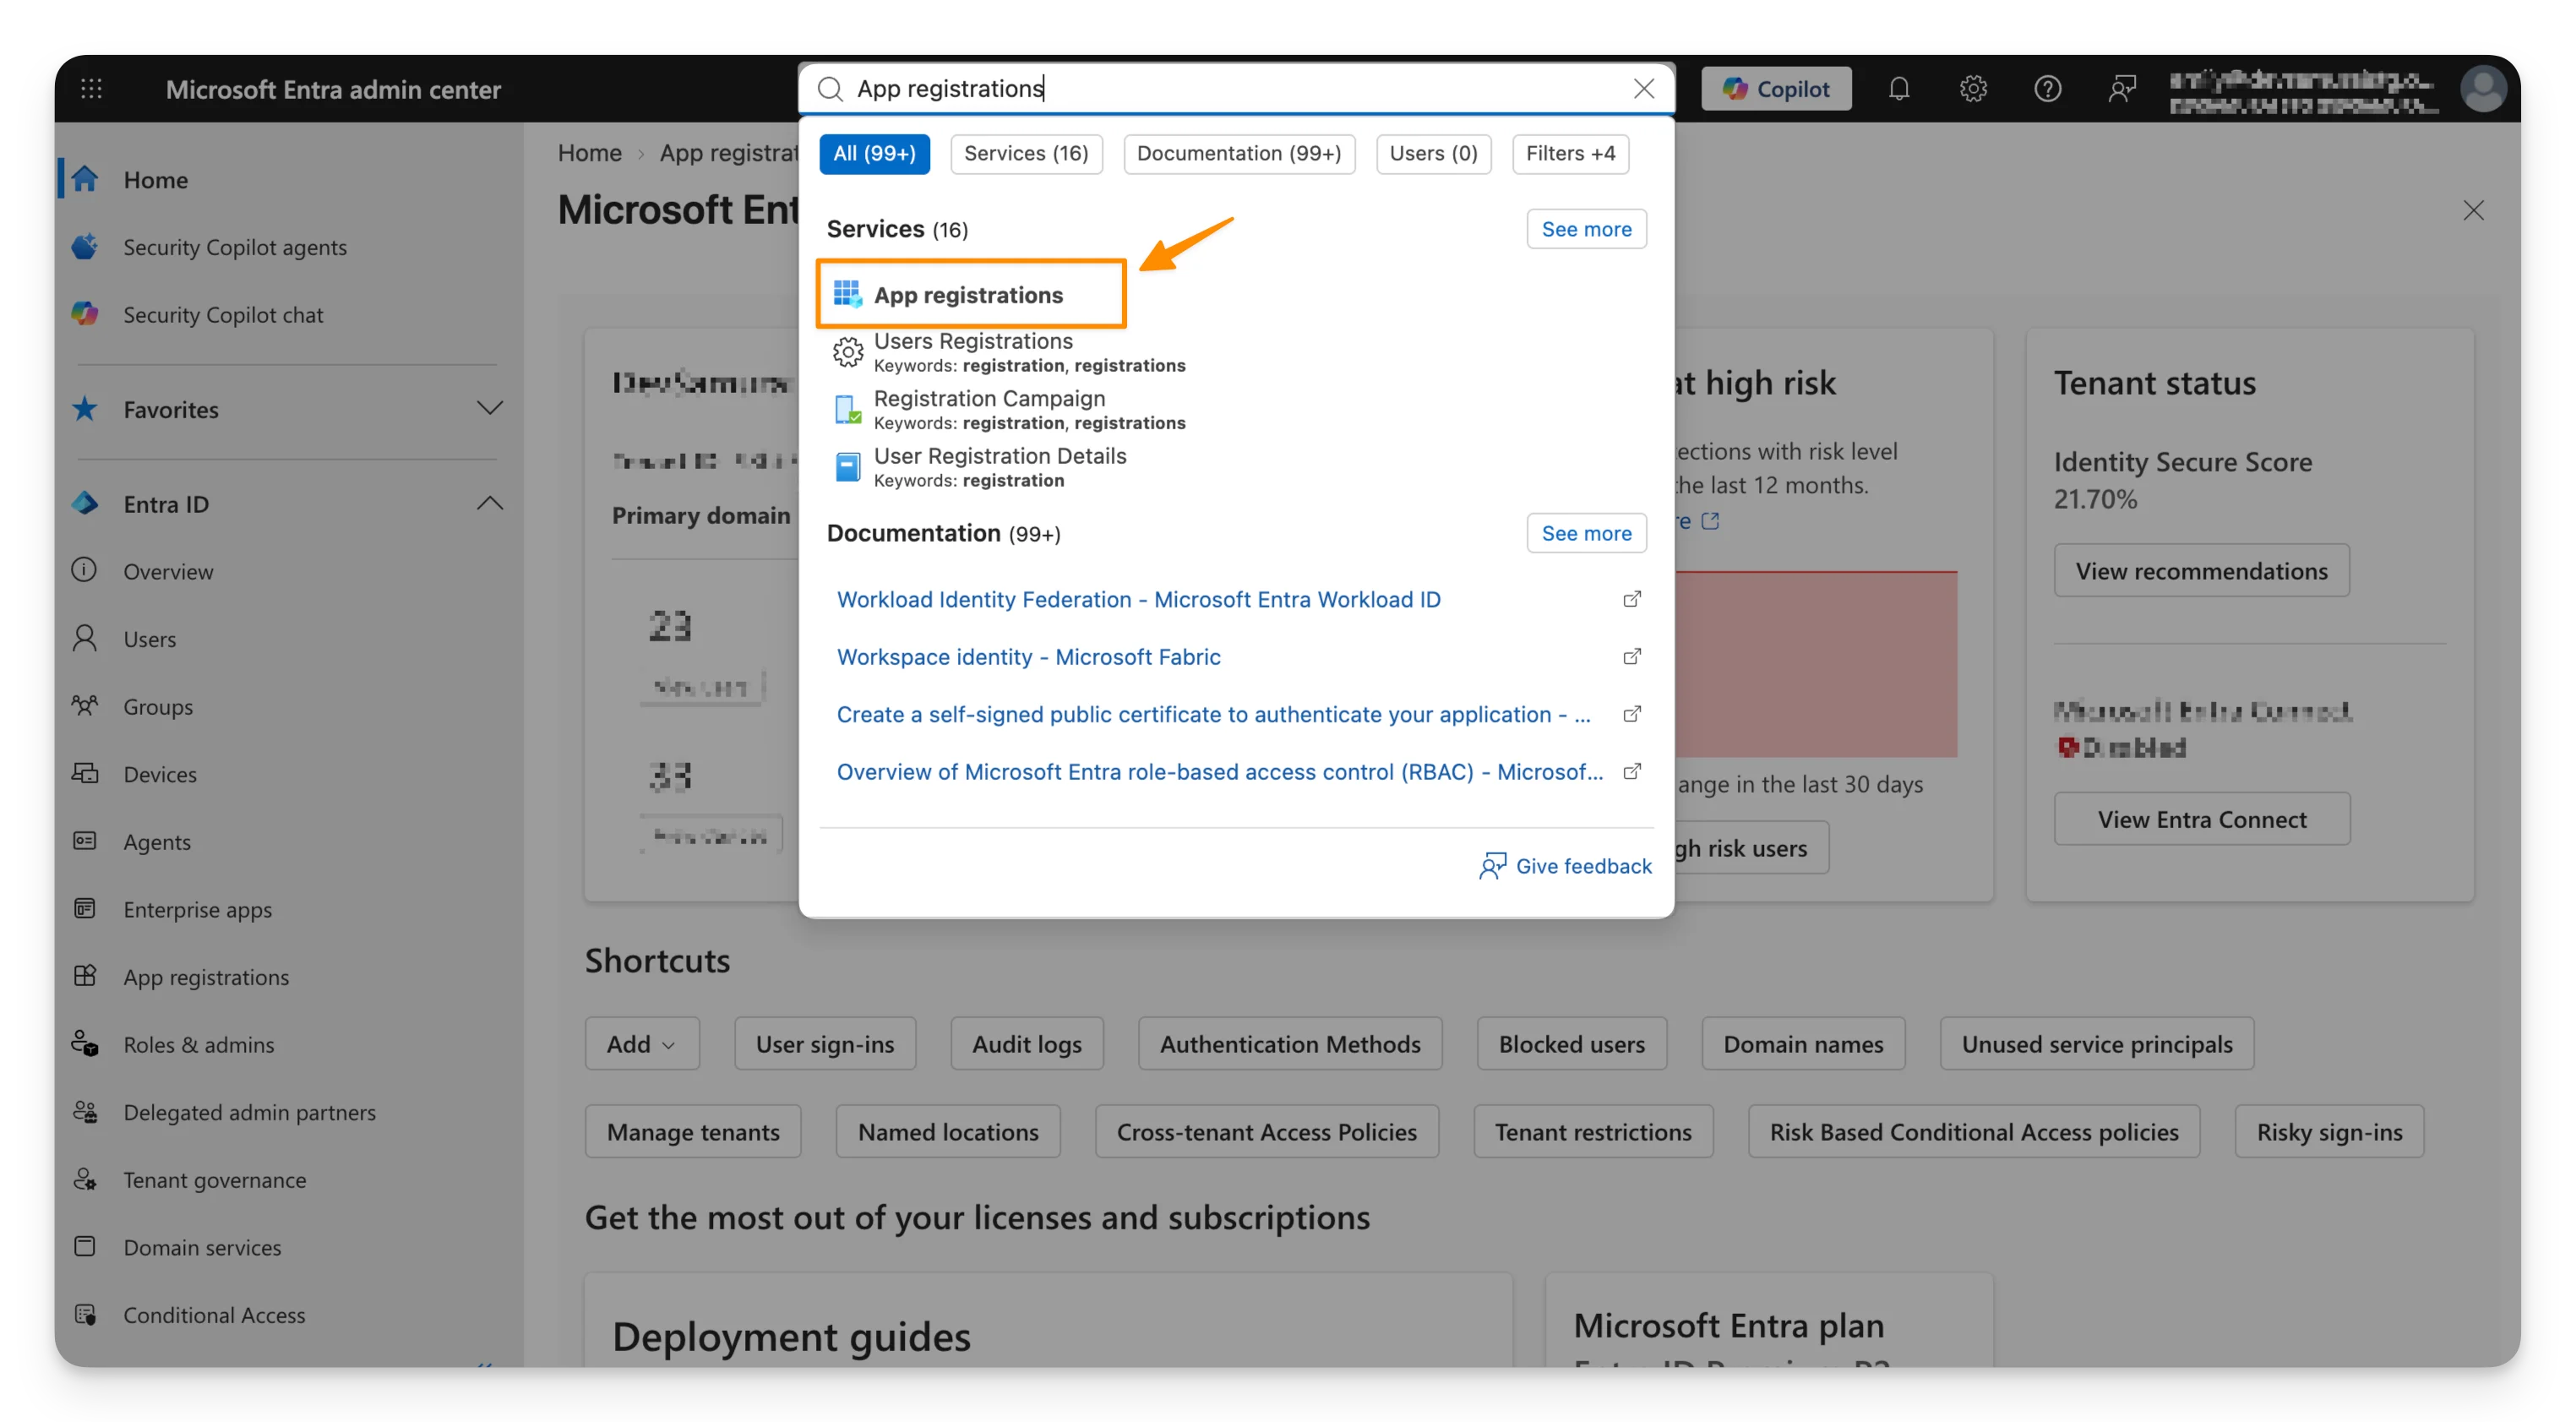
- Search for App registrations and open it.
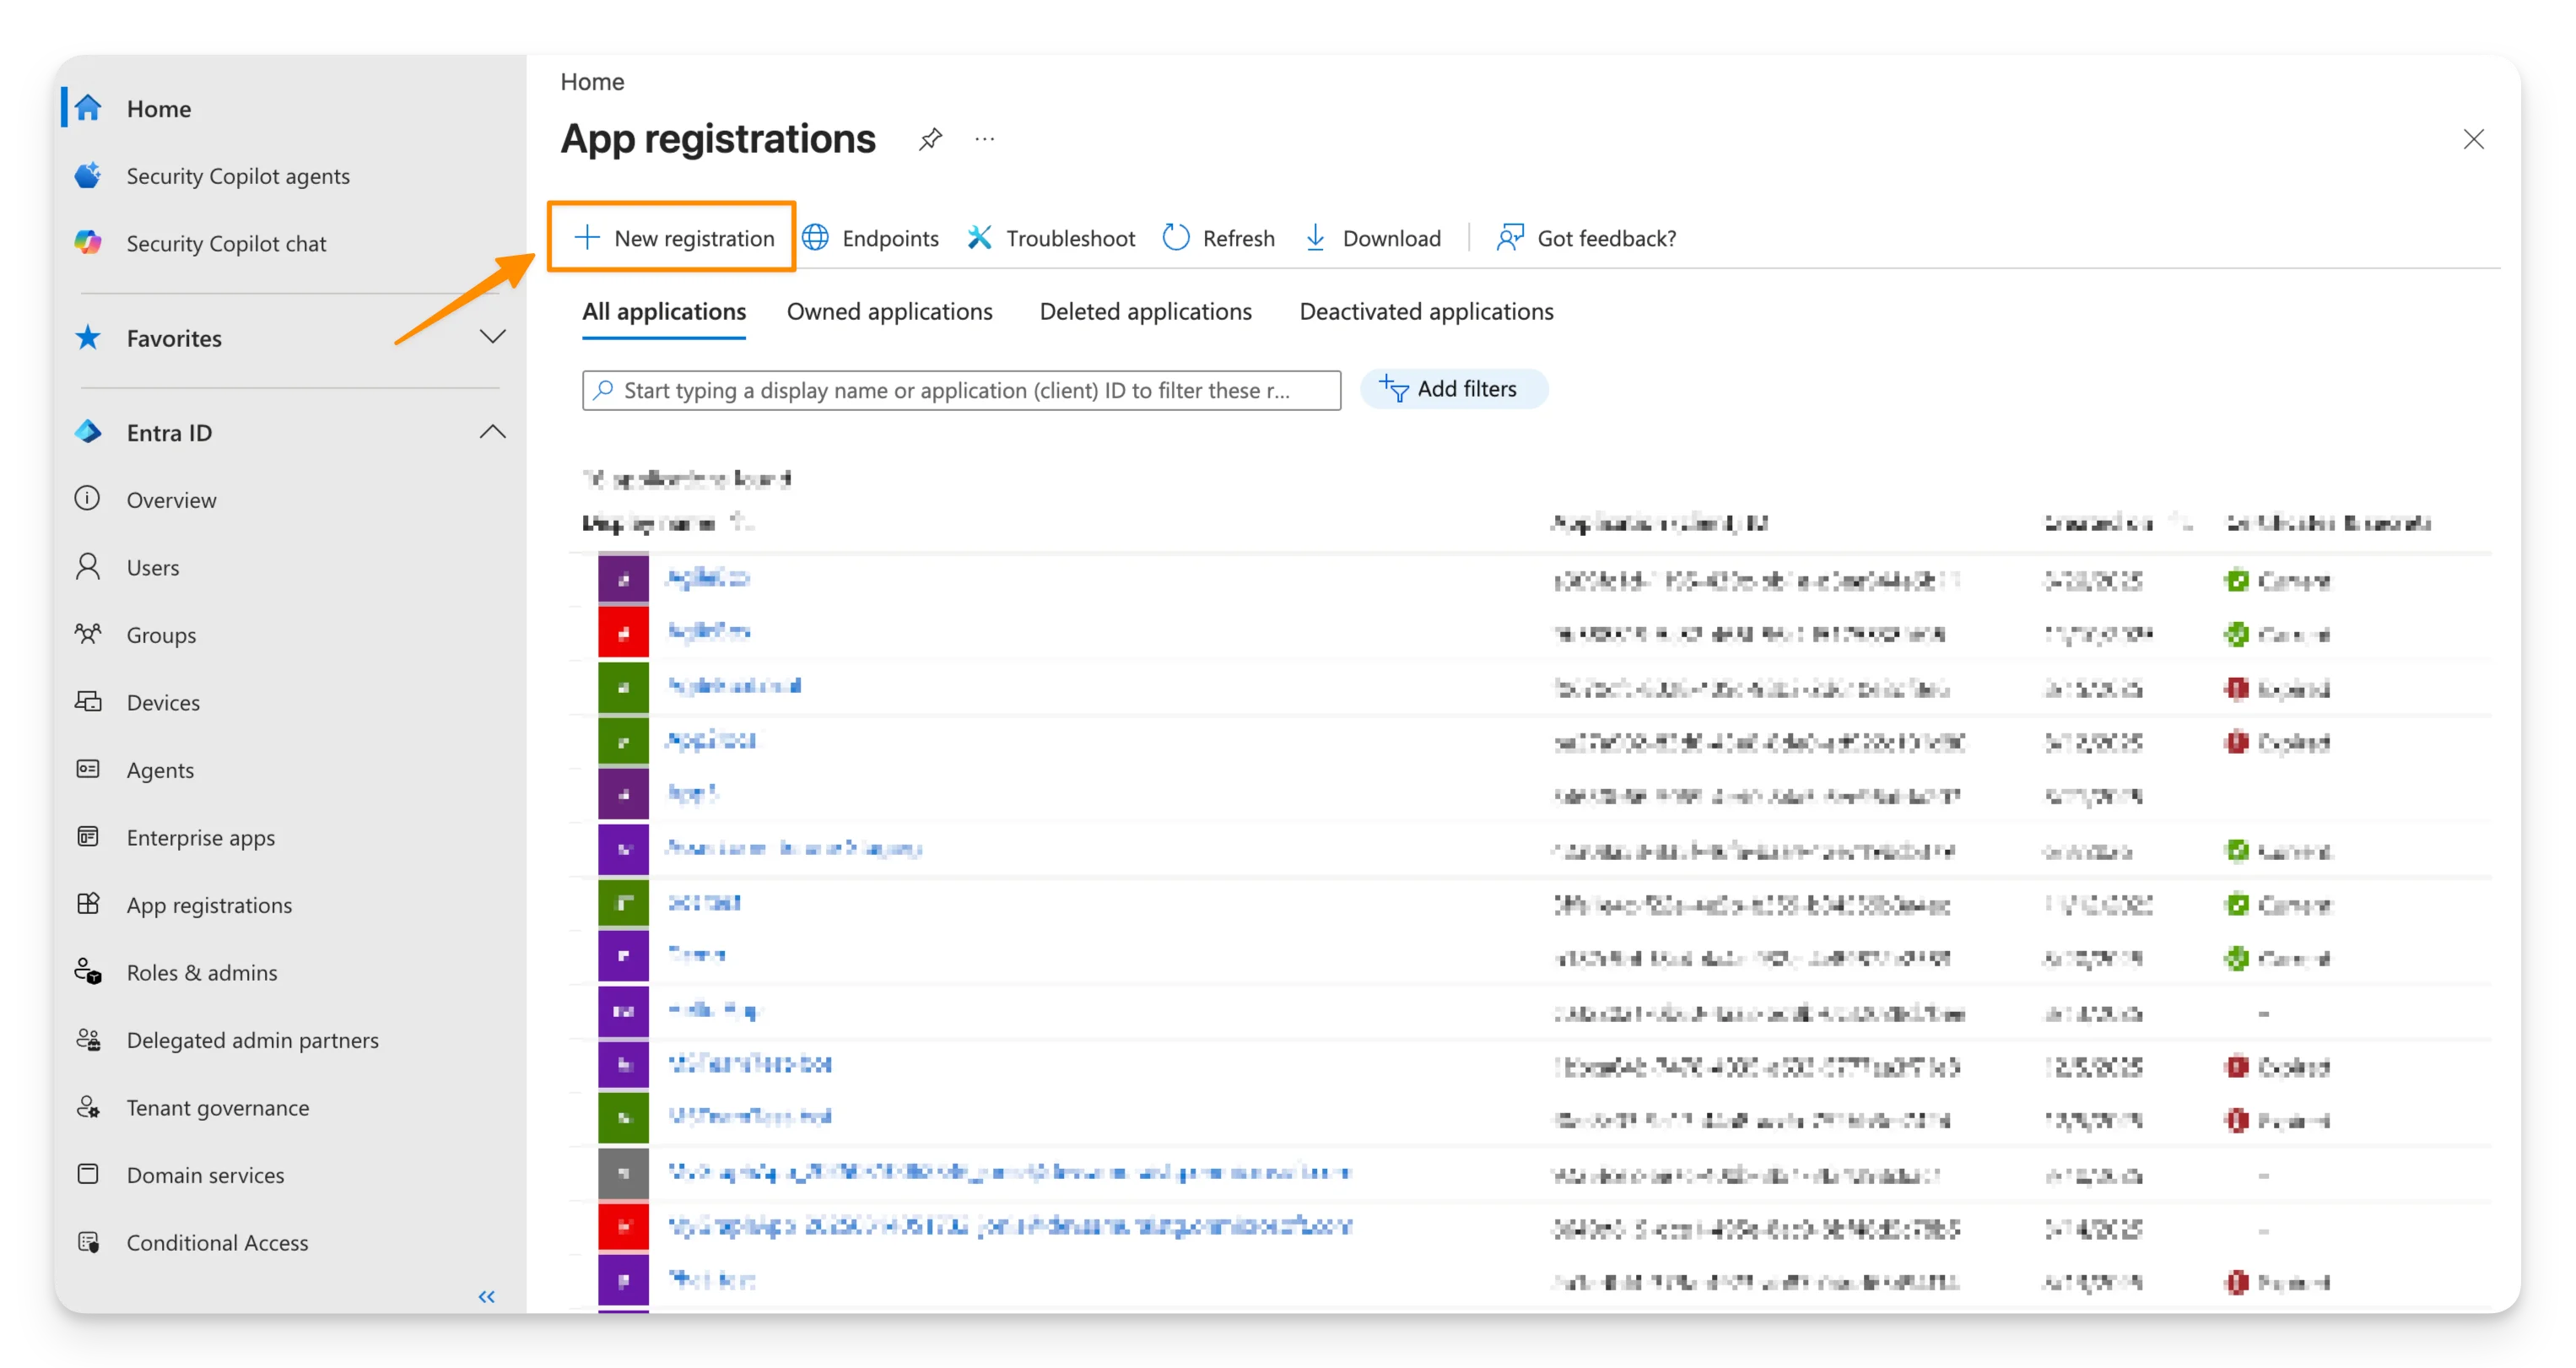
- At the App registrations screen, click New registration to create a new application.
- You will be redirected to the Application Creation screen. On this screen, complete the following:
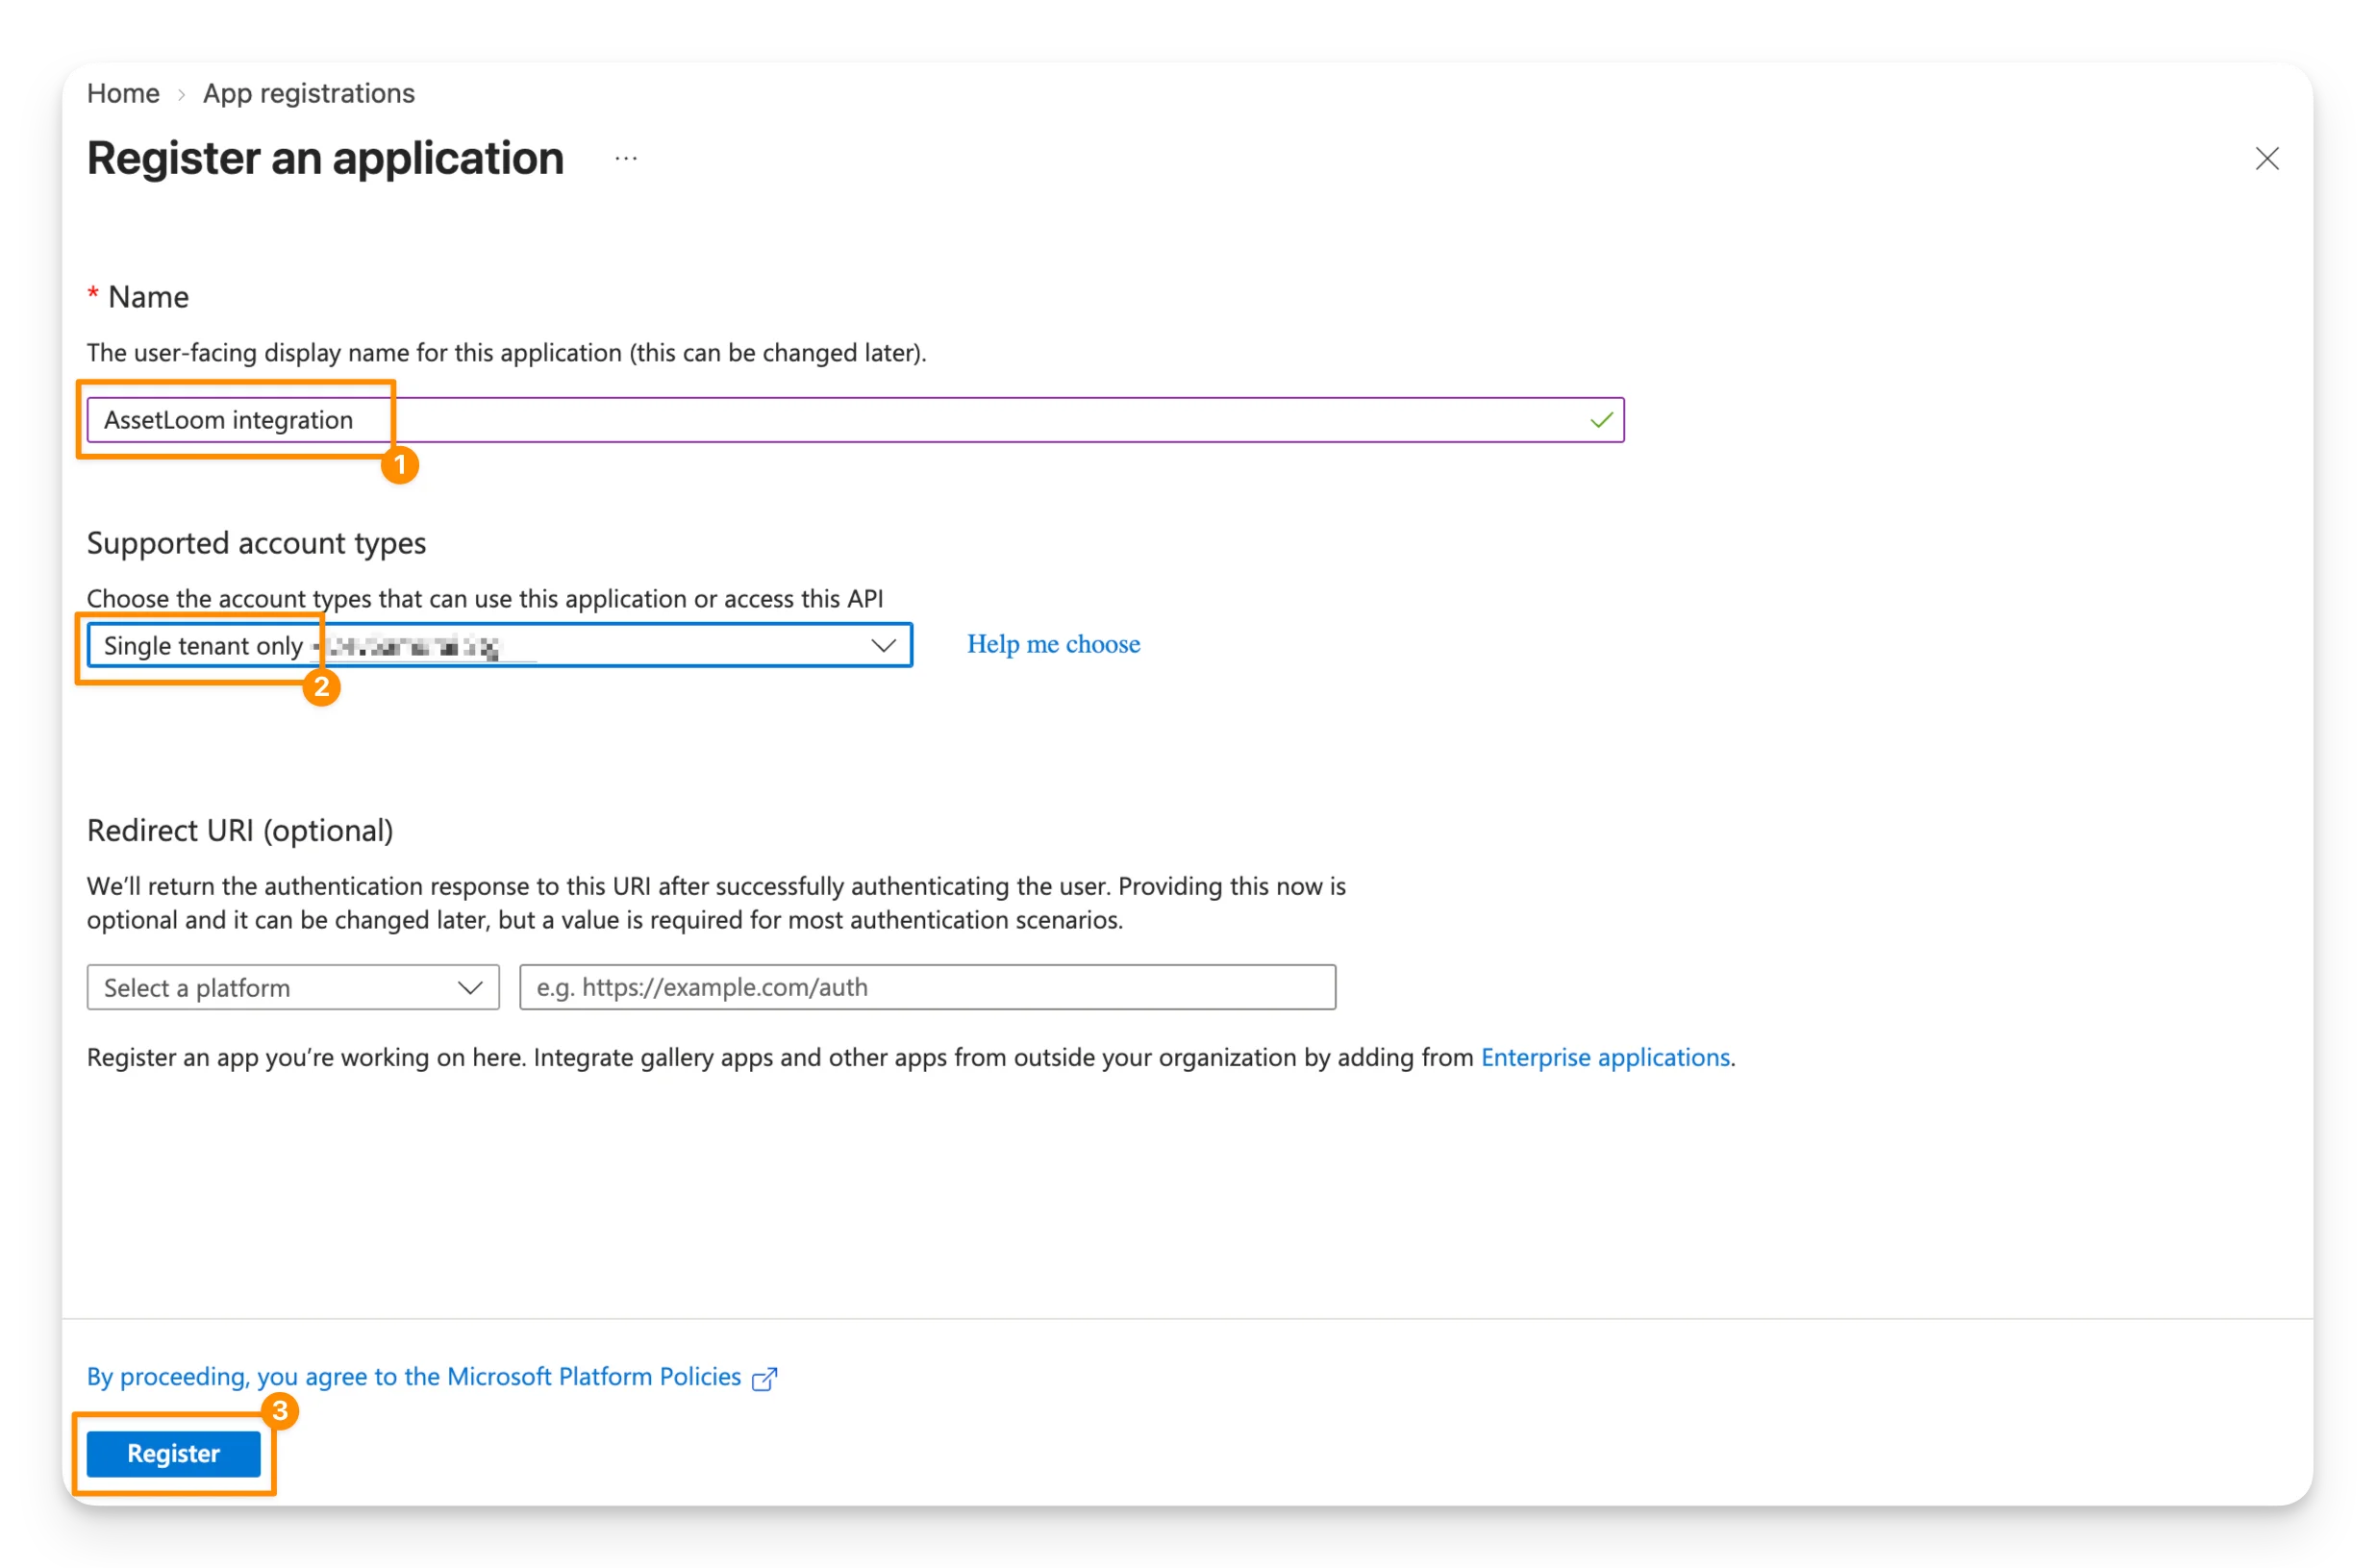
- Name: Enter a recognizable name for the application, e.g. AssetLoom Integration. This name is used to identify the application in Microsoft Entra ID and can be changed later.
- Supported account types: Select Single tenant only (Accounts in this organizational directory only). This keeps the application limited to your organization’s Microsoft tenant.
- Redirect URI (optional): You can leave this field blank. AssetLoom uses application credentials to authenticate, so a redirect URI is not required for this application.
- Select Register.
Microsoft Entra ID will create the application and open its Overview page. From here, you can continue by granting the Microsoft Graph API permissions needed for the integration.
2. Add the required Microsoft Graph API permissions
The registered application needs permission to access the Microsoft data required for the integration. Microsoft Intune device information is available through the Microsoft Graph API, so you need to configure the registered application with the appropriate Microsoft Graph API permissions.
Here is how to do it:
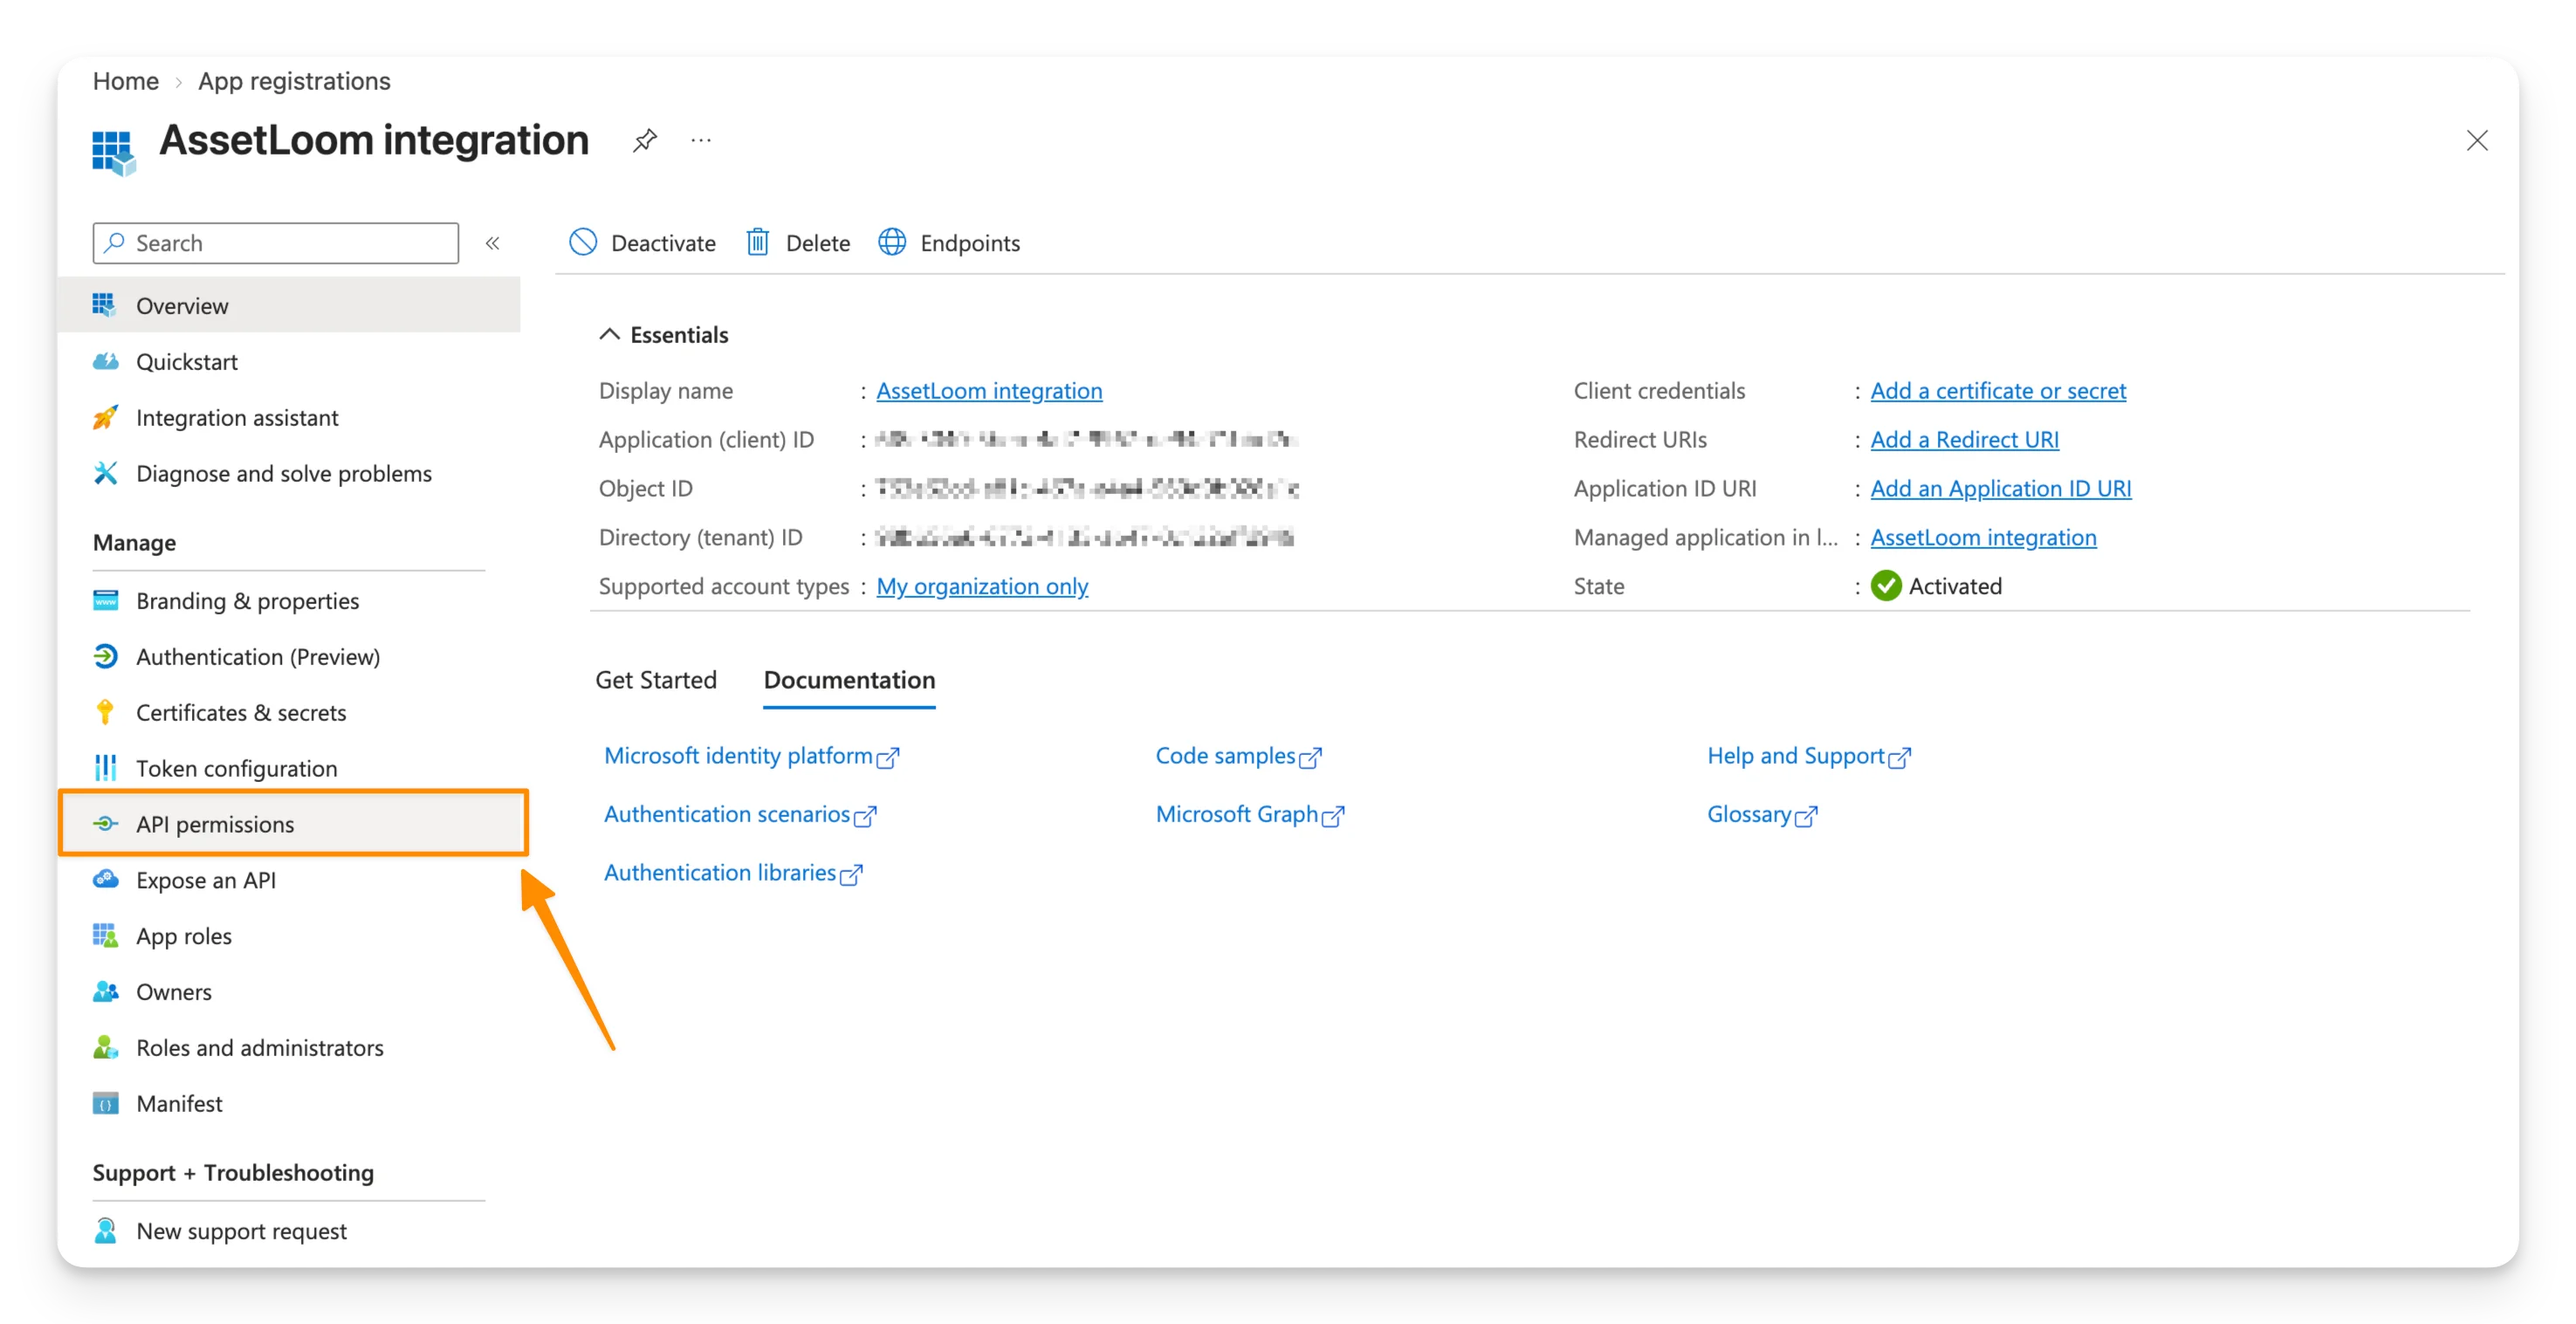
- In the left-hand menu of your newly created application page, select API permissions.
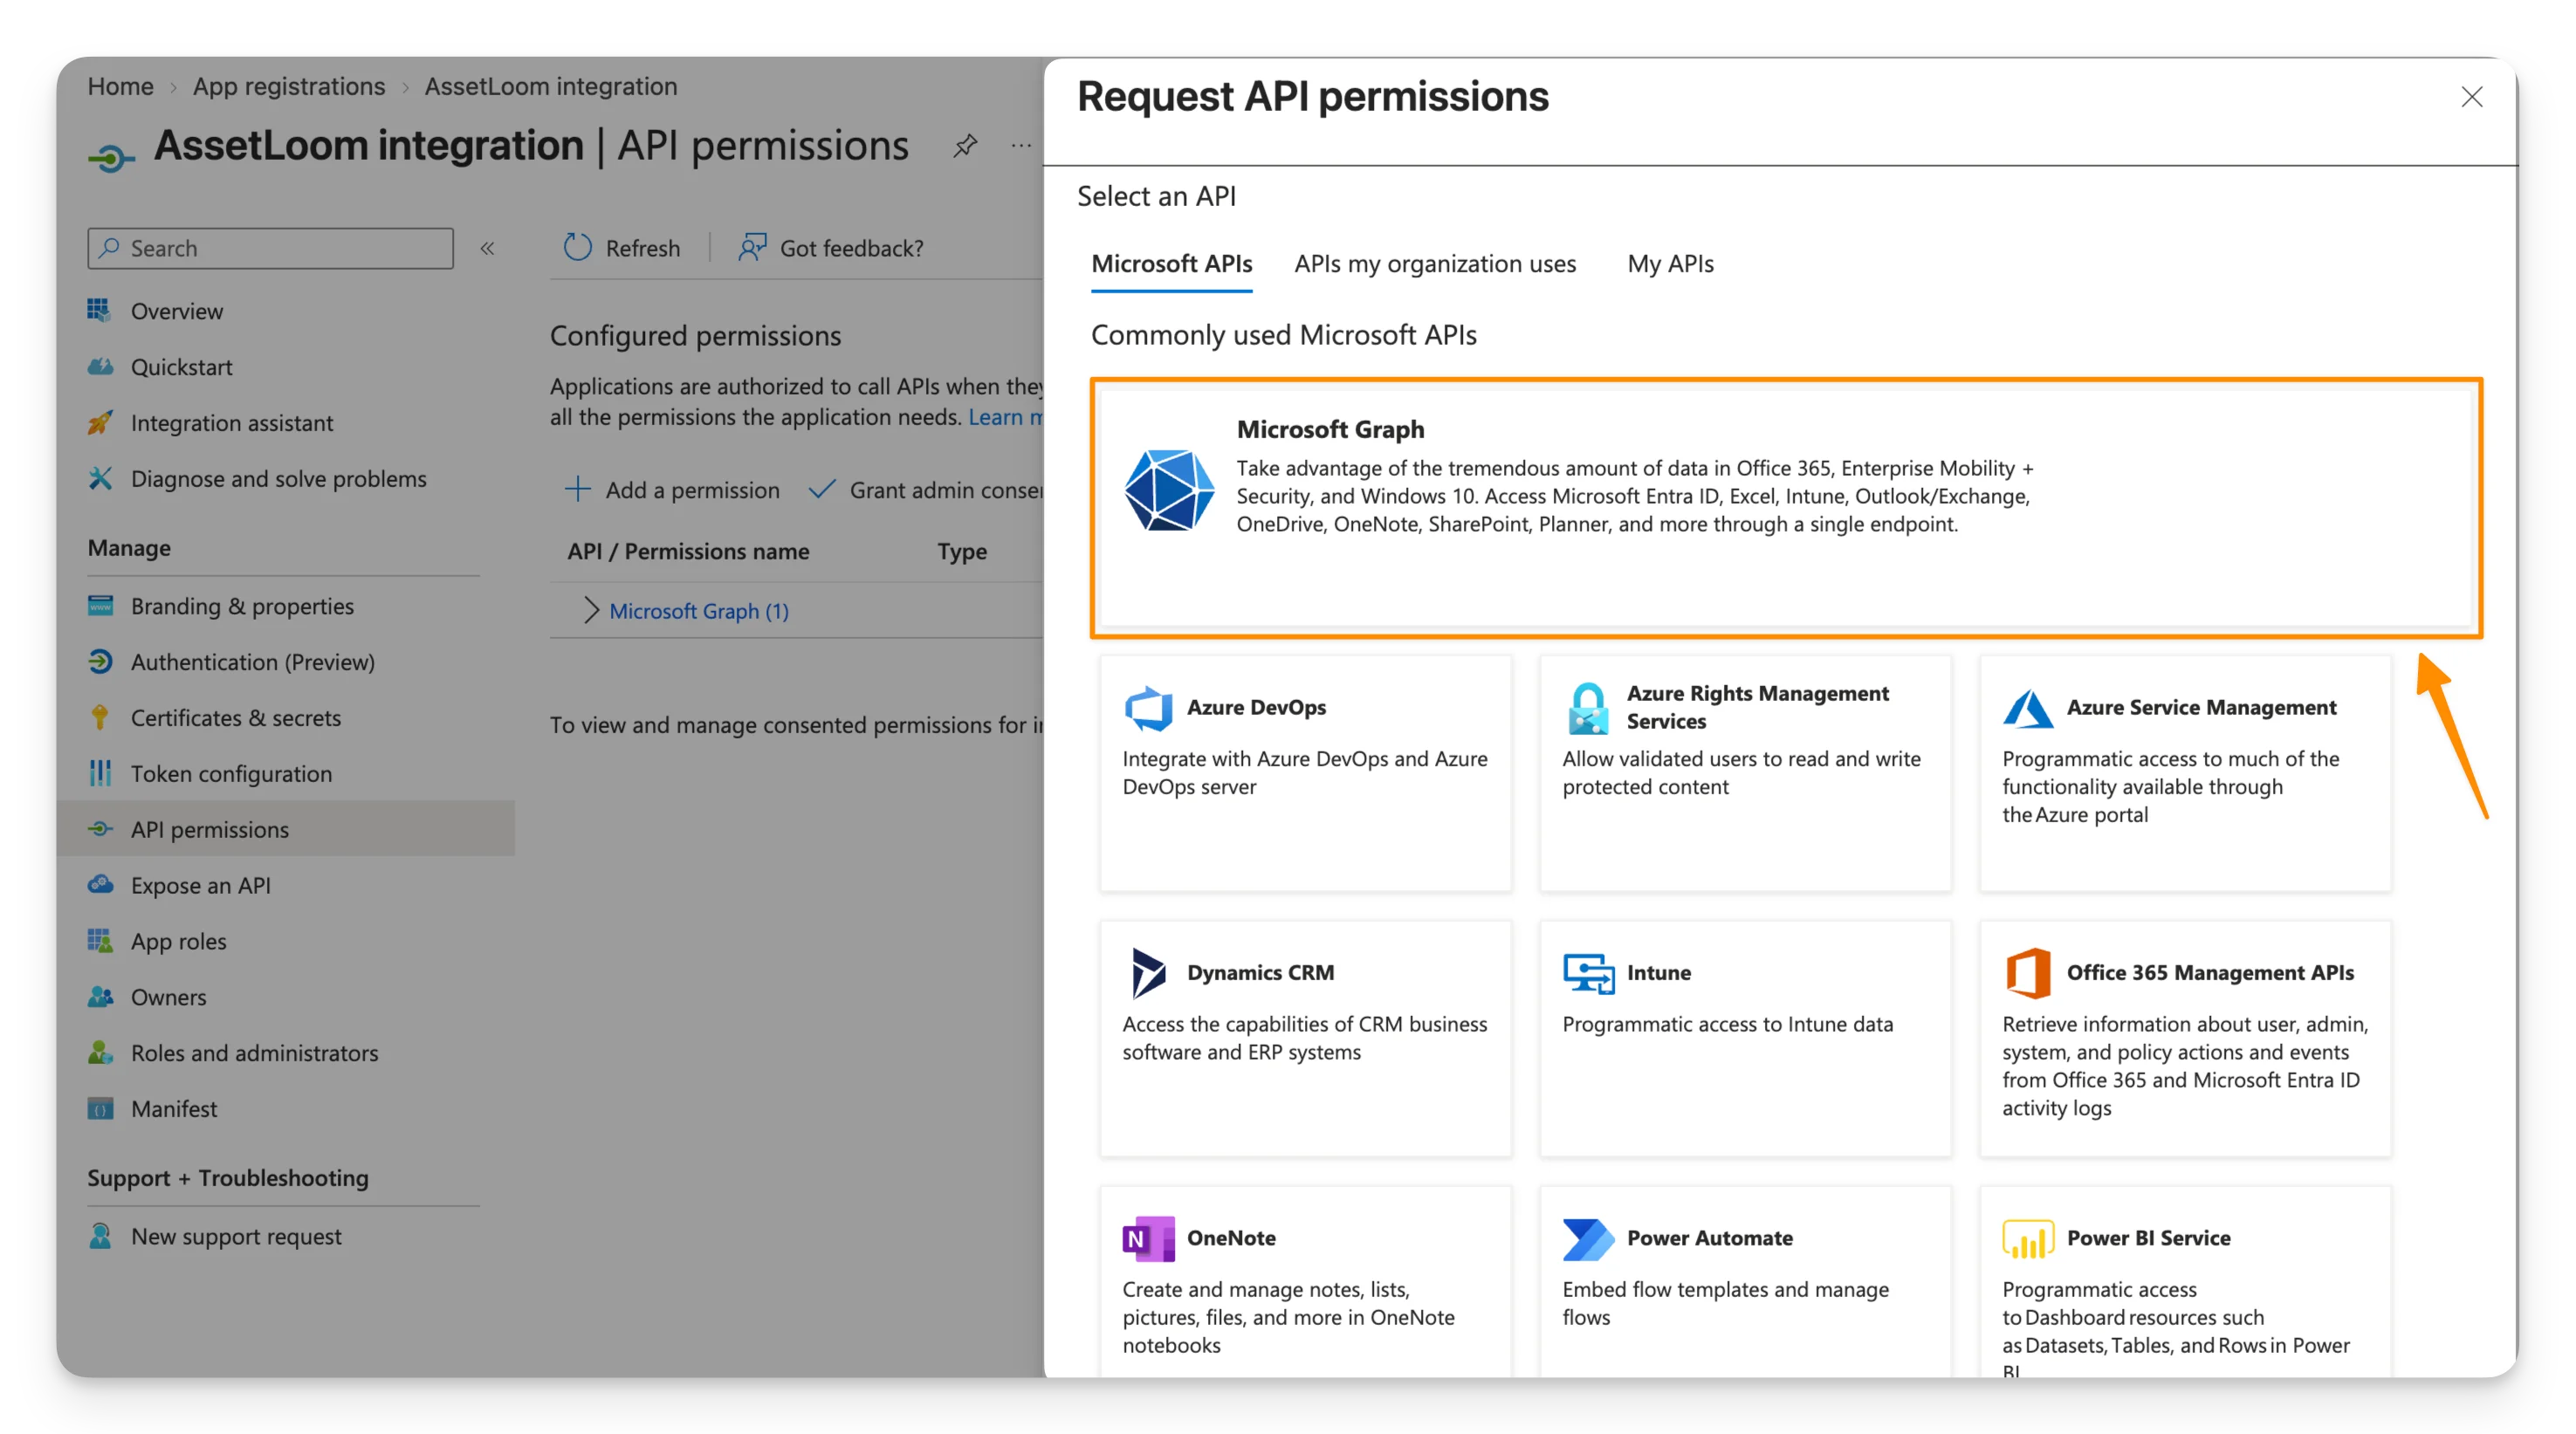
- You will be navigated to the API permissions page. On this page, select Add a permission.
- You should now see a sidebar to select a Microsoft API. From the API lists, select Microsoft Graph. Microsoft Graph is the API the registered application will use to access Intune and related Microsoft directory data.
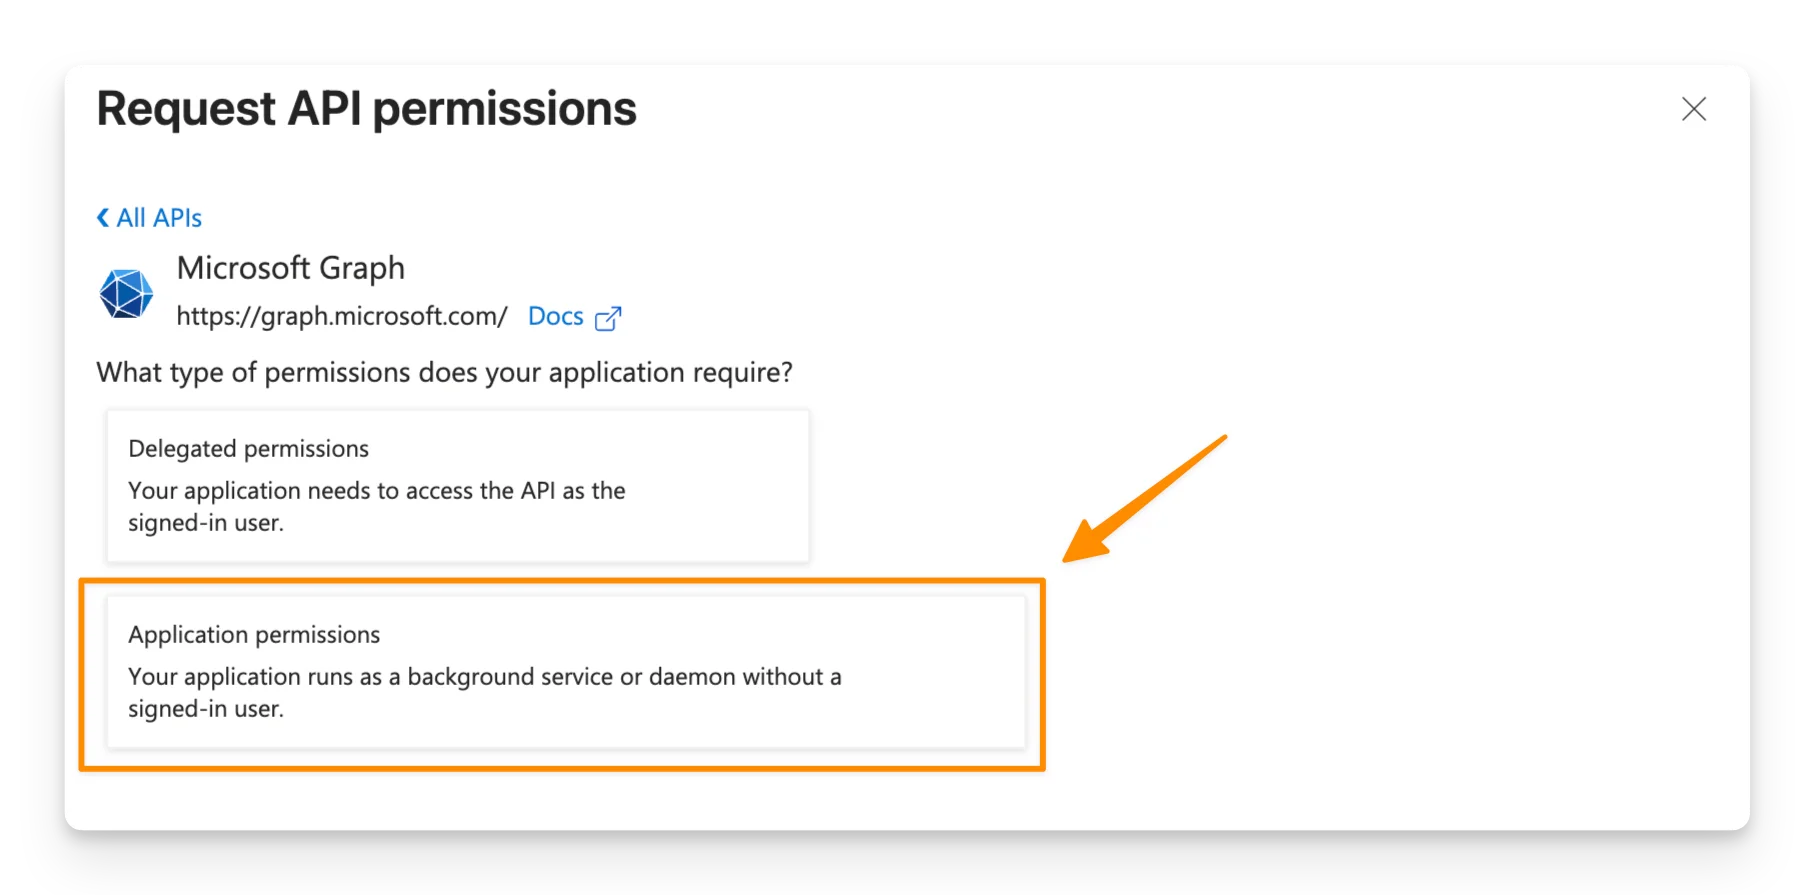
- Select Application permissions for the Microsoft Graph API.
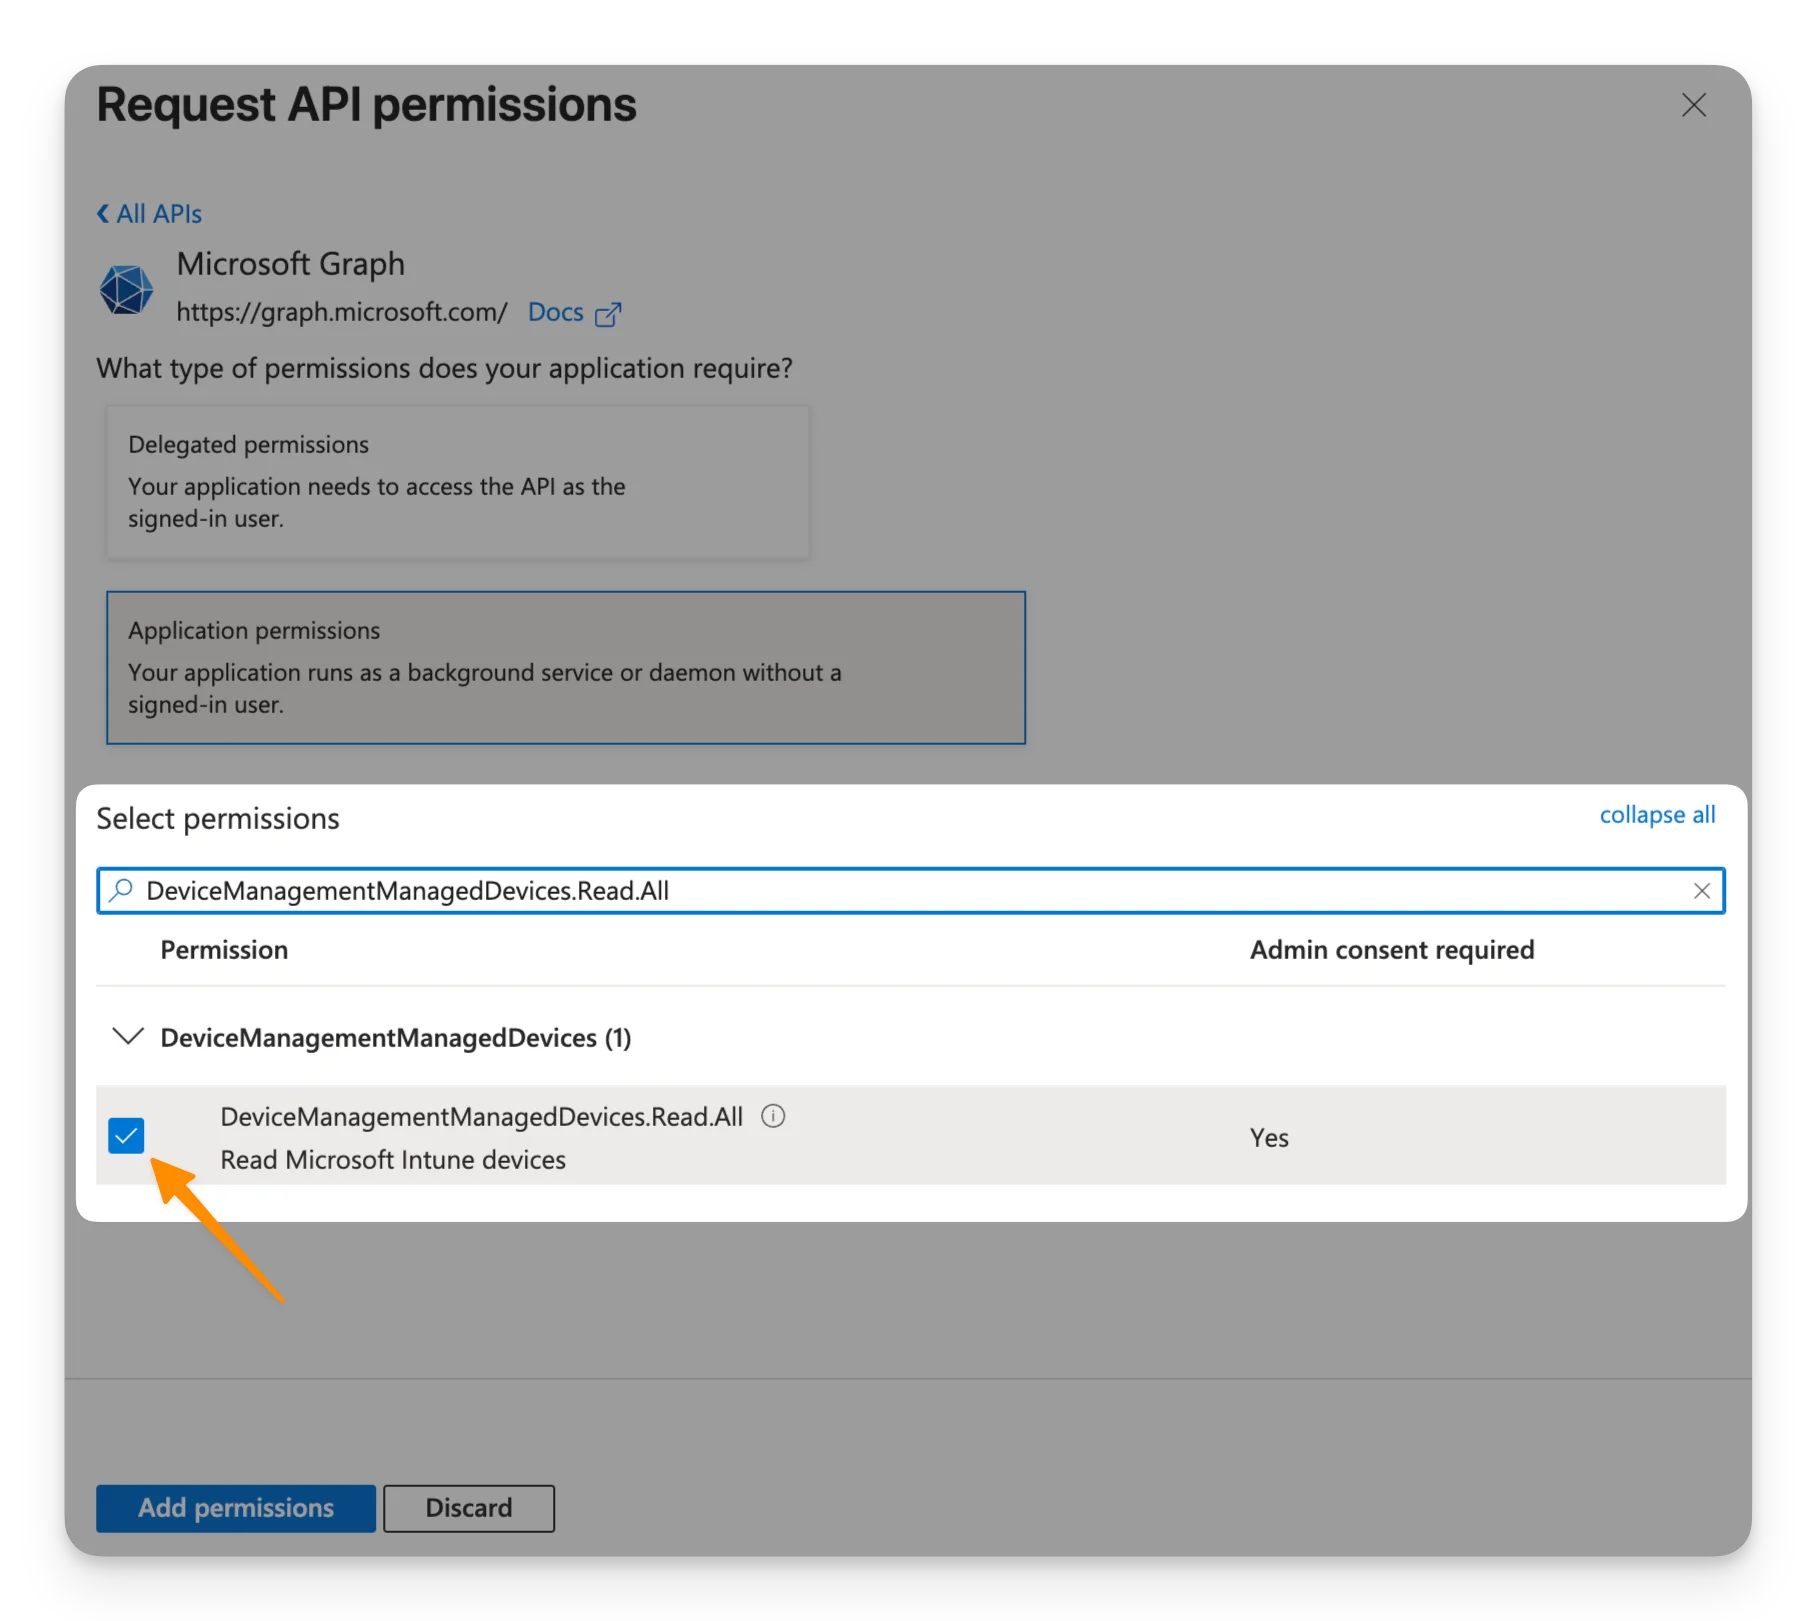
 You should now see the list of available application permissions. Search and select the following permissions:
- Device Management > DeviceManagementManagedDevices.Read.All (Read Microsoft Intune devices): Allows the registered application to read managed device information from Microsoft Intune.
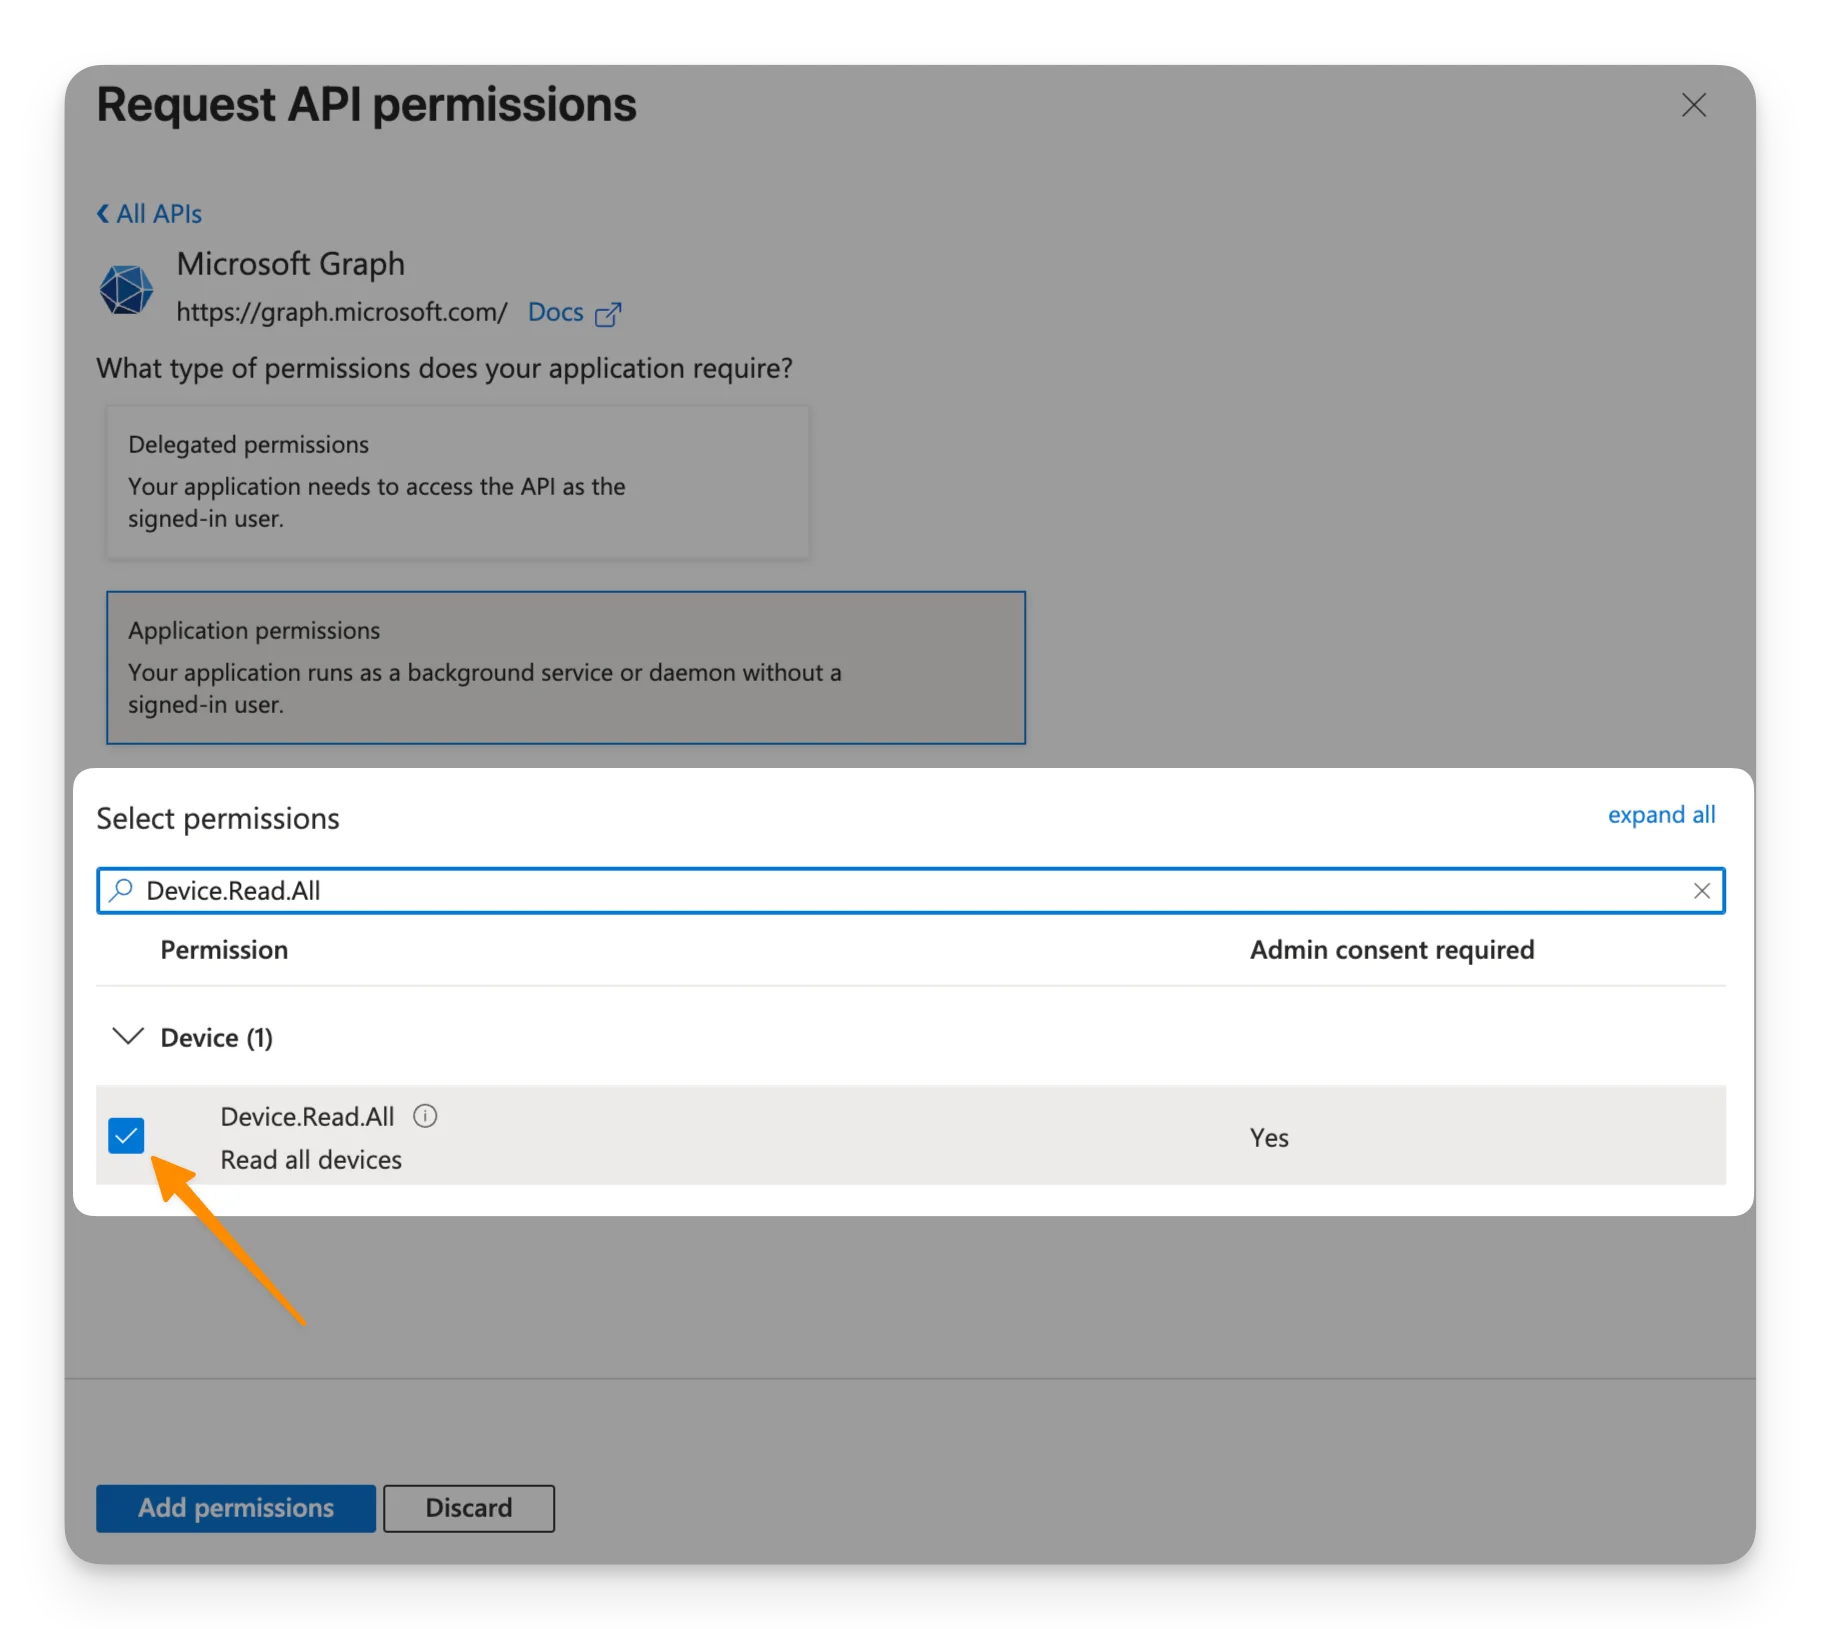
- Devices > Device.Read.All (Read all devices): Allows the registered application to read device information from your Microsoft Entra directory.
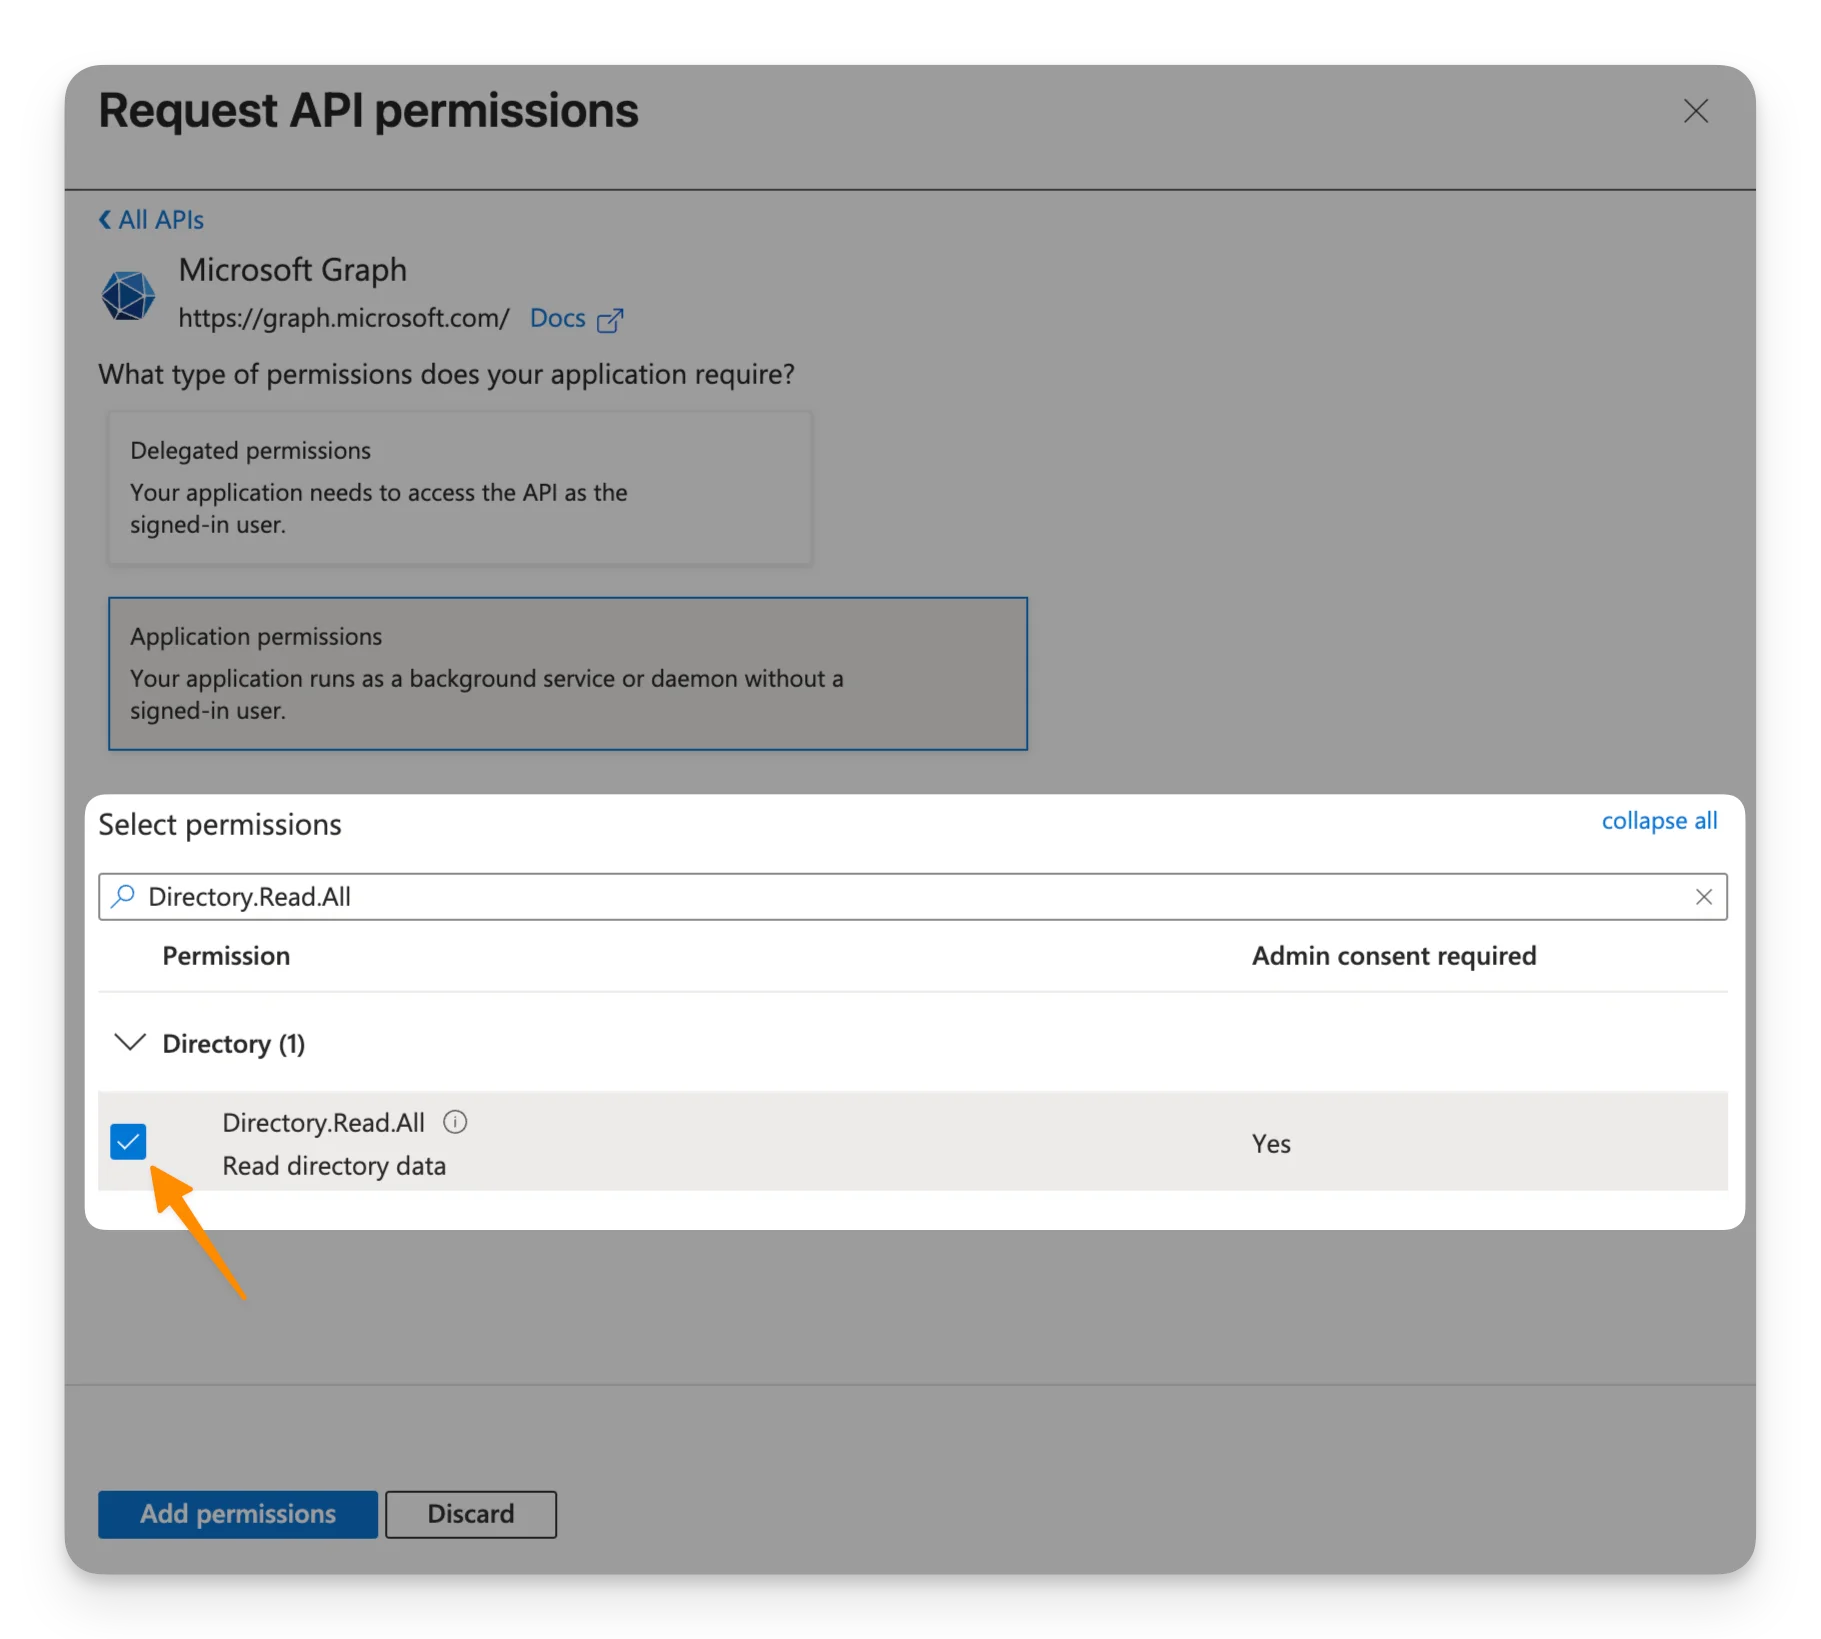
- Directory > Directory.Read.All (Read directory data): Allows the registered application to read related directory information needed to identify and associate devices and users.
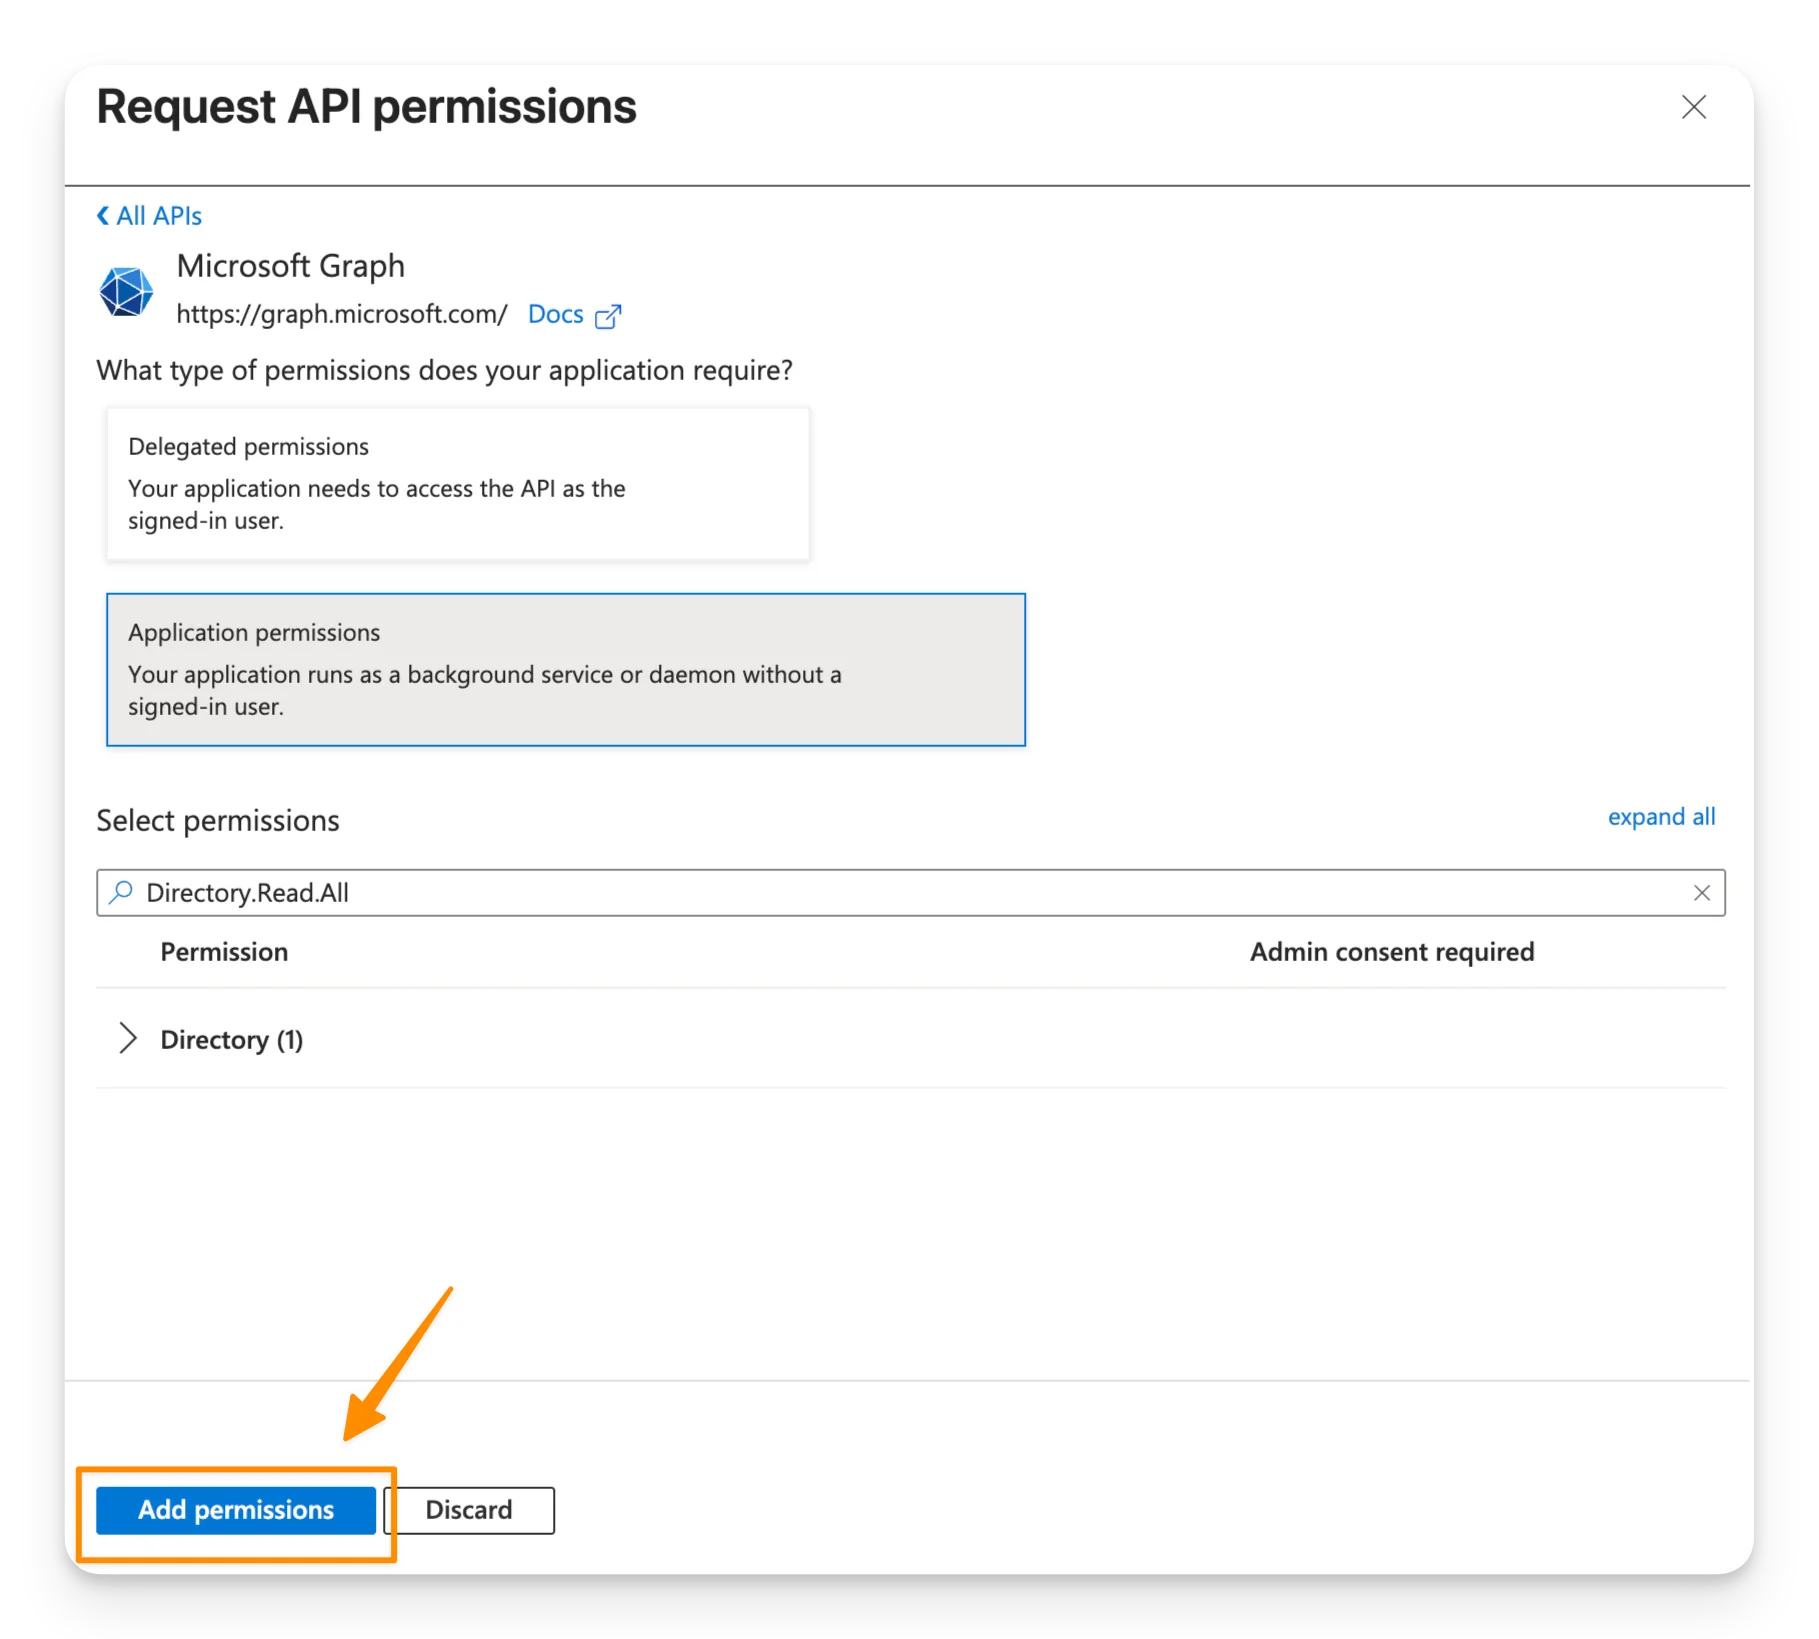
After selecting all 3 permissions with the corresponding checkboxes, click Add permissions.
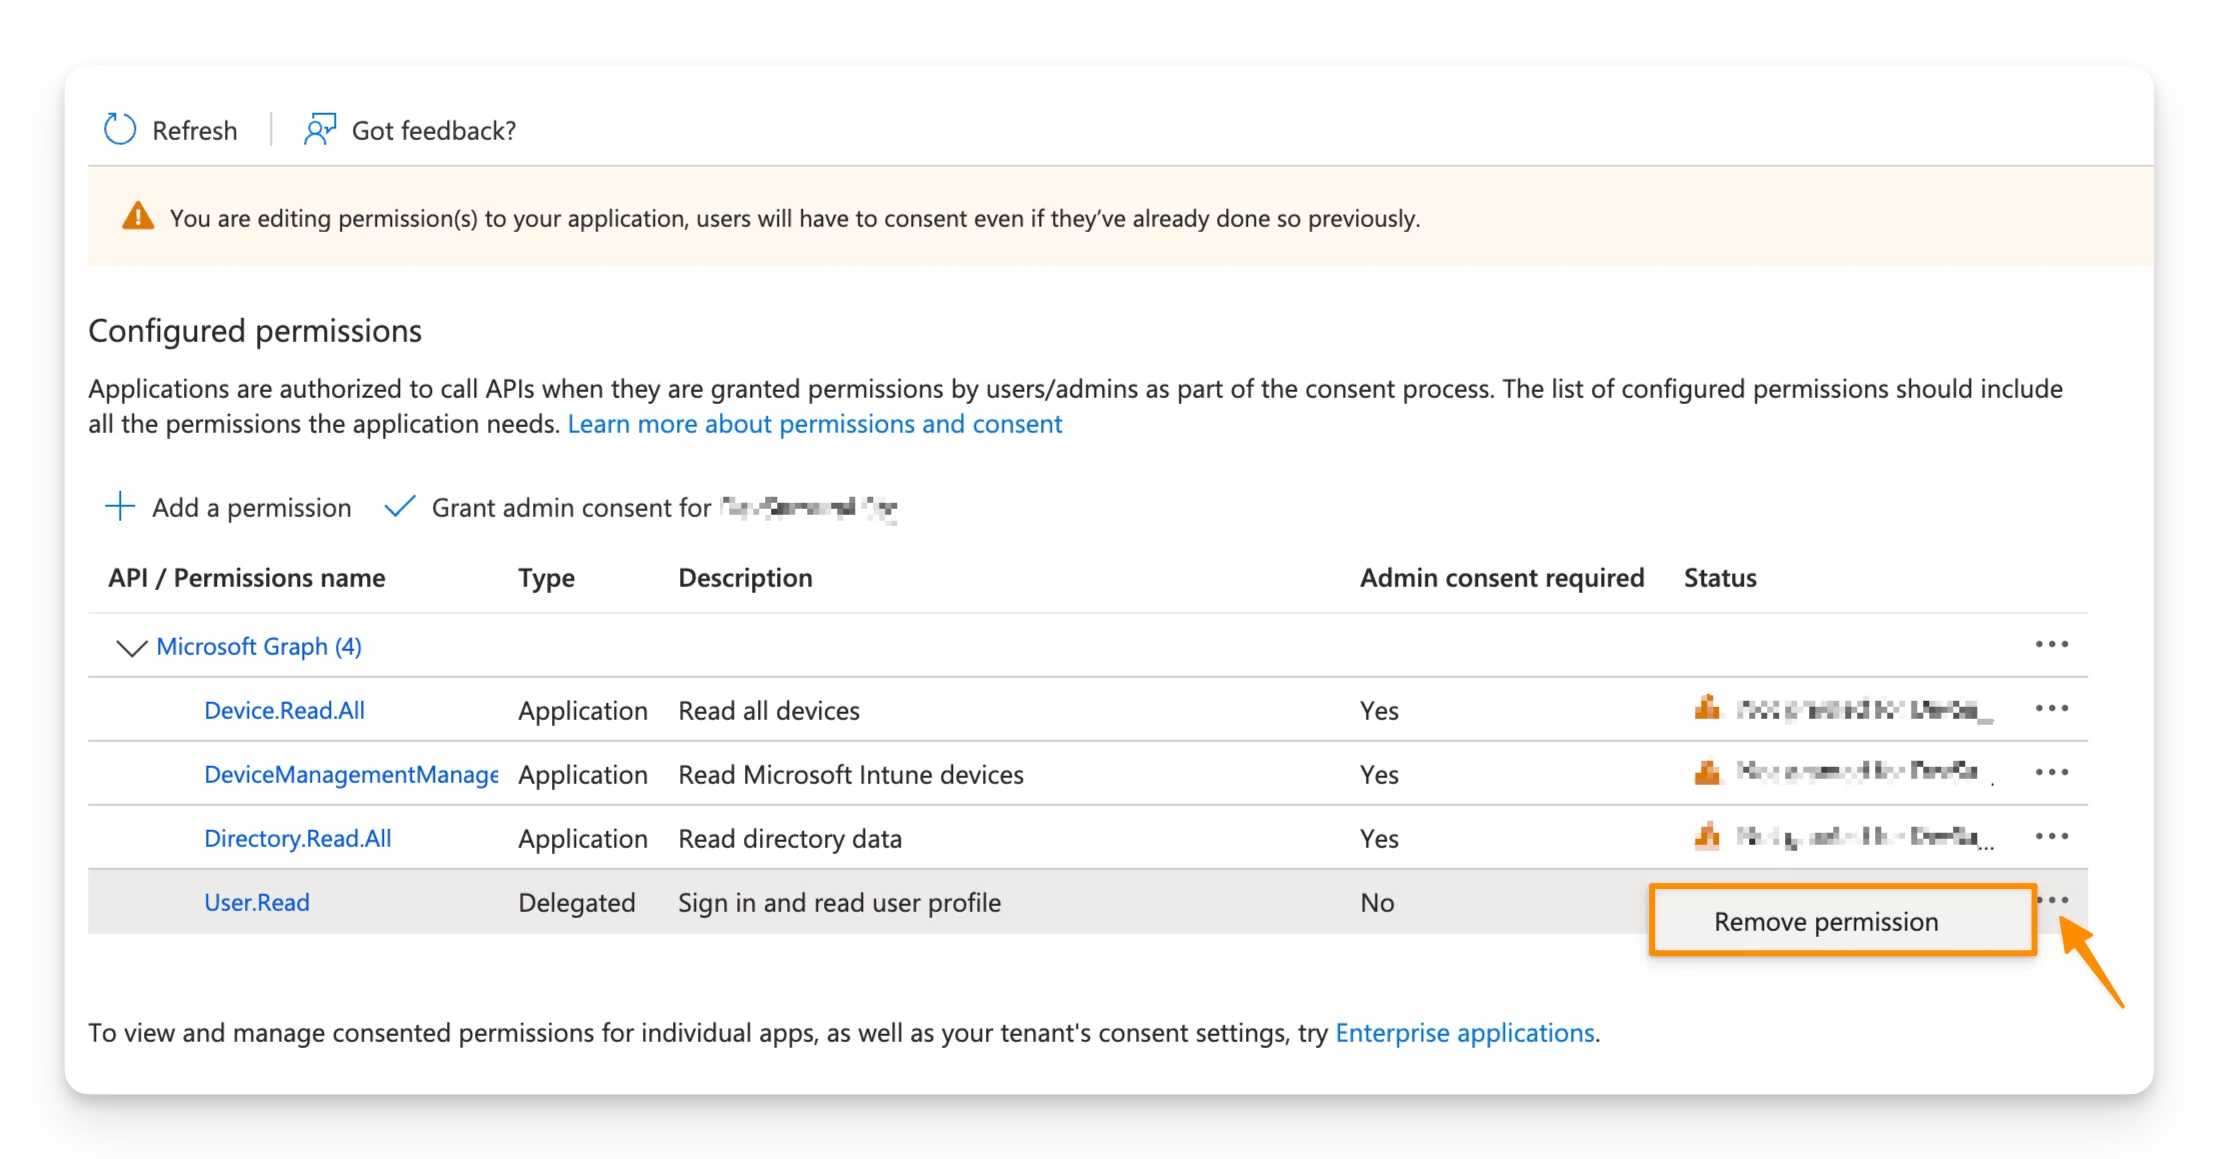
You will now be returned to the API permissions page to review and confirm all permissions currently configured for the application.
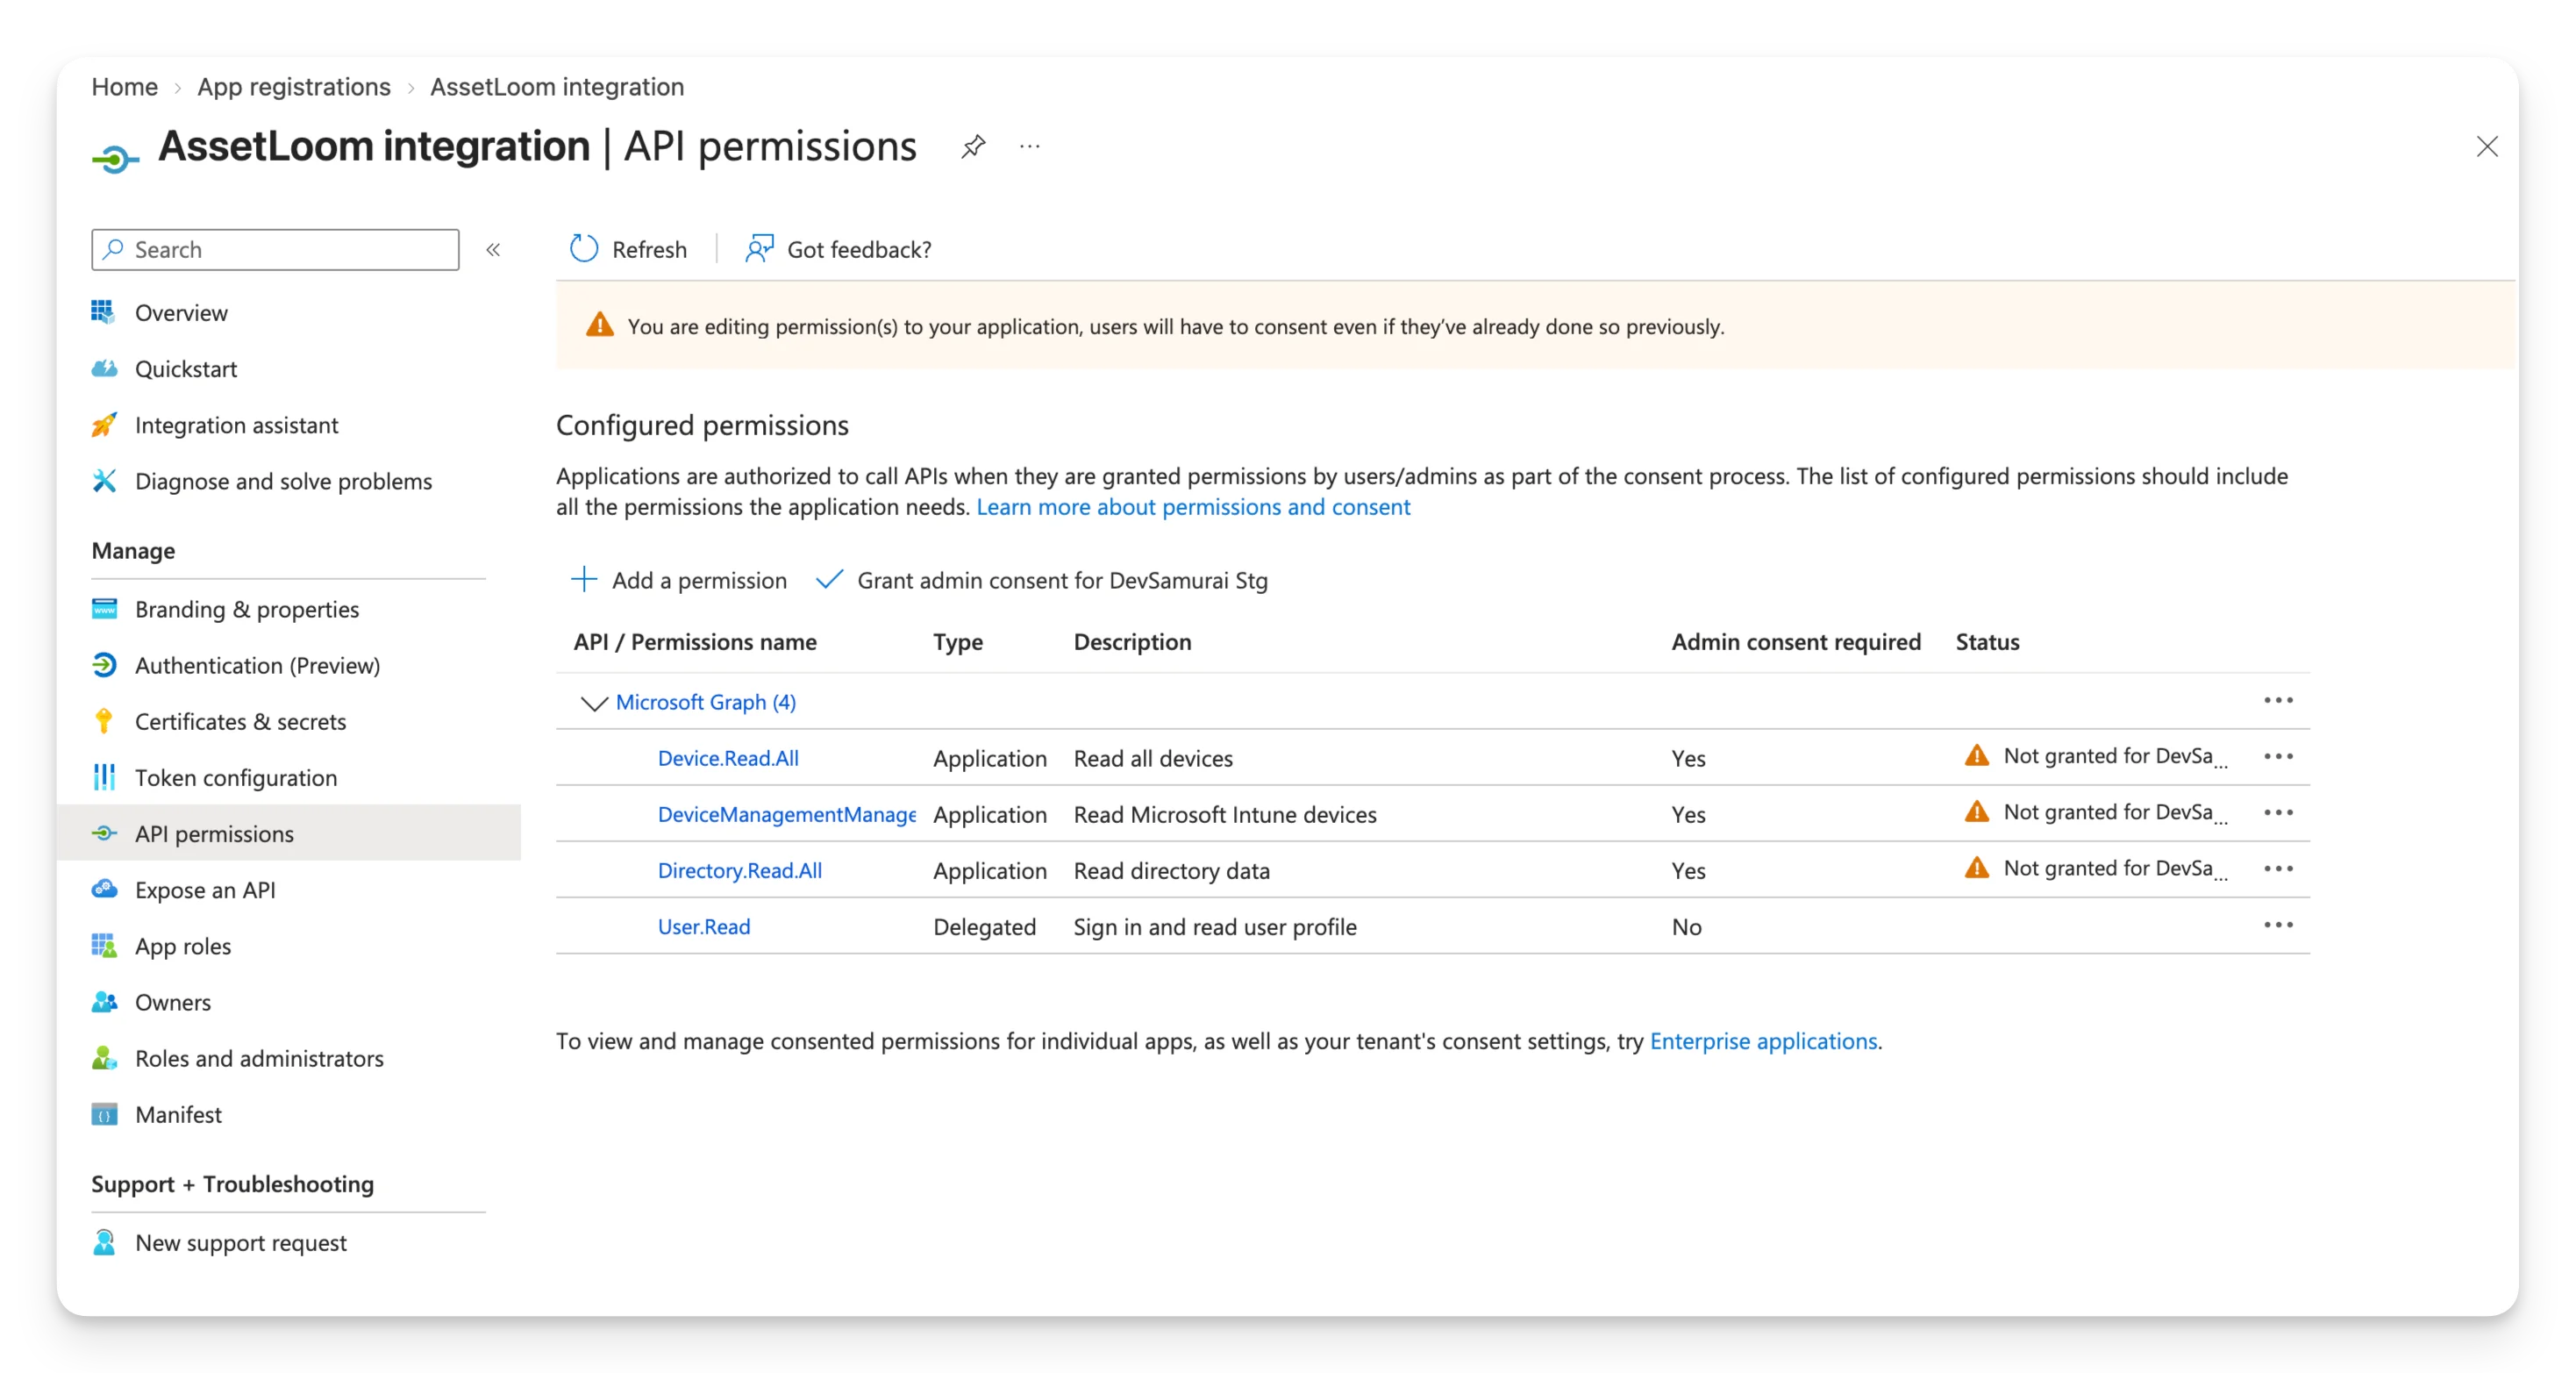
Microsoft Entra may add the User.Read delegated permission by default when the application is registered. This permission is not required for the AssetLoom integration. If it appears in the list, open the More actions menu next to User.Read and select Remove permission.
3. Grant admin consent
After having the required permissions, as an admin, you still need to approve them because application permissions allow the registered application to access data without a signed-in user.
To grant admin consent, follow these steps:
- On the API permissions page, review the configured permissions and make sure the following are listed:
- DeviceManagementManagedDevices.Read.All
- Device.Read.All
- Directory.Read.All
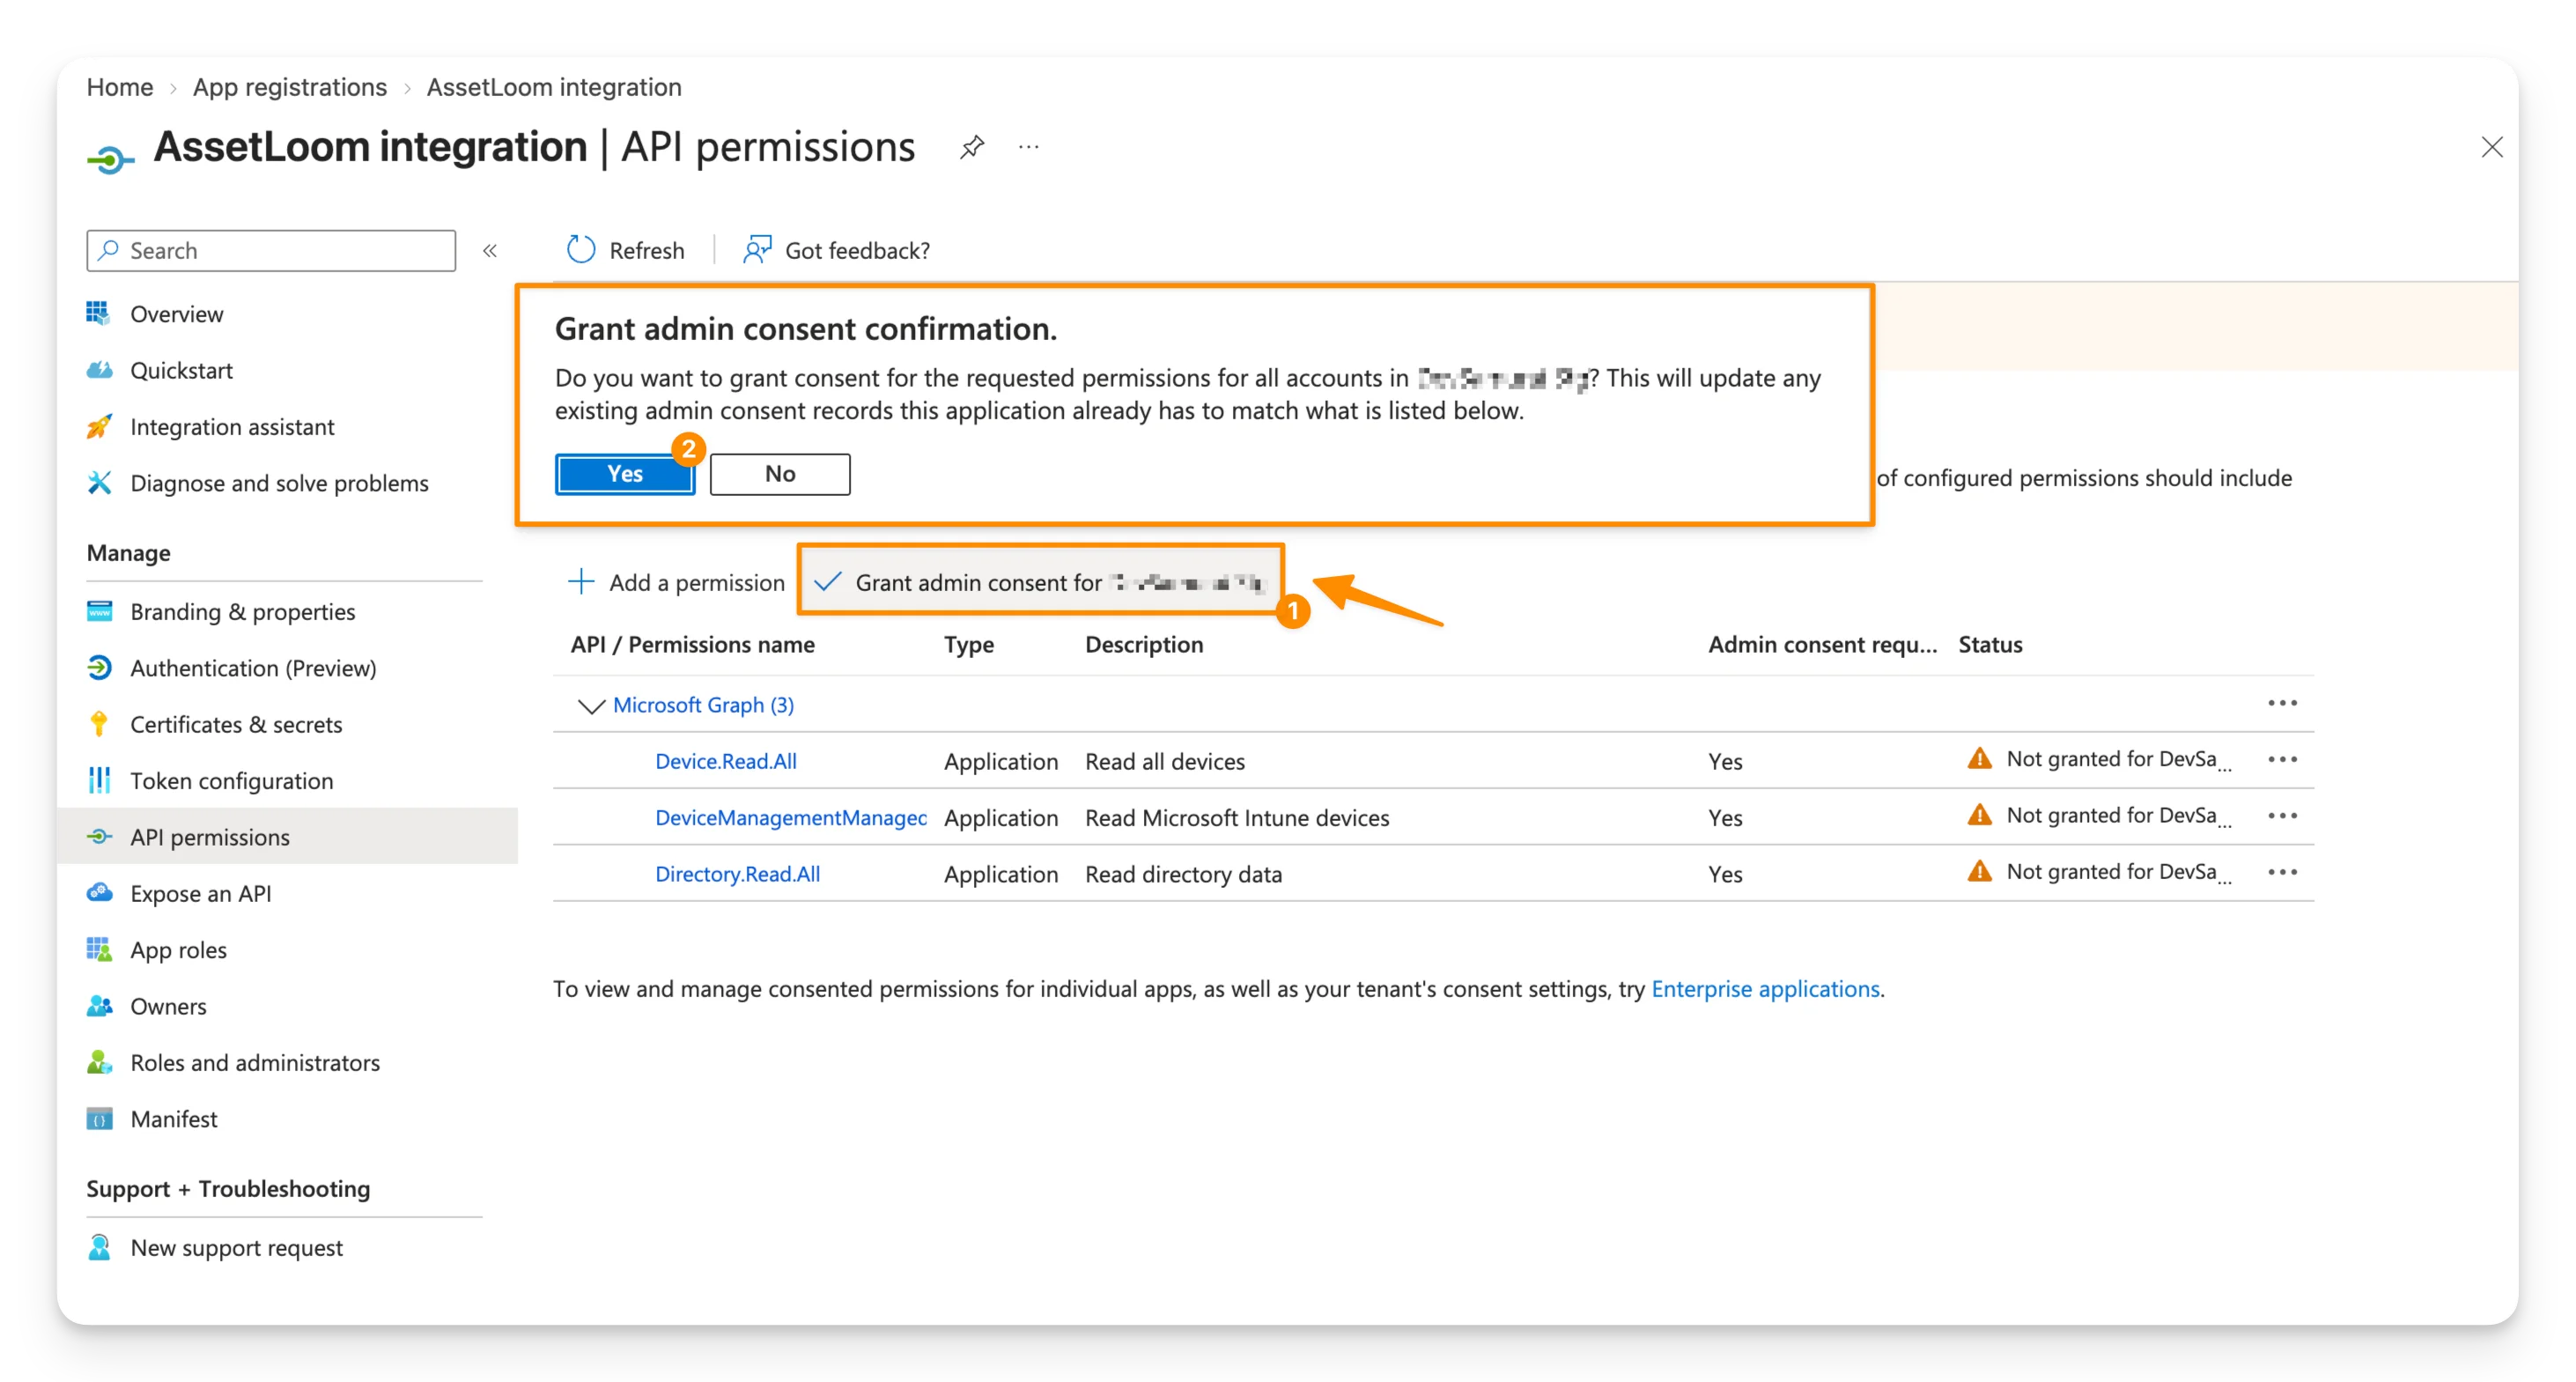
- Select Grant admin consent for [your organization] and Select Yes in the pop-up dialog to confirm your consent.
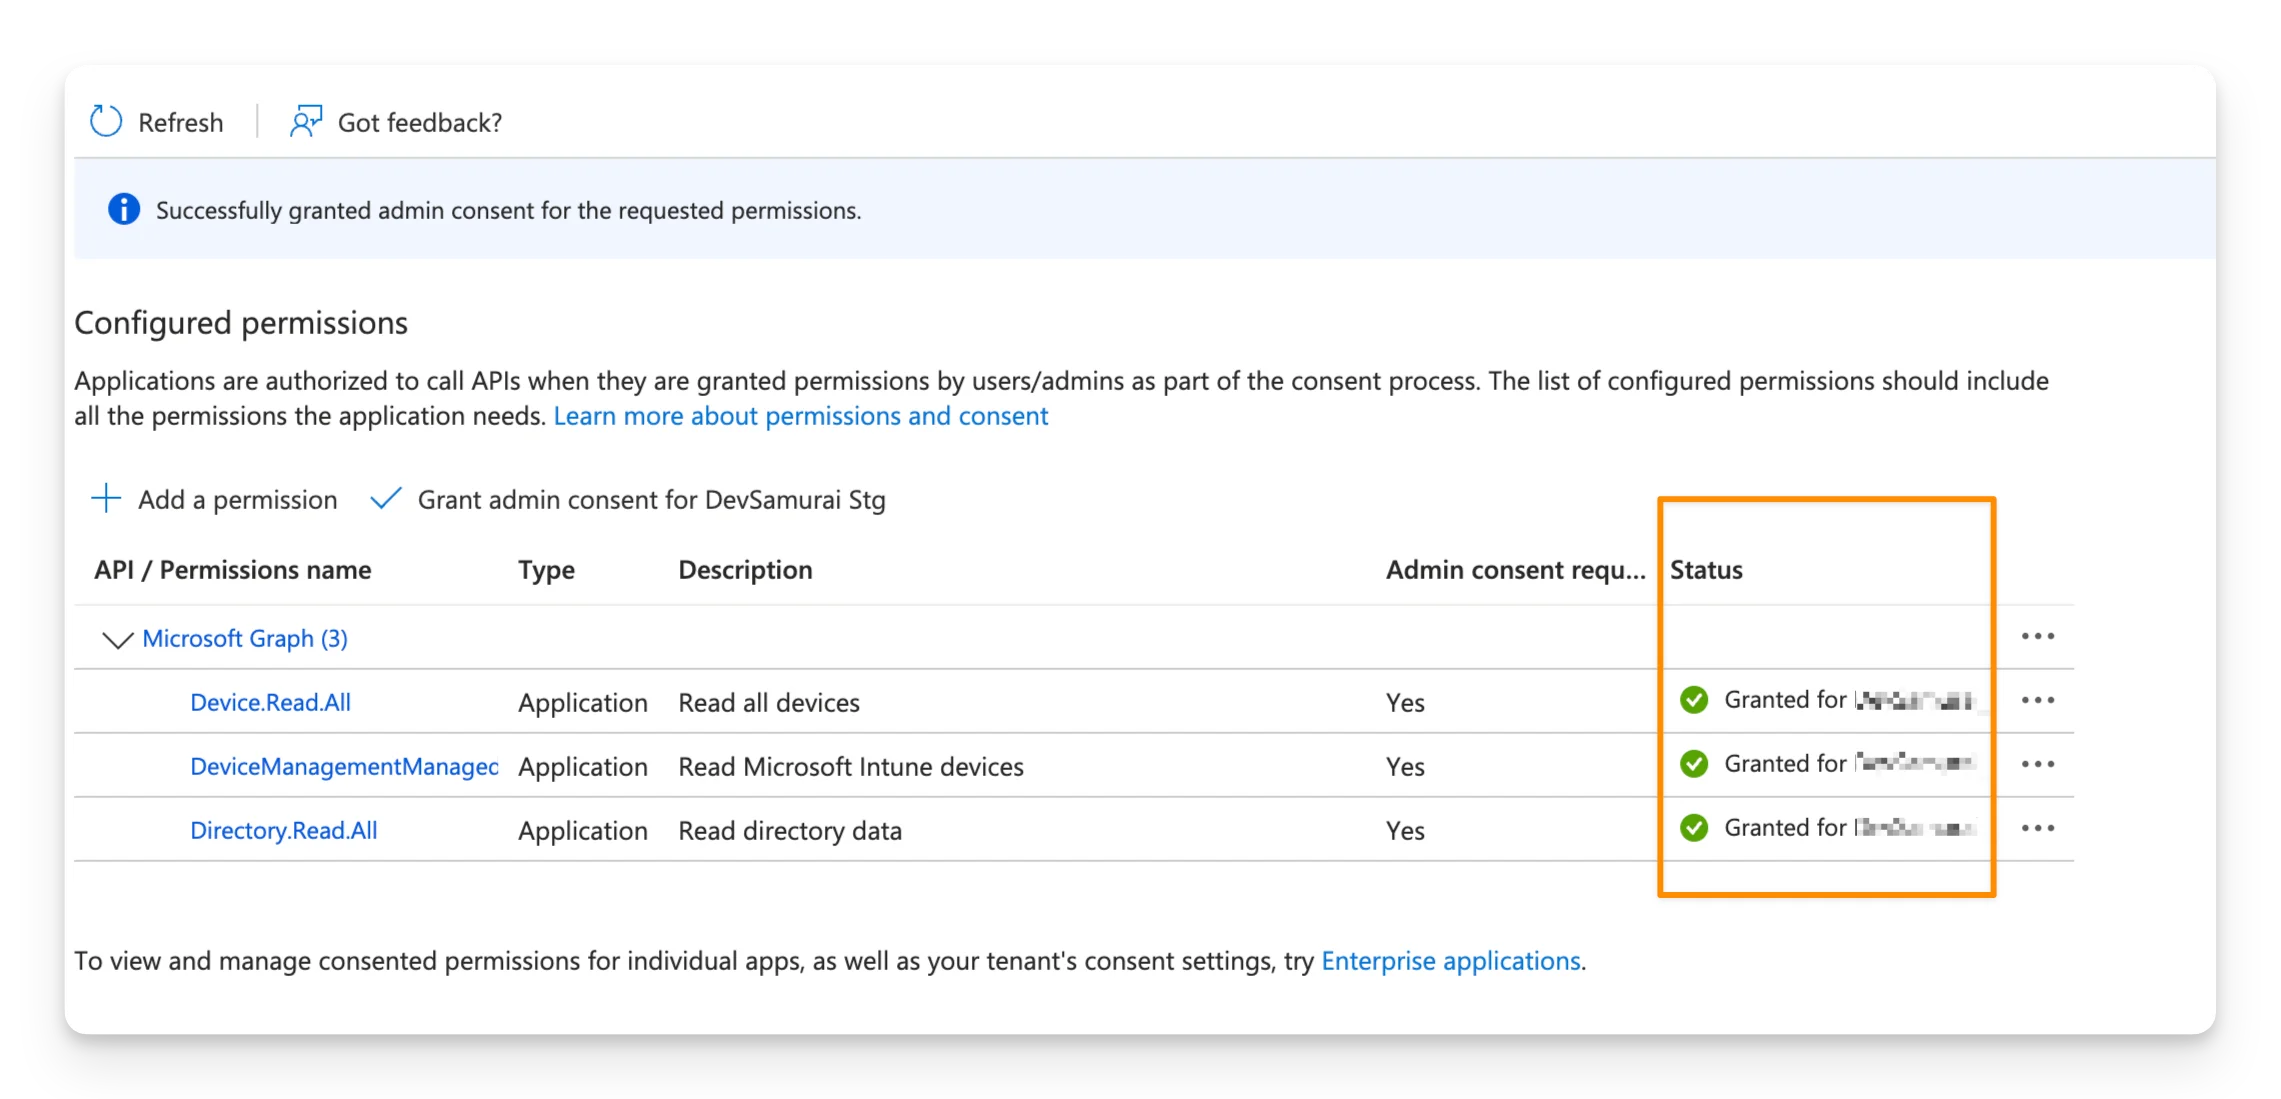
- The required permissions should now be approved. You can verify it by checking the Status column. Select Refresh if the status has not updated yet.
4. Collect the Client ID and Client Secret
Now that the application has the required permissions, collect the credentials AssetLoom will later use to authenticate as the registered application.
4.1. Copy the Client ID
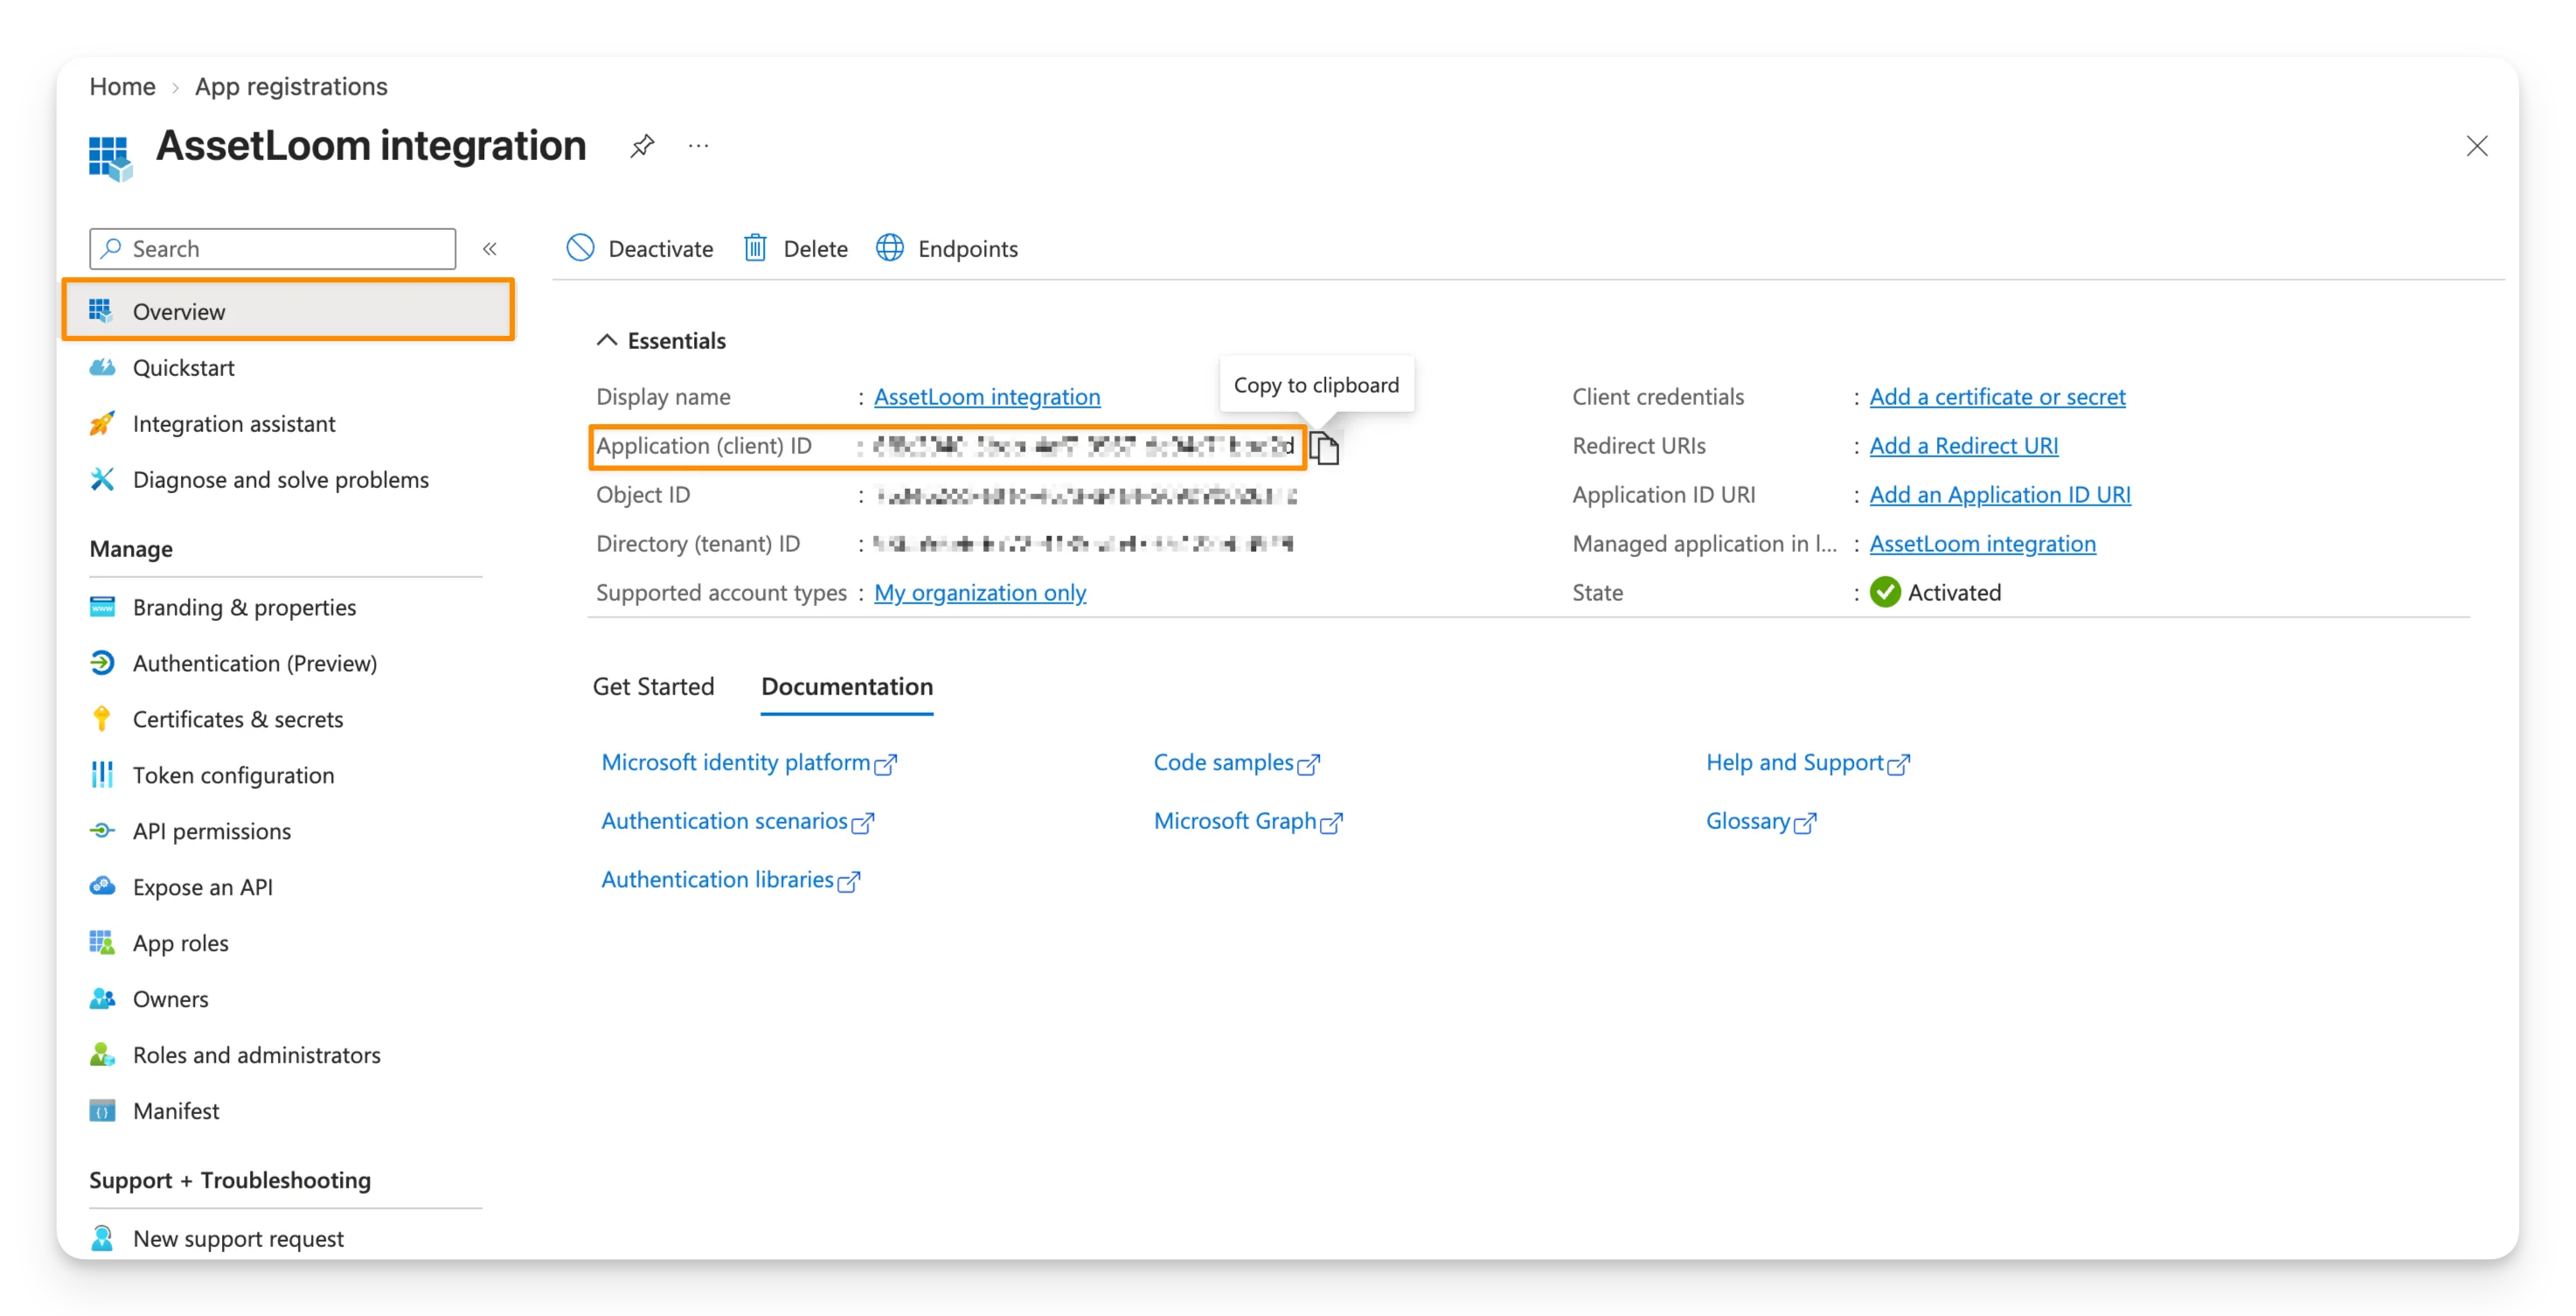
- From the registered application, open the Overview screen from the left-hand menu.
- Under Essentials, locate and click to copy the Application (client) ID.
4.2. Create and copy the Client Secret
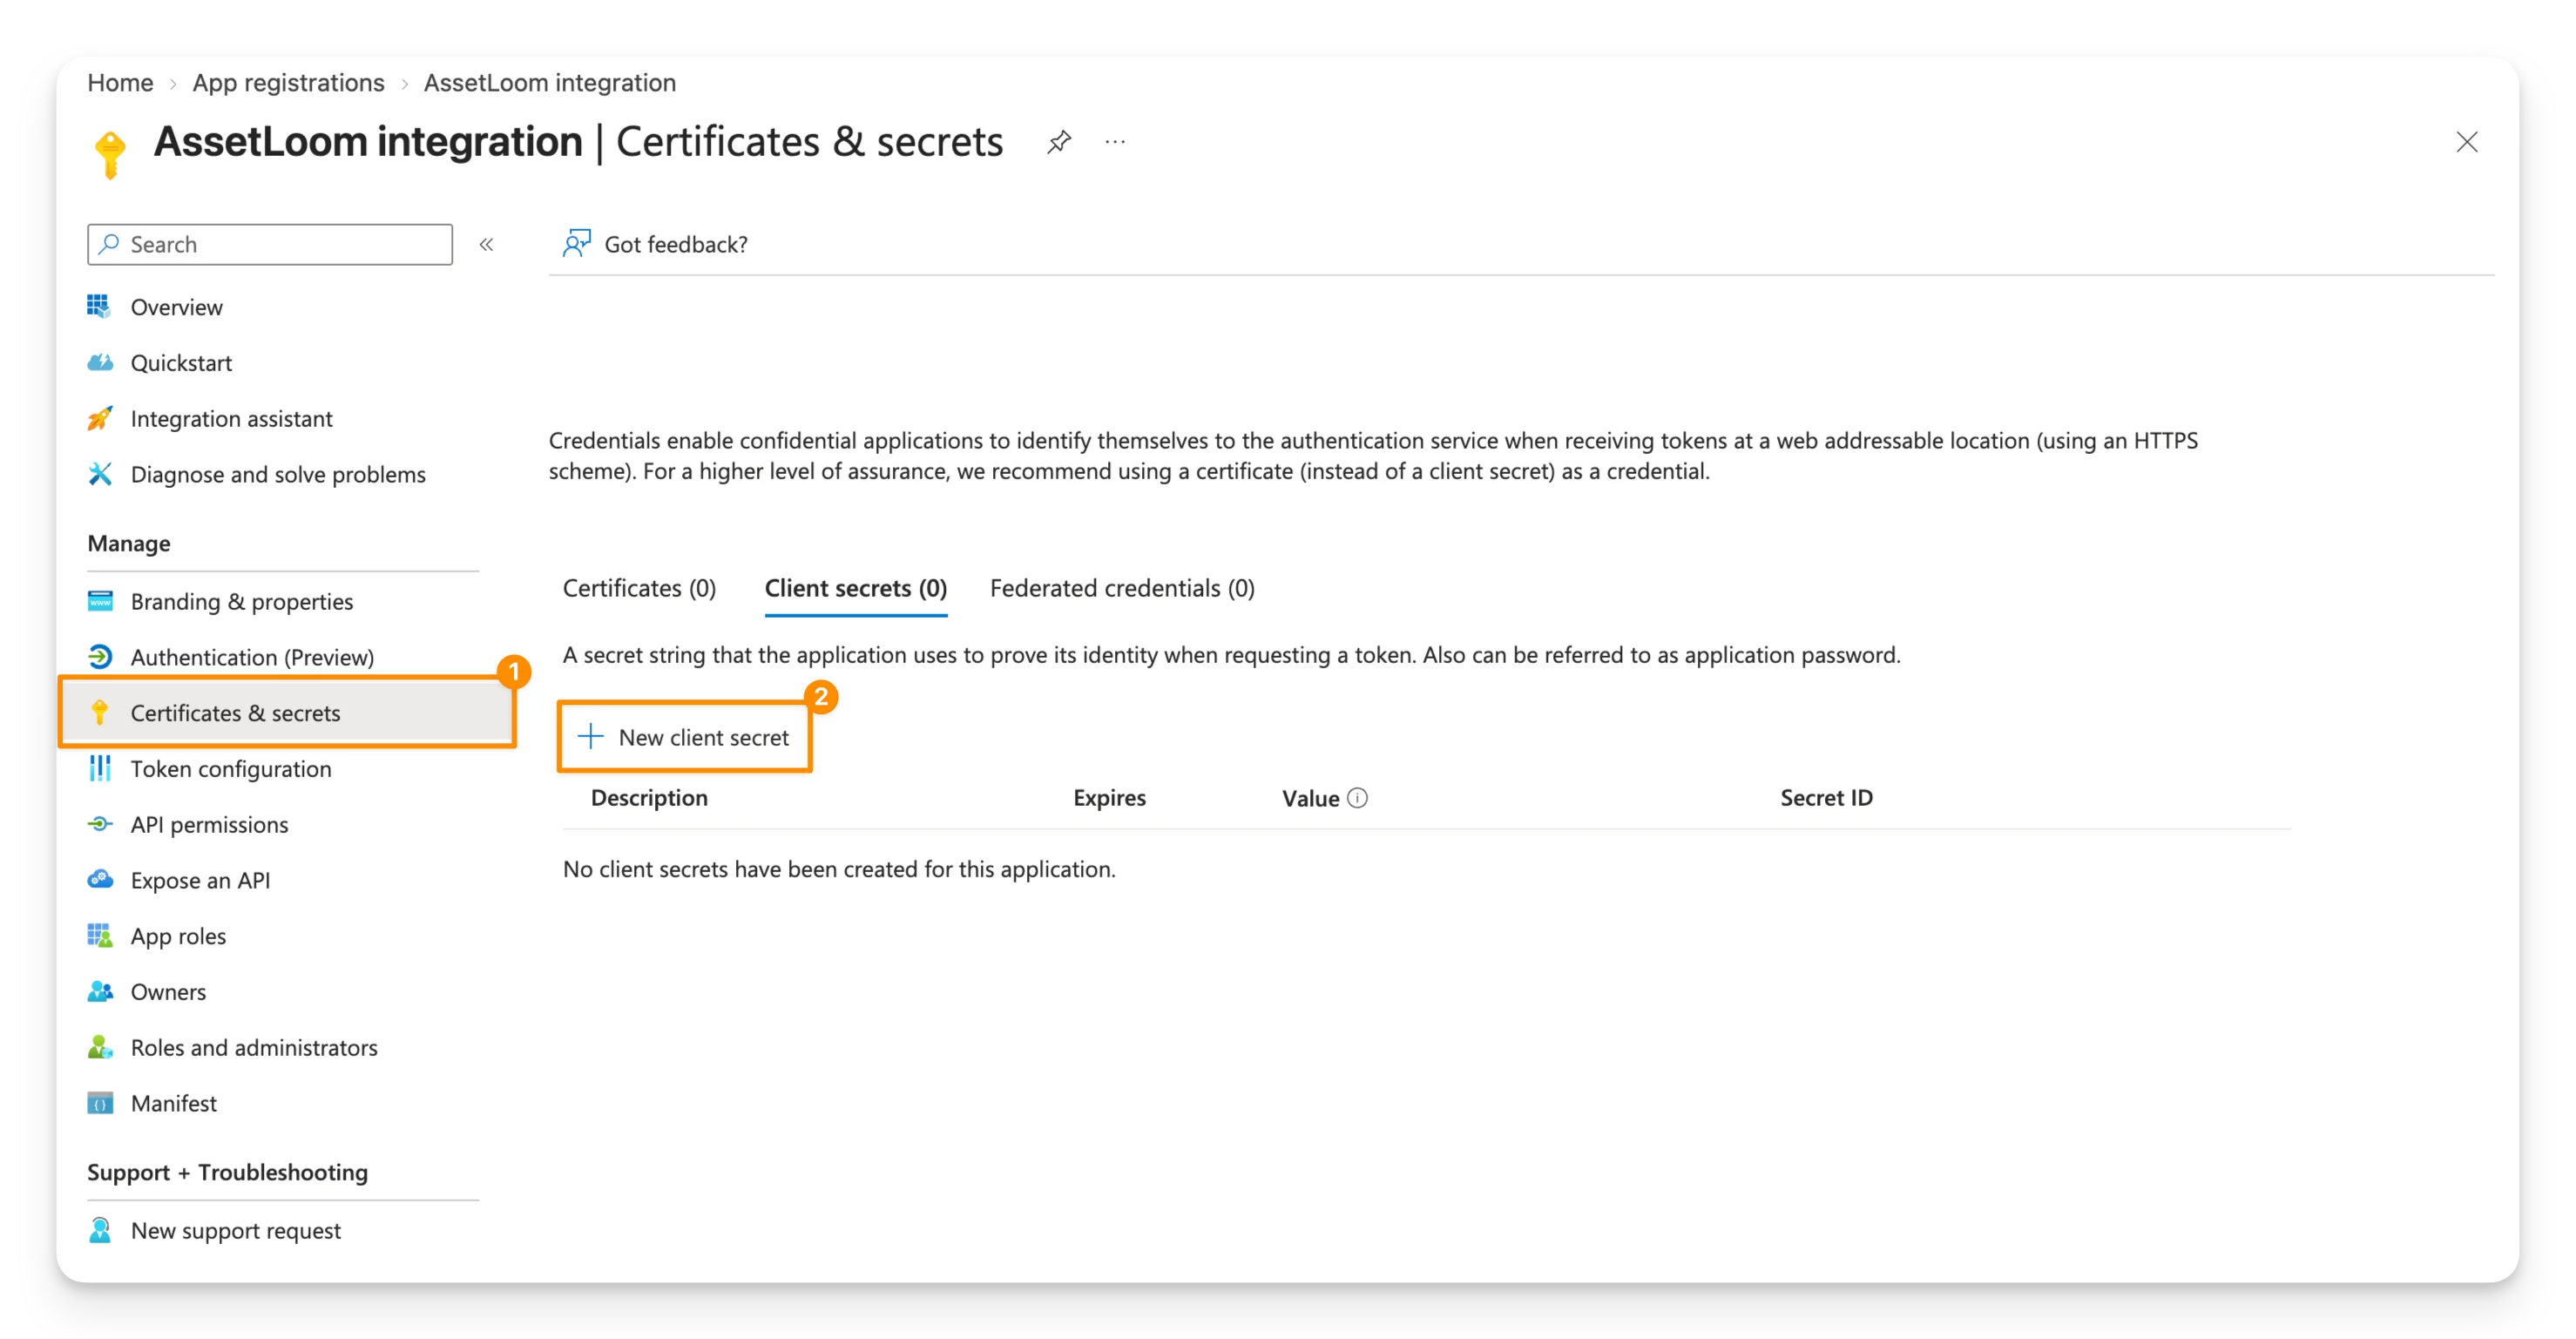
- From the left-hand menu, navigate to Certificates & secrets.
- Under Client secrets, select New client secret.
- Enter the necessary information for the new client secret:
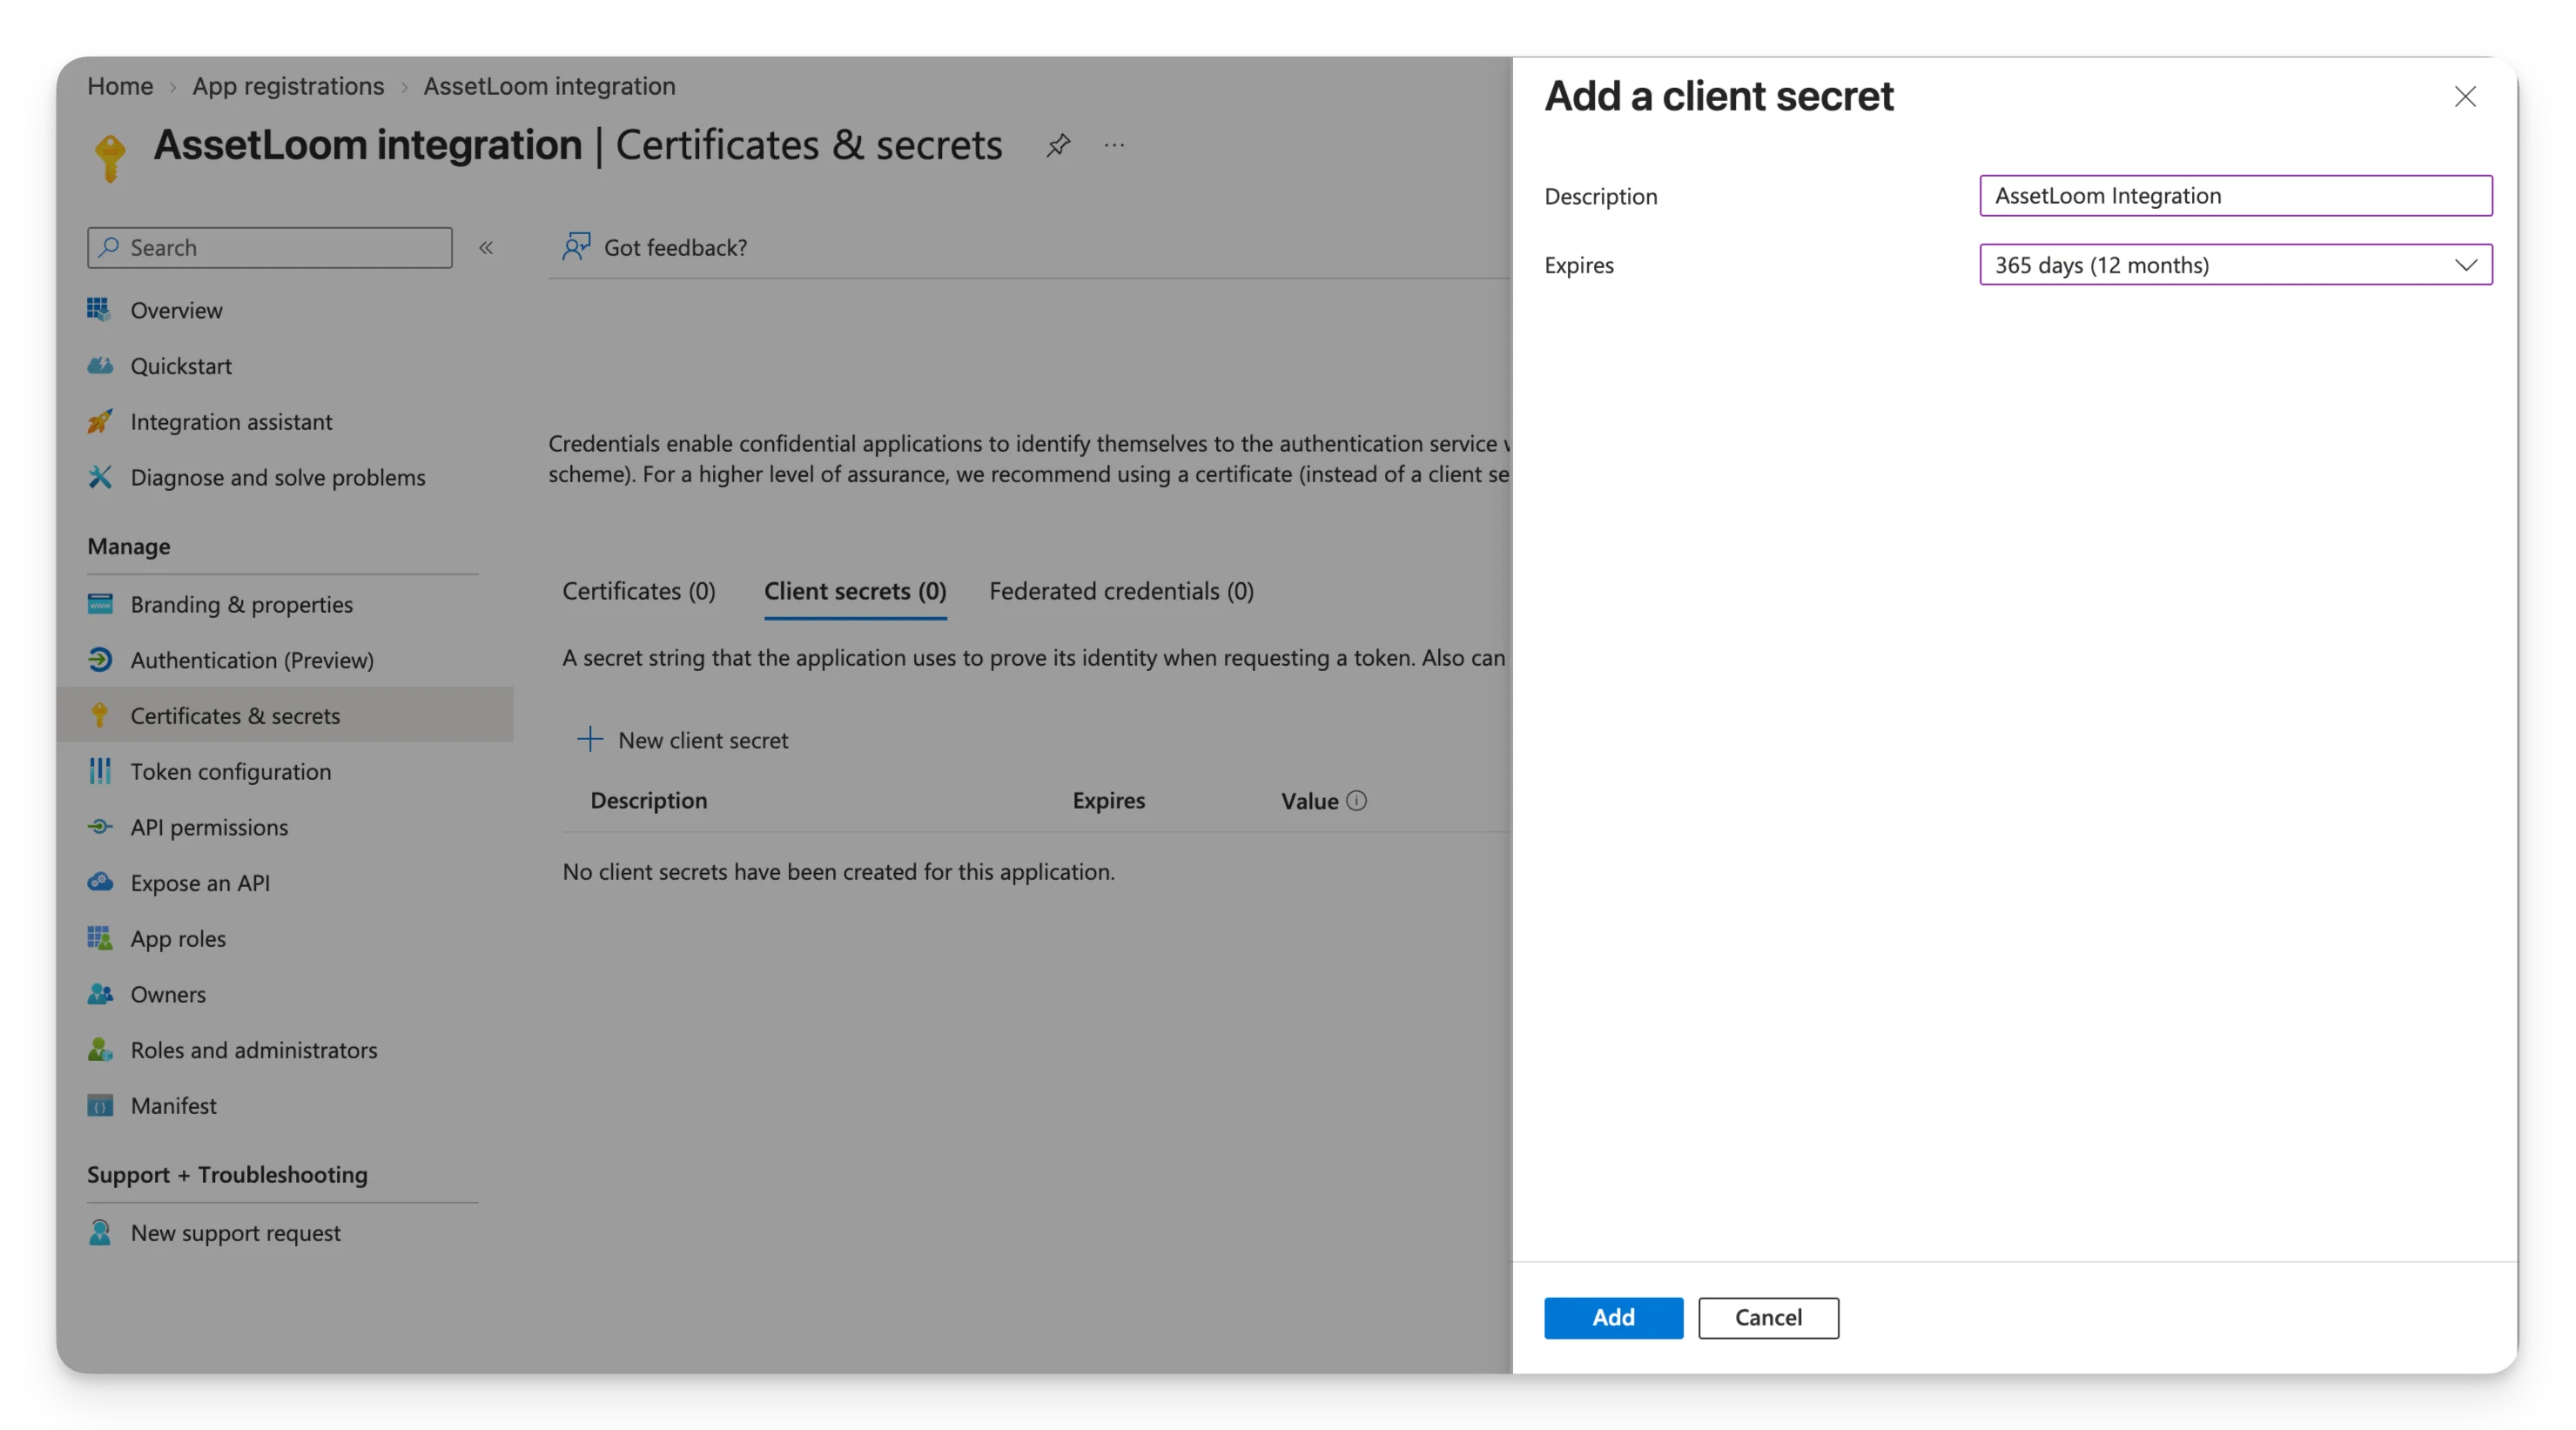
- Set a recognizable description, e.g., AssetLoom Integration.
- Choose an expiration period that follows your organization’s credential policy.
- Click Add to finish.
Once the secret is created, copy the value shown under Value and save it securely. This is the Client Secret you need as part of the credentials.
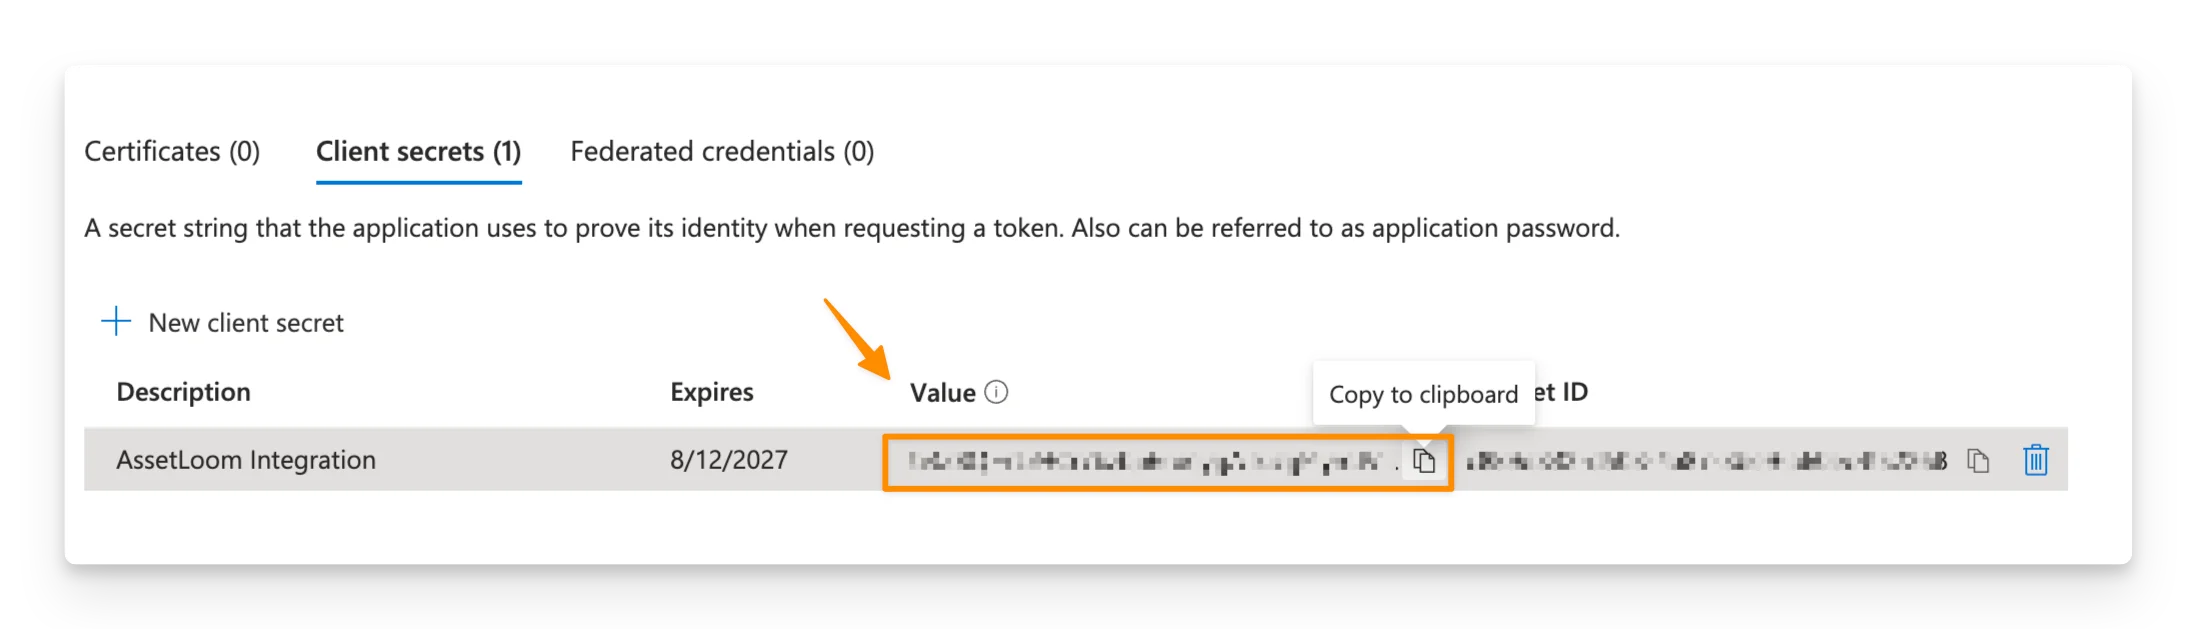
At this point, you should have both the Application (client) ID and Client Secret ready for the integration.
5. Collect the OAuth 2.0 token endpoint
The Client ID and Client Secret identify and authenticate the registered application. The OAuth 2.0 token endpoint tells AssetLoom where to send the authentication request for your Microsoft tenant.
Here is how to get it:
- From the registered application, open the Overview screen from the left-hand menu.
- Select Endpoints at the top of the page.
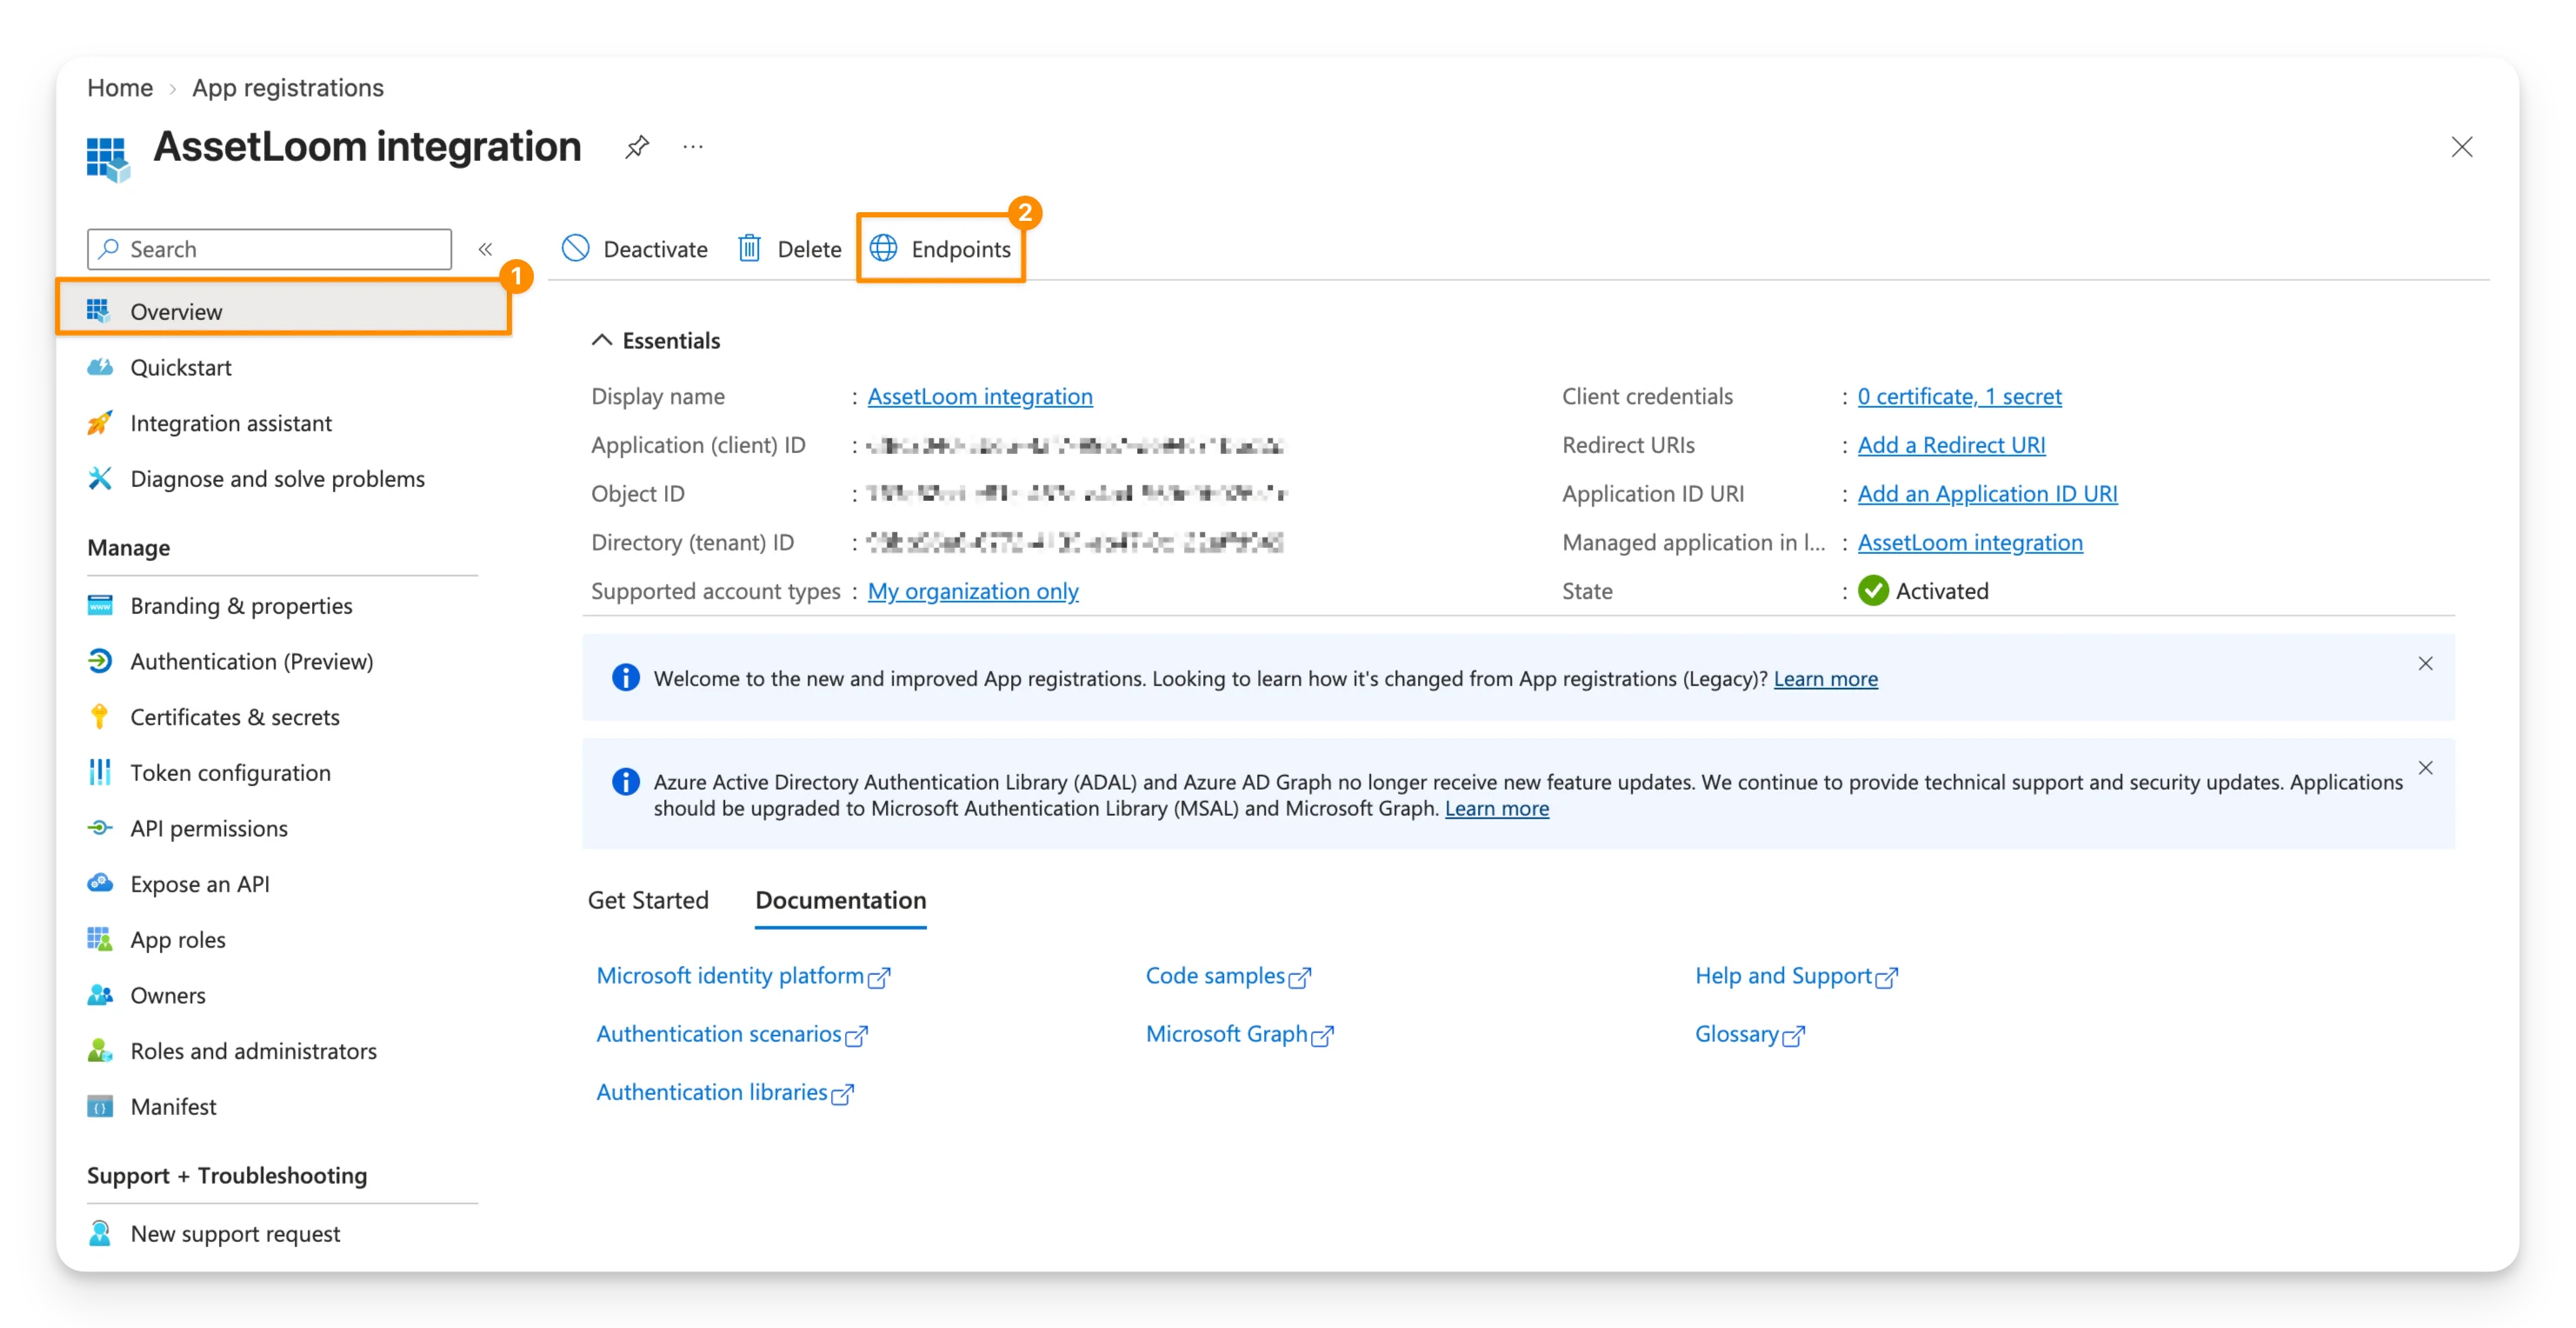
- You should now see a list of endpoints on the Endpoints panel. Locate the OAuth 2.0 token endpoint (v2) and copy the endpoint.
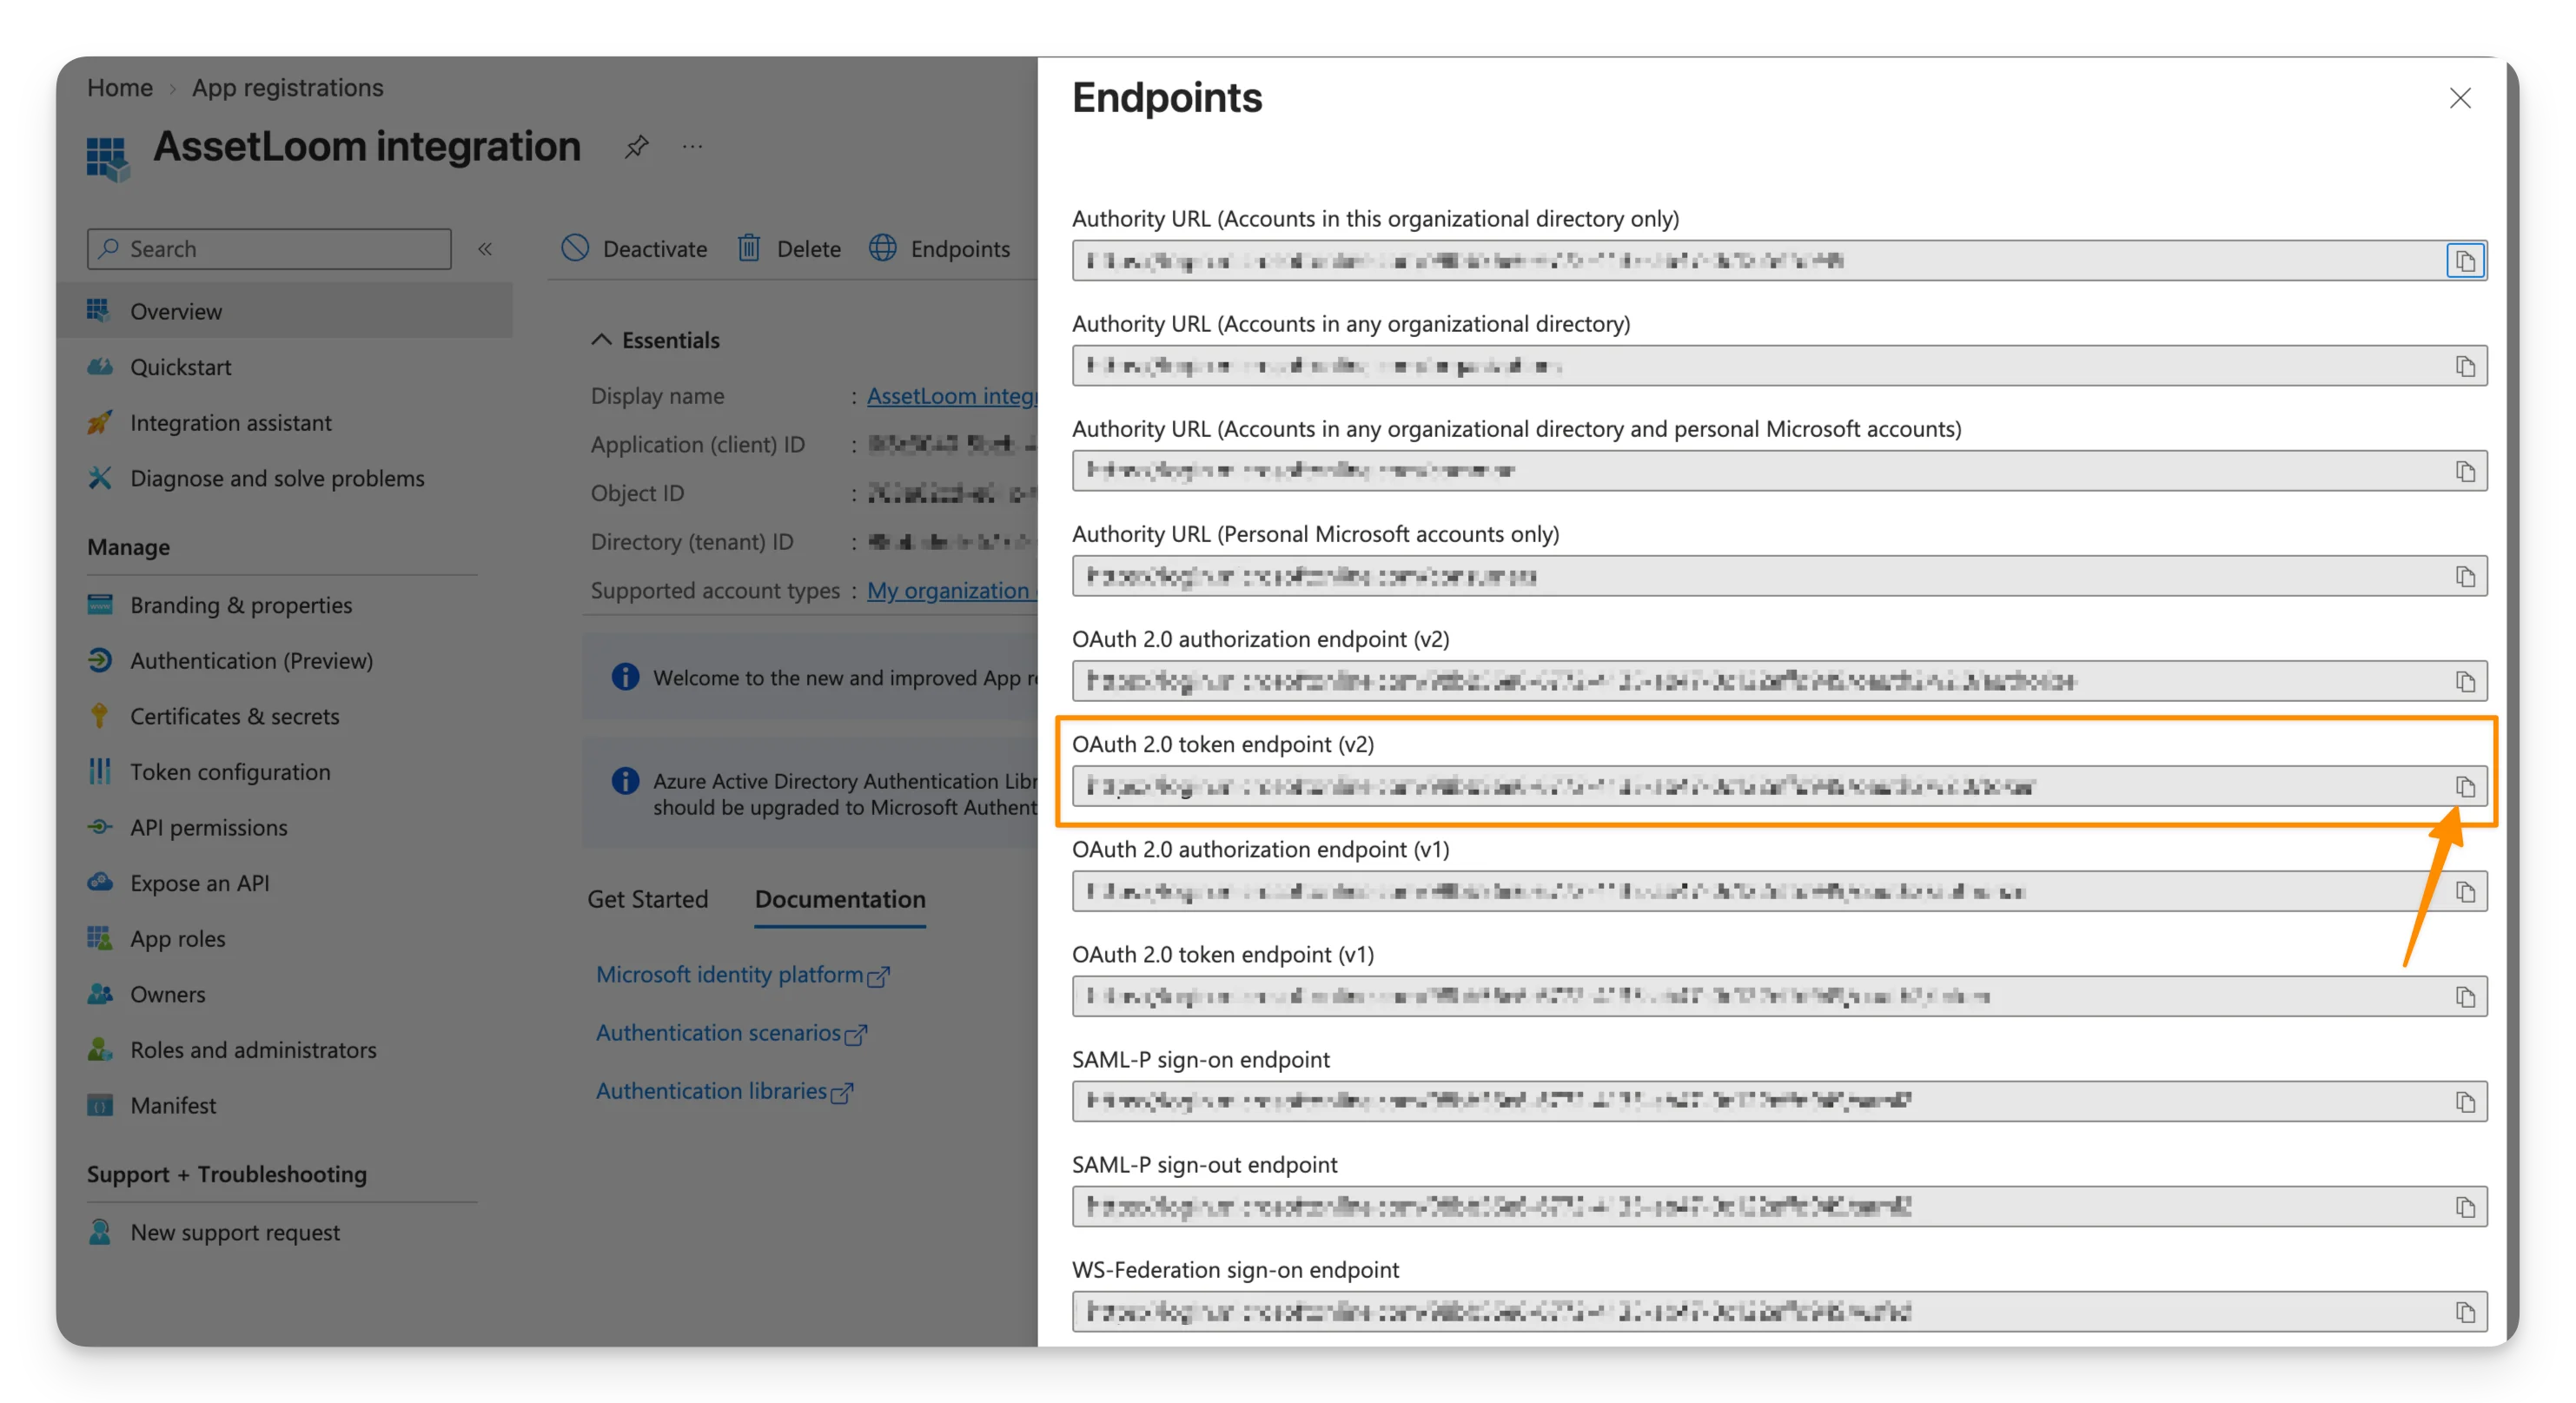
You will enter this endpoint together with the Client ID and Client Secret in AssetLoom to complete the connection.
6. Connect Microsoft Intune to AssetLoom
With your Client ID, Client Secret, and OAuth 2.0 token endpoint (v2) ready, you can now move to AssetLoom and complete the Microsoft Intune connection.
6.1. Open the setup panel
- In AssetLoom, go to Administration > Integrations.
- Filter by MDM, or use search to locate the Microsoft Intune card.
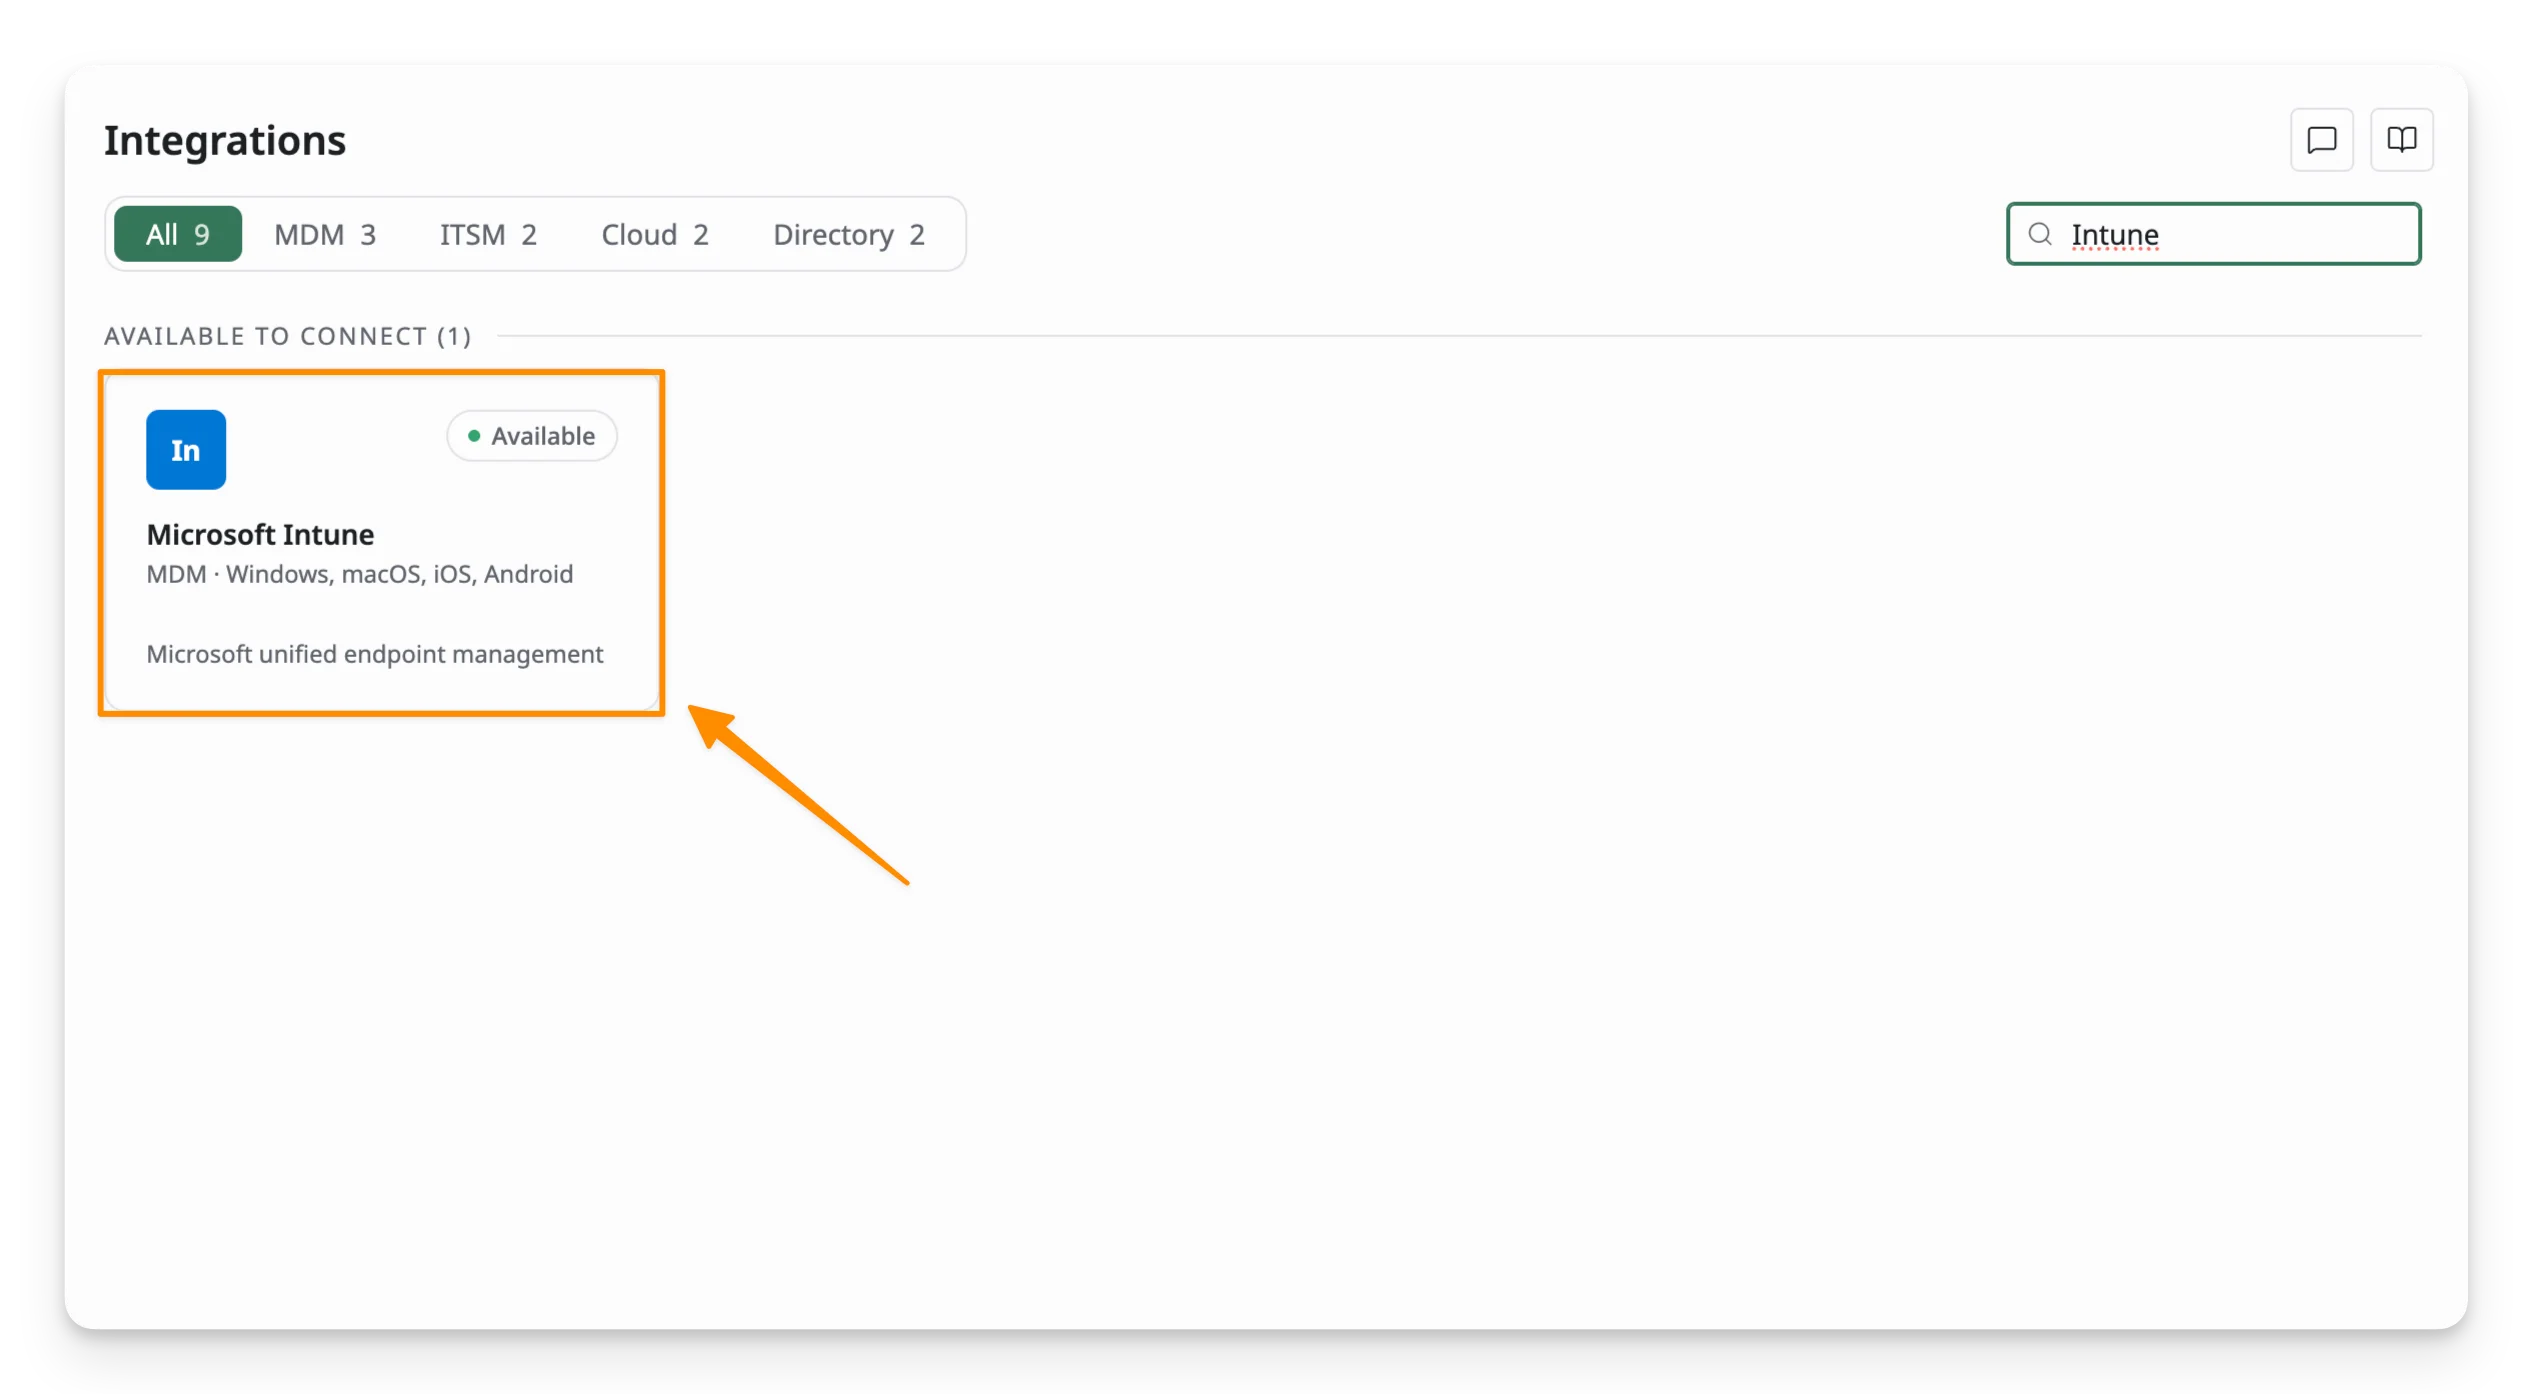
Click on the Microsoft Intune card, and a Set up sync panel will open on the right.
6.2. Enter your credentials
Enter the credentials you collected from the Microsoft Entra application:
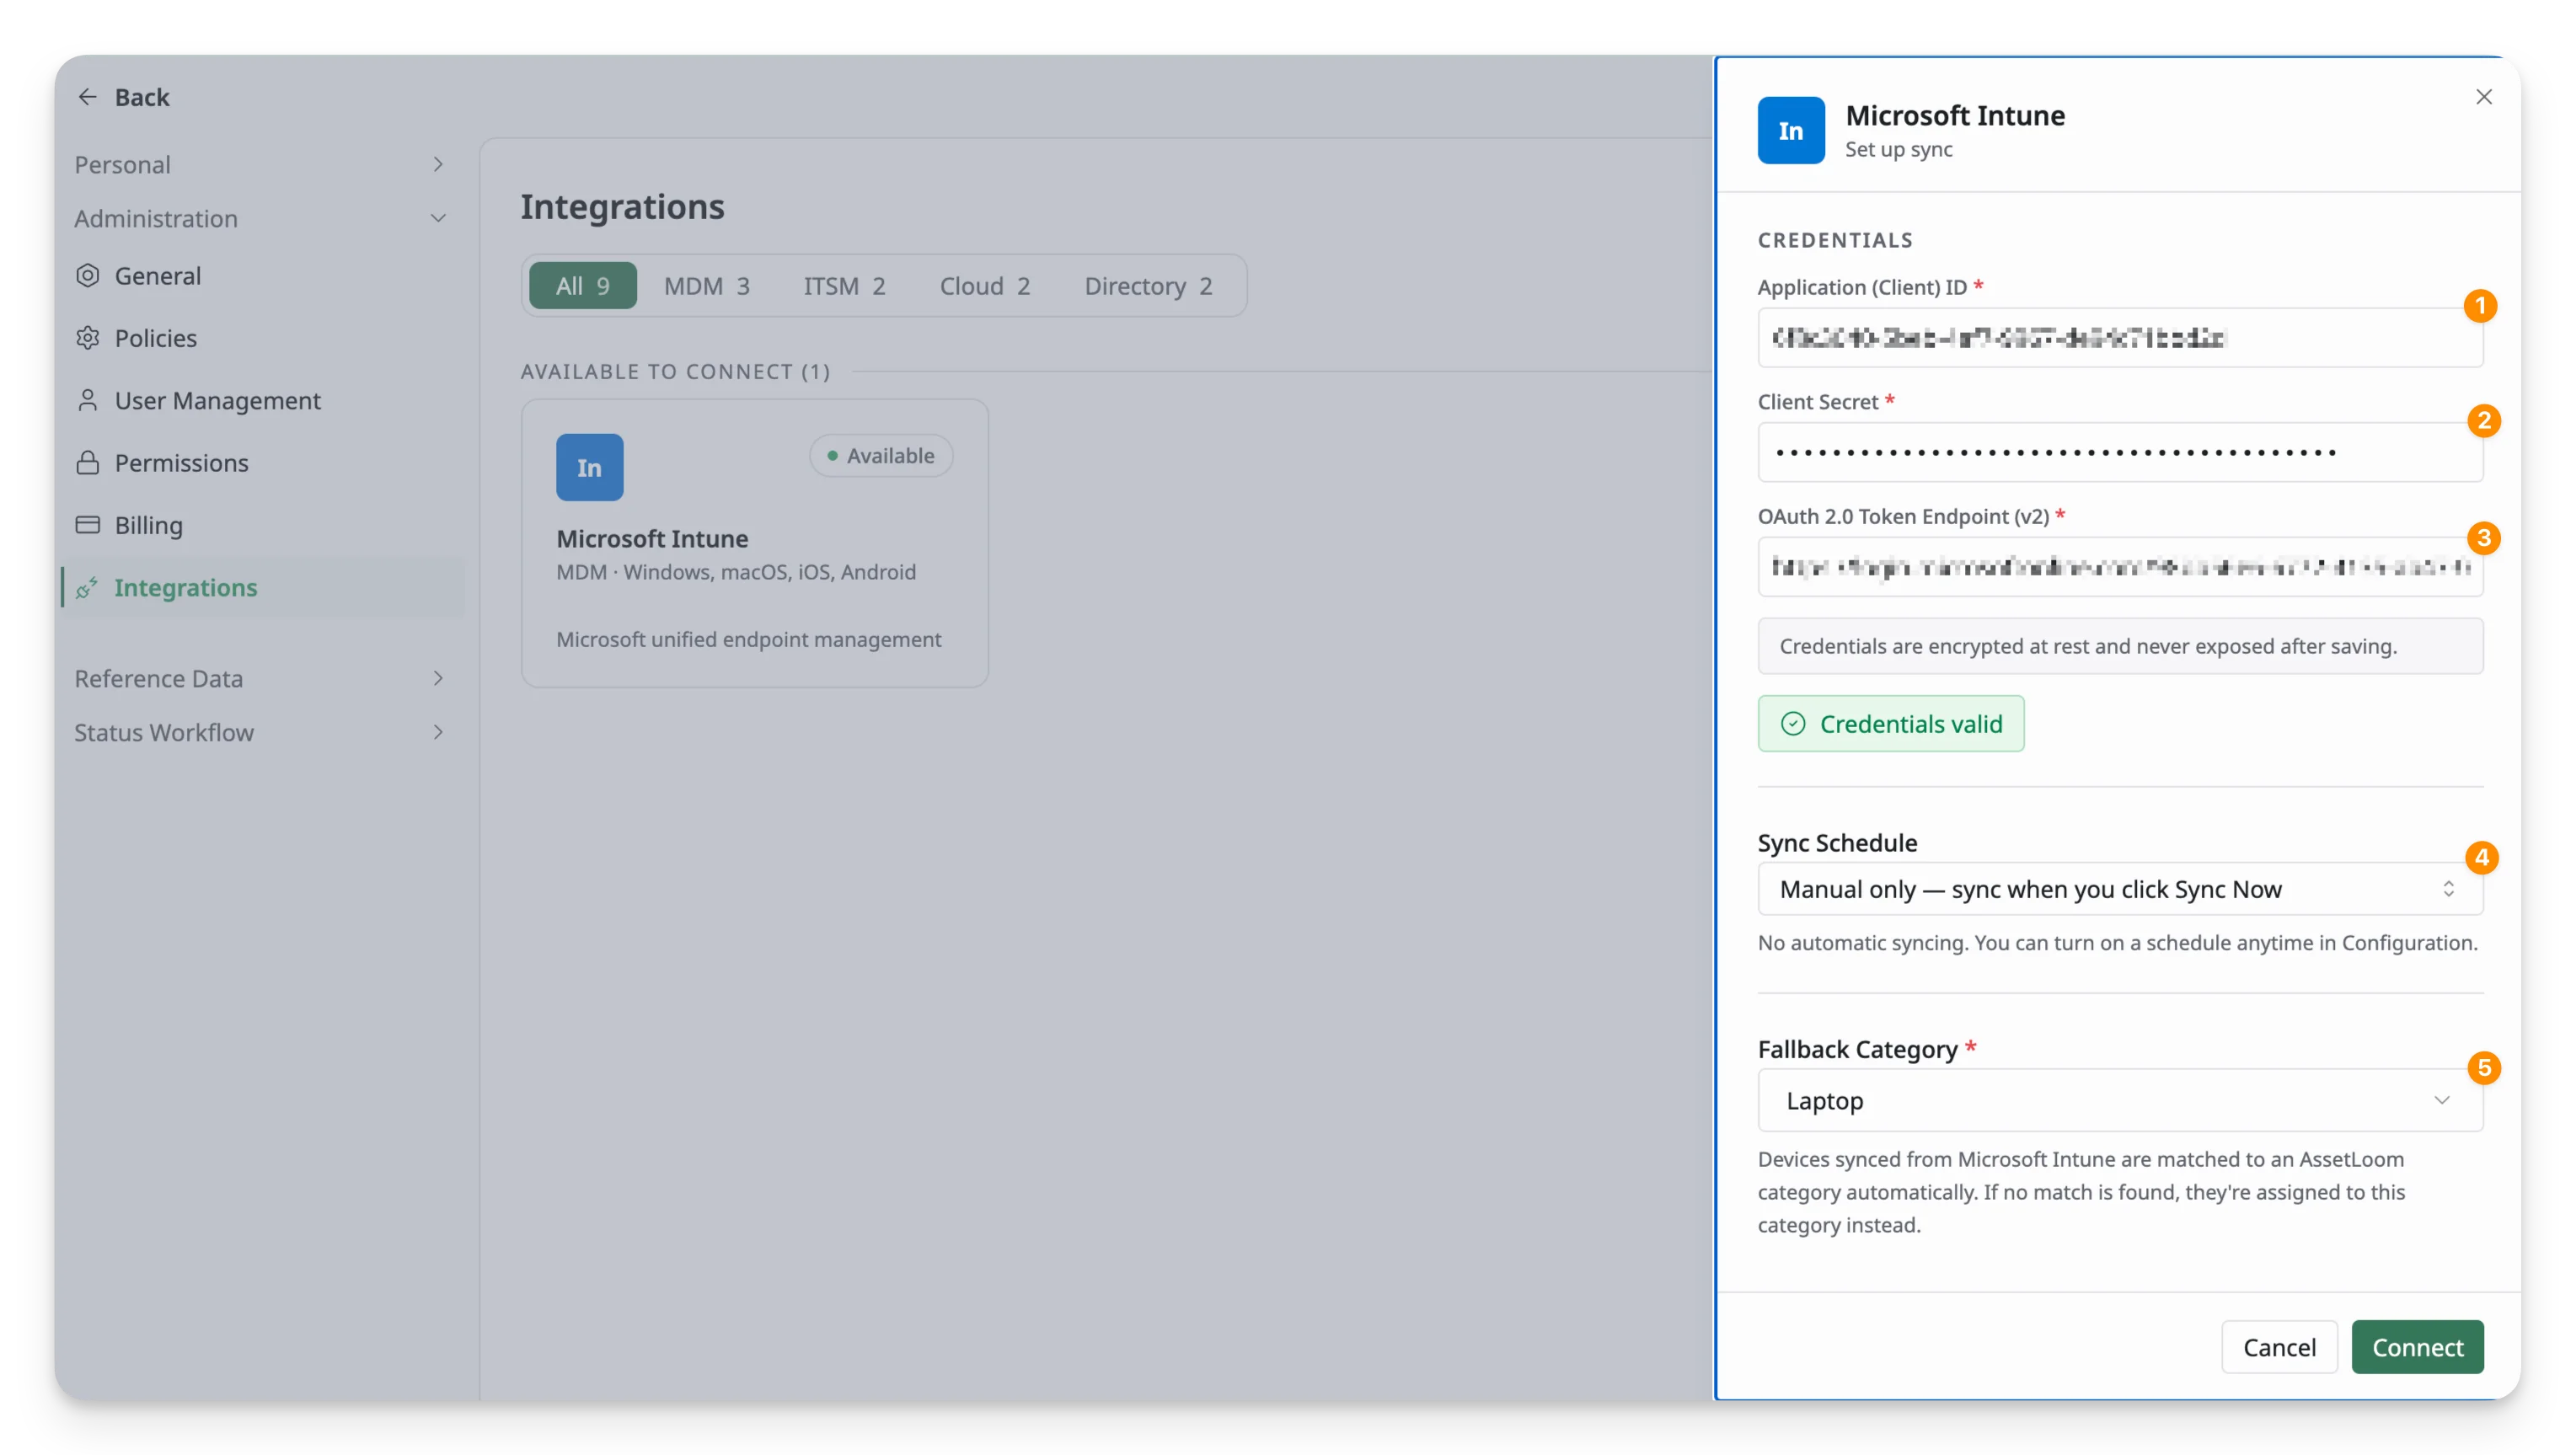
- Client ID: the Application (client) ID copied from the application’s Overview page.
- Client Secret: the secret Value created under Certificates & secrets.
- OAuth 2.0 token endpoint: the OAuth 2.0 token endpoint (v2) copied from the application’s Endpoints.
Select Test Connection to confirm that AssetLoom can authenticate successfully before continuing.
6.3. Set the sync schedule
Use the Sync Schedule dropdown to choose how often AssetLoom should automatically retrieve updated device data from Microsoft Intune.
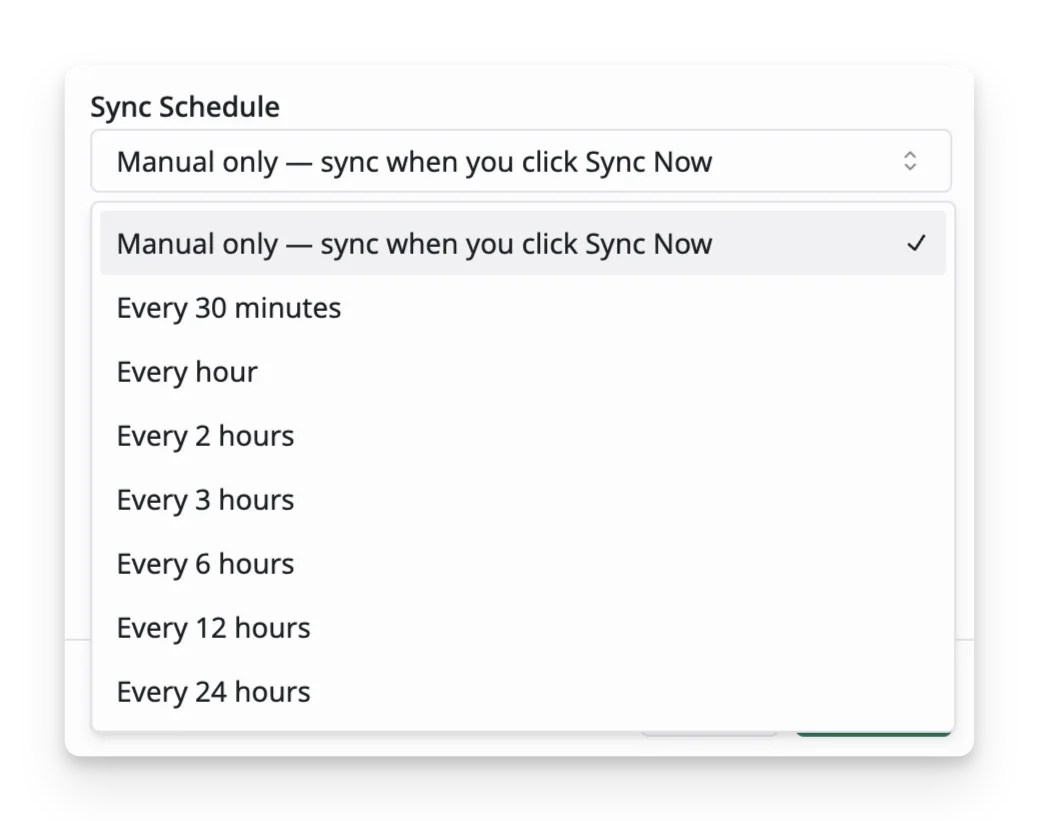
By default, sync is set to Manual only. This means AssetLoom will not automatically pull data until you select a recurring schedule here or configure one later from the Configuration tab.
You can still run a sync manually at any time after the connection is complete.
6.4. Set a fallback category
Select the AssetLoom category that should be assigned to a synced device when AssetLoom cannot match it to an existing category.
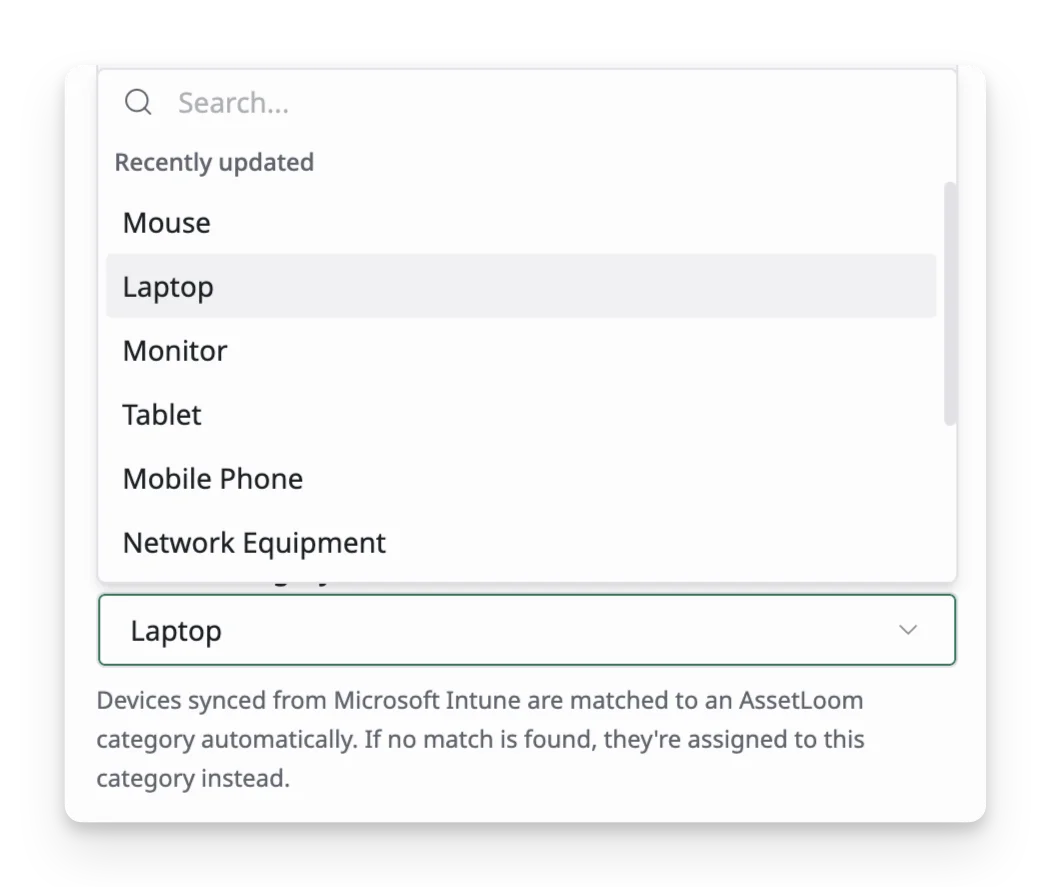
The Fallback Category acts as a safety net during synchronization.
When AssetLoom imports a device from Microsoft Intune, it attempts to match the device to one of your existing AssetLoom categories. If no suitable match can be found, AssetLoom assigns the device to the category you selected as the fallback instead of leaving it uncategorized.
6.5. Complete the connection
Once you have entered the credentials and configured the initial sync settings, select Connect to complete the setup. Select Cancel if you want to close the setup without saving the connection.
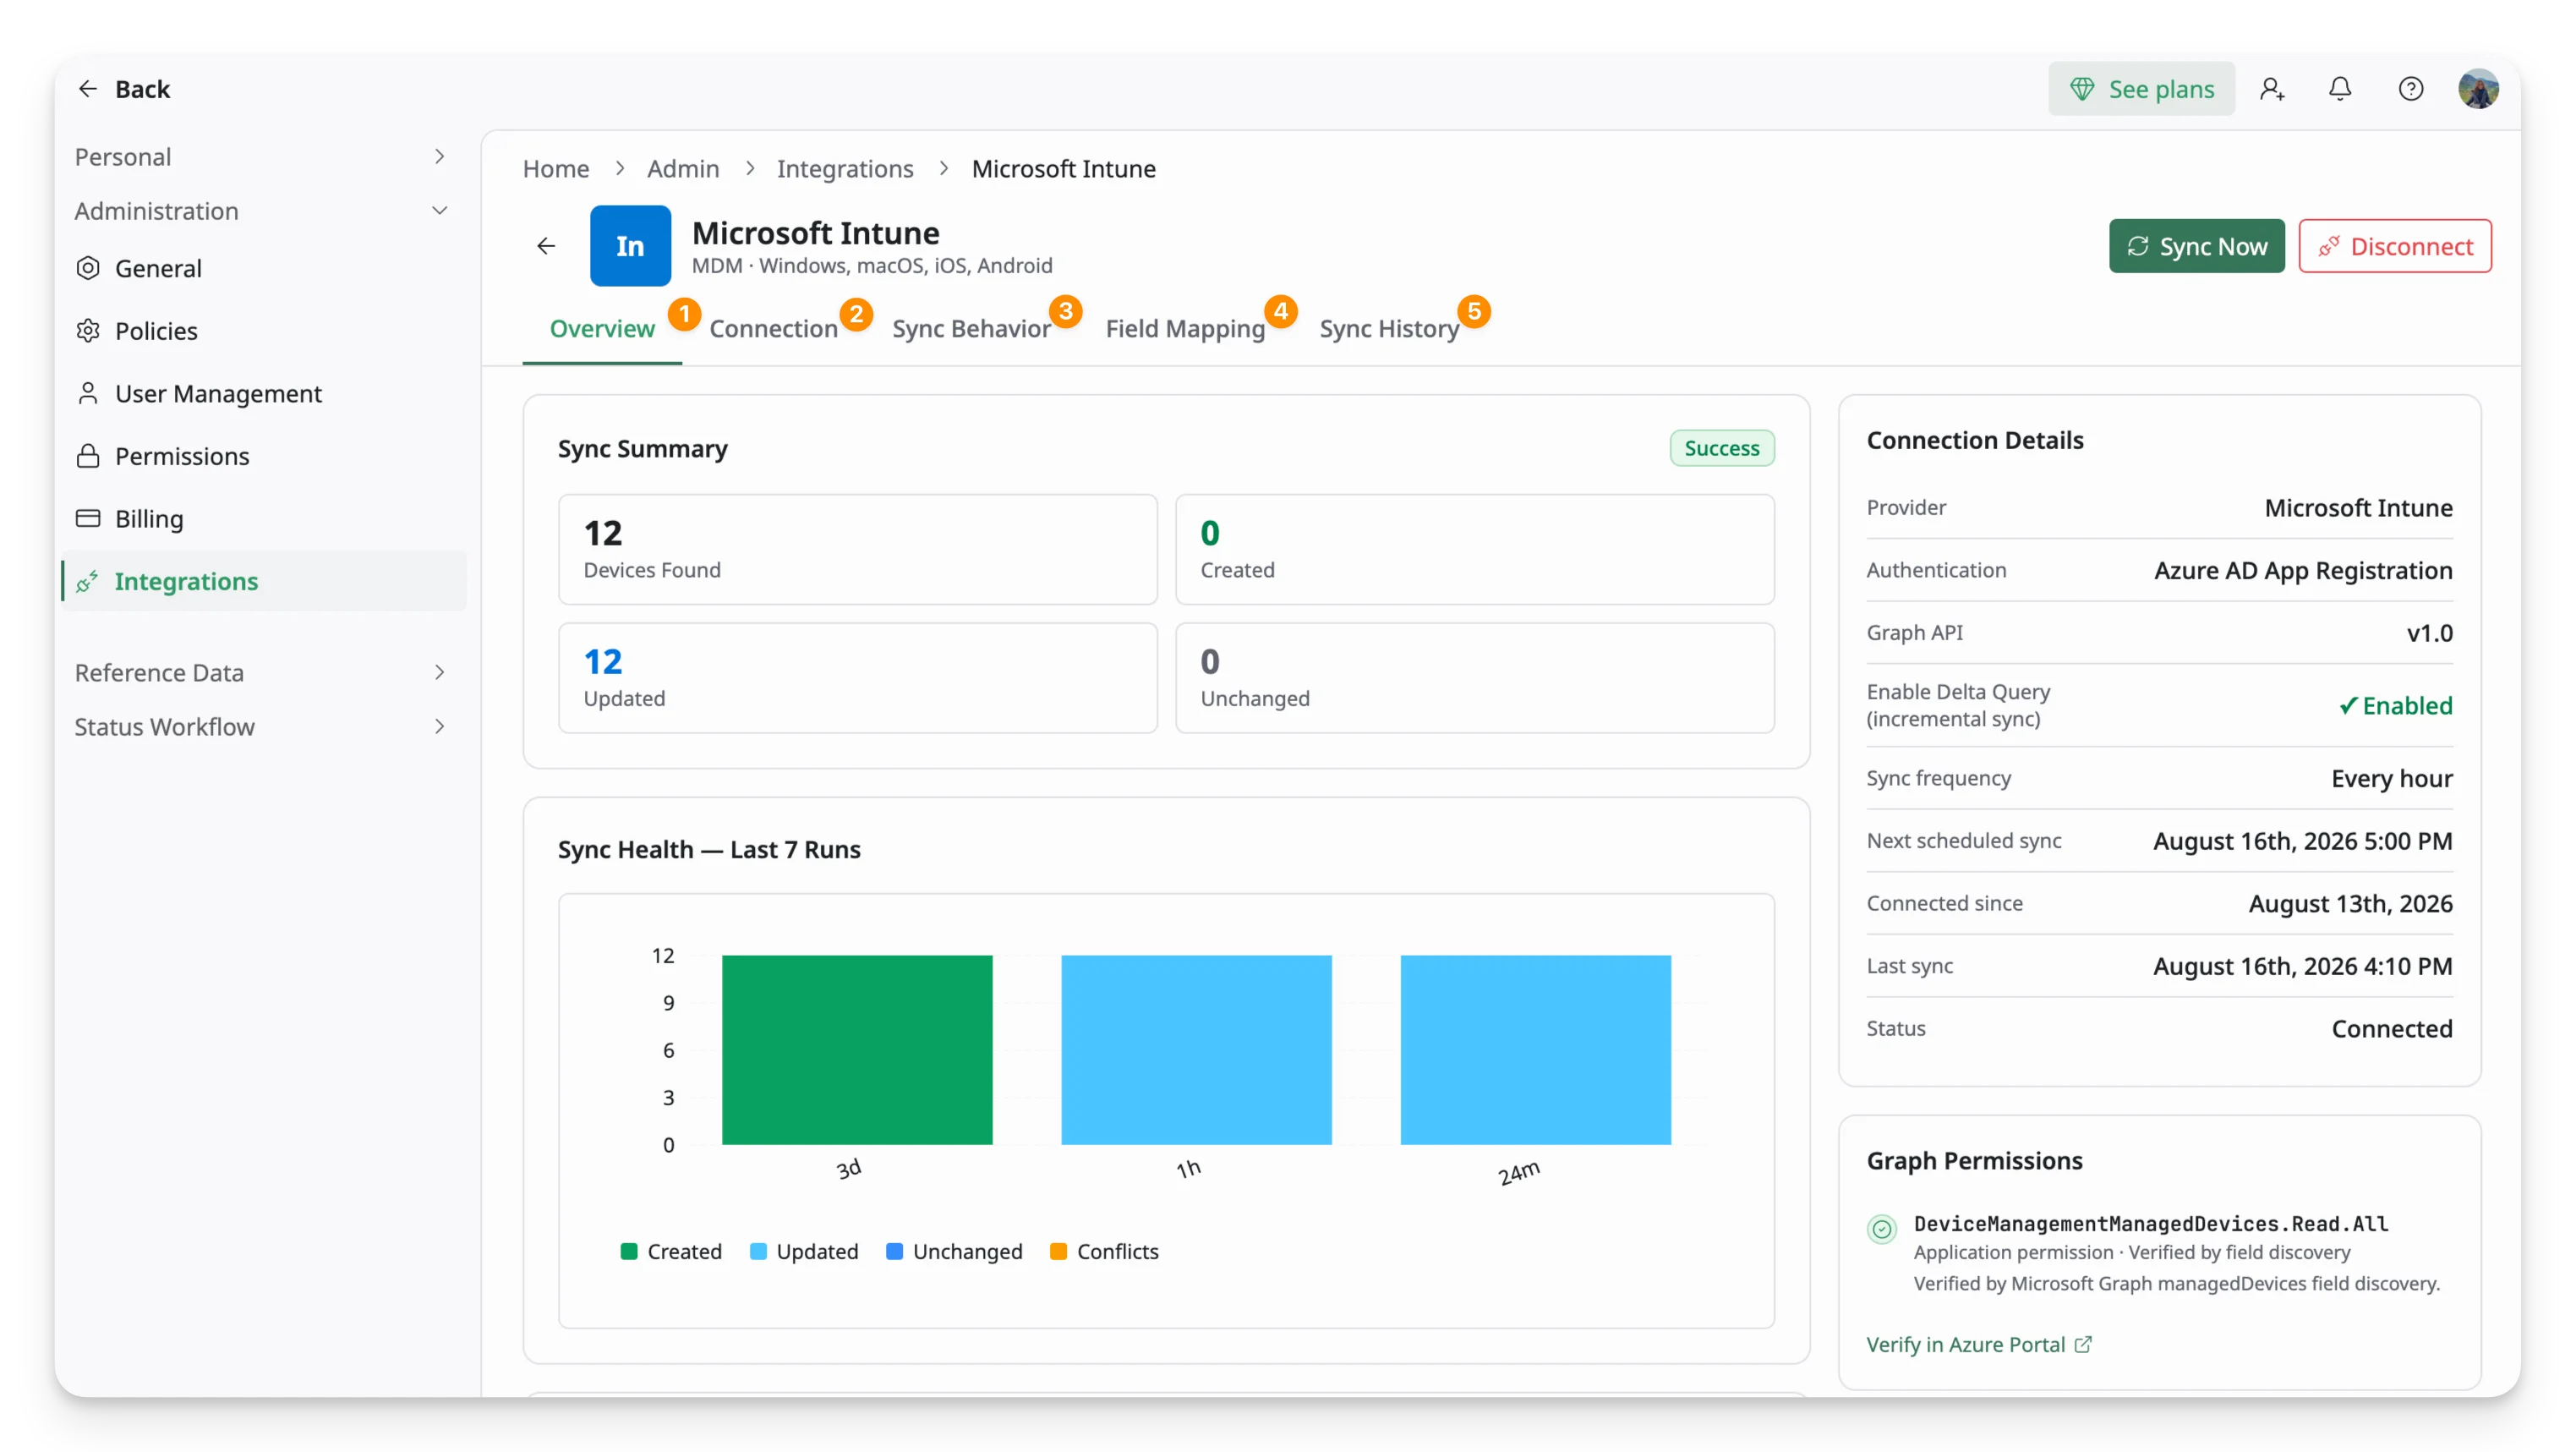
After the connection is established, AssetLoom takes you to the Microsoft Intune integration details page.
7. Access the Microsoft Intune Integration Details Page
After the connection is successfully set up, you can return to the Microsoft Intune integration at any time from the Integrations hub.
- From the Integrations hub, locate and click the Microsoft Intune card. A panel opens on the right showing general information about the integration.
- In the right panel, click Microsoft Intune to open the full Integration Details page.
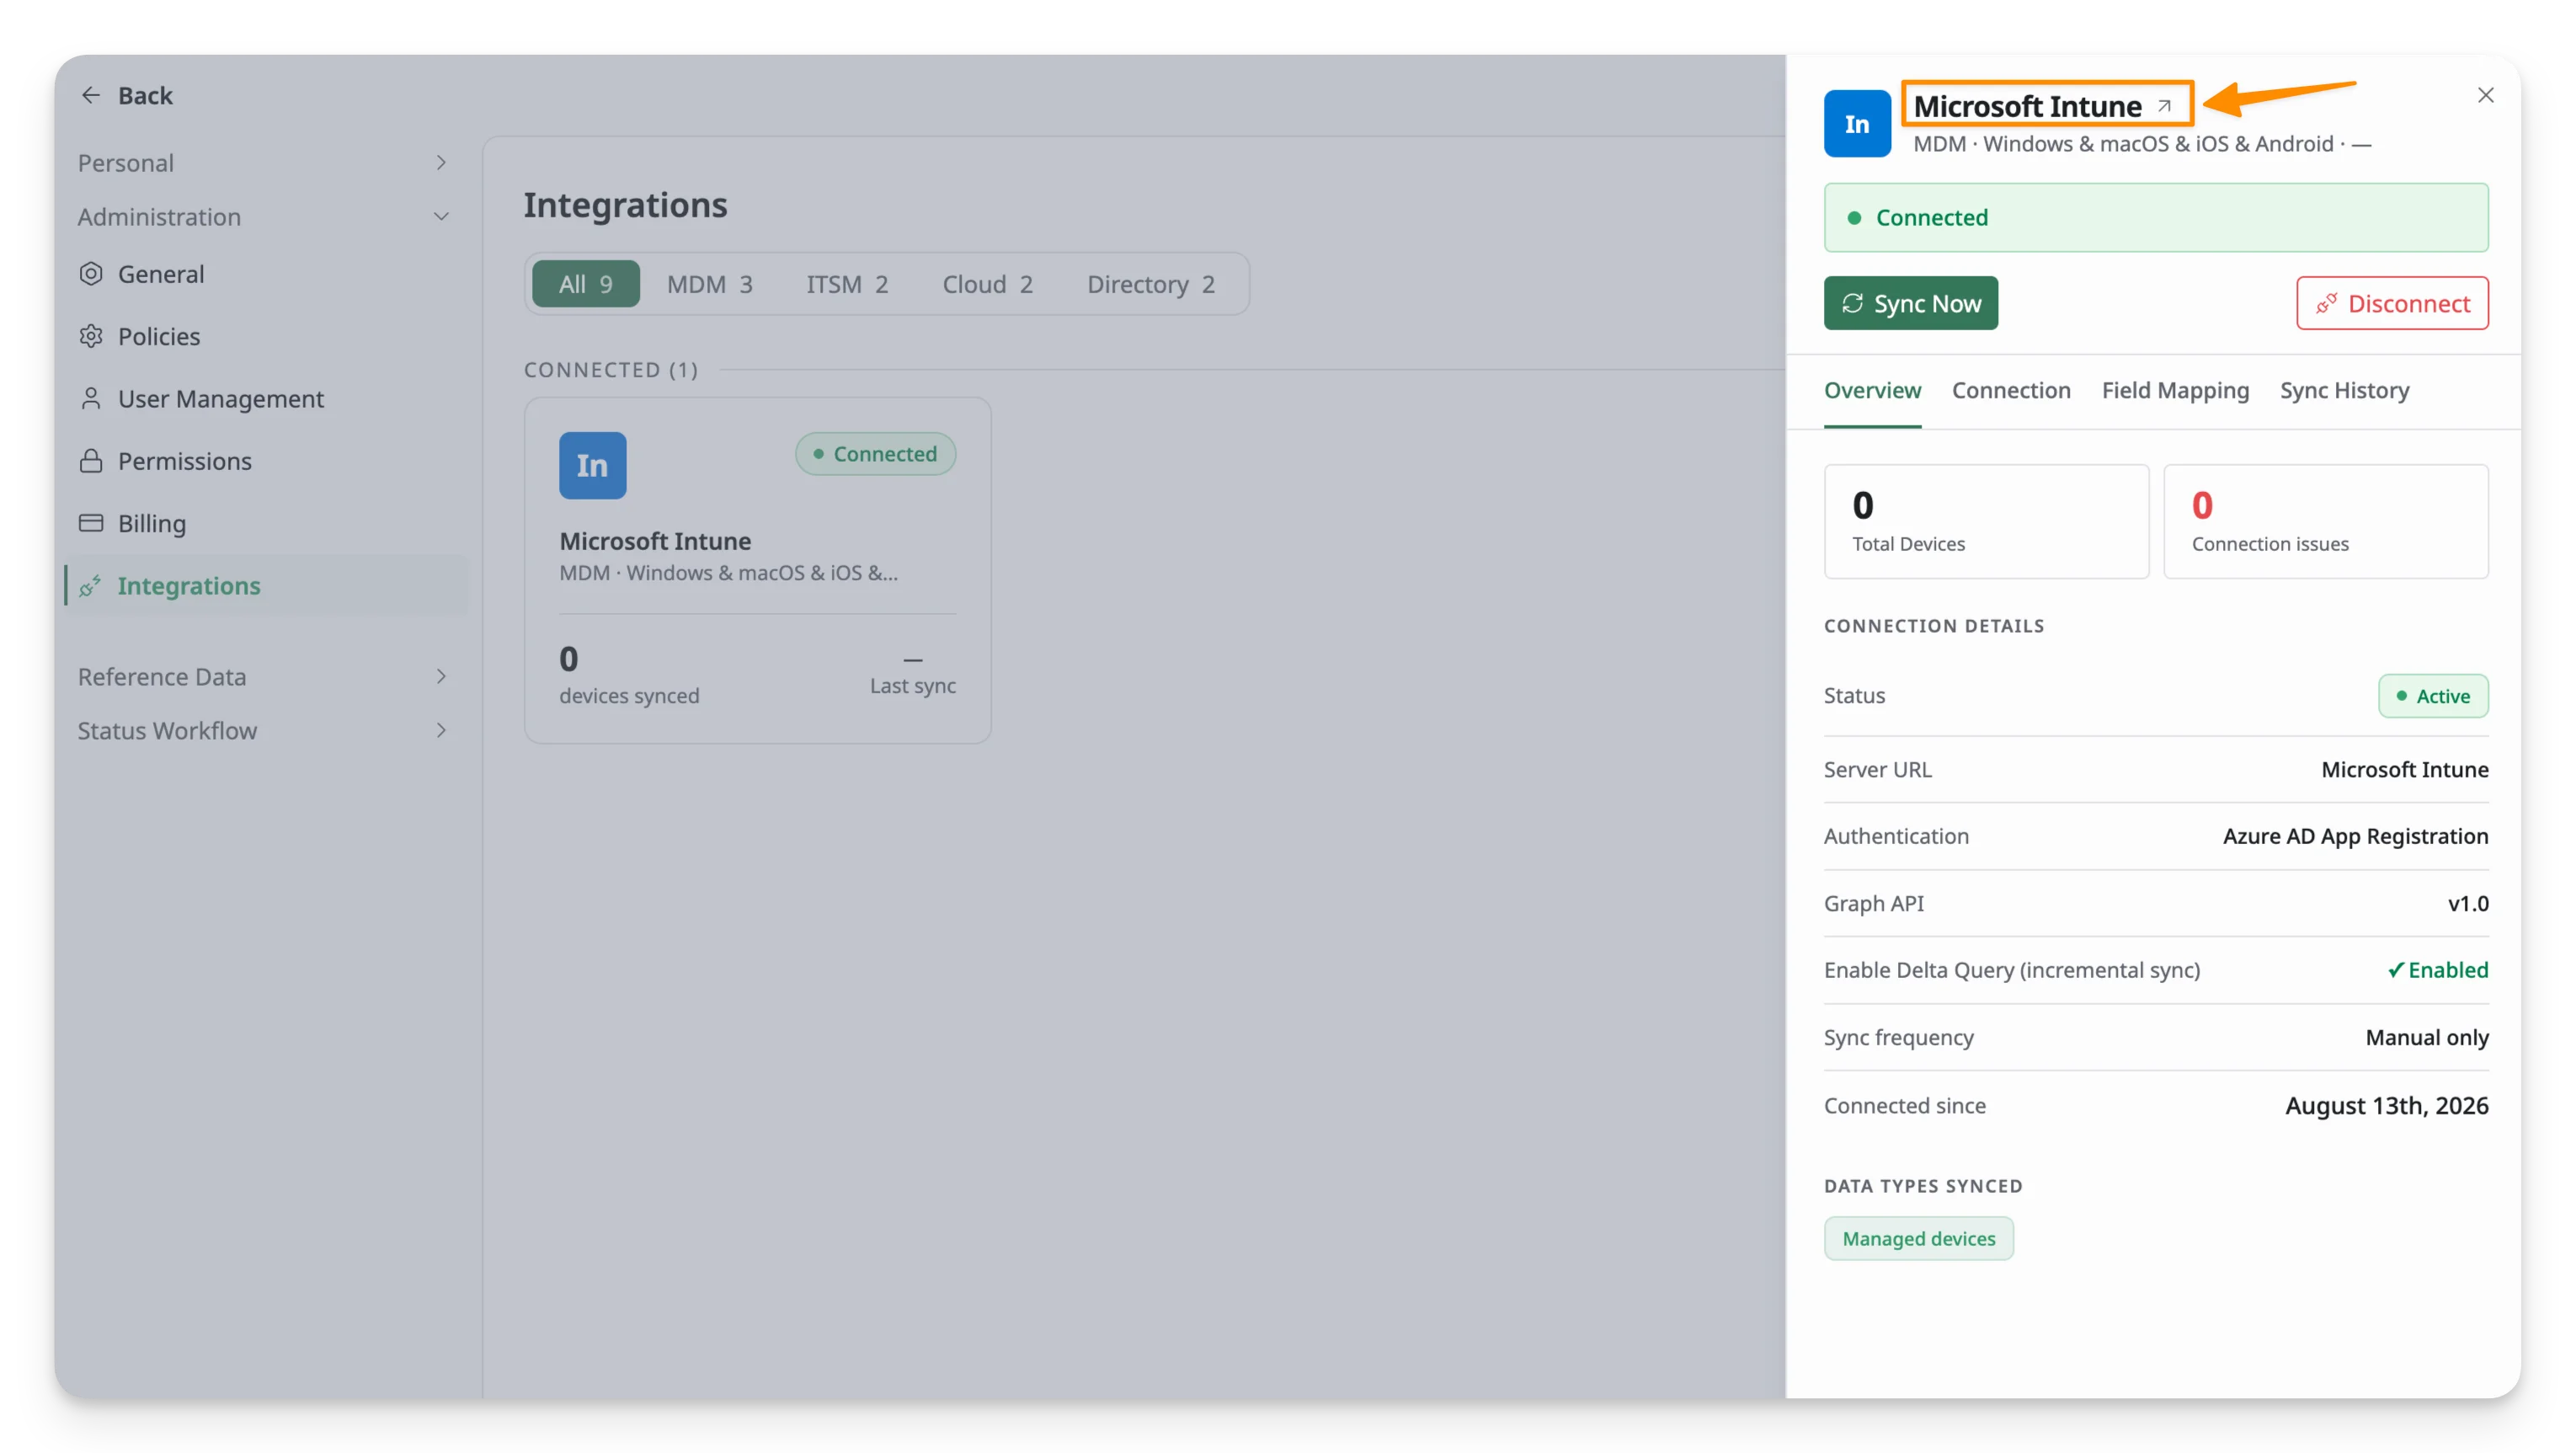
You’ll land on the Overview tab, where you can review the connection status, recent sync activity, and access the other integration settings.