Manage Asset Reservations
Learn how to manage asset bookings with AssetLoom Reservation
Reservations allows you to manage asset booking requests submitted through the Asset Booking System.
When a user submits a booking request, the request is automatically added to the Reservations section. From here, you can review each request, approve or decline it, and complete checkout once the booking is approved.
To access this page, go to: Allocation → Reservations.
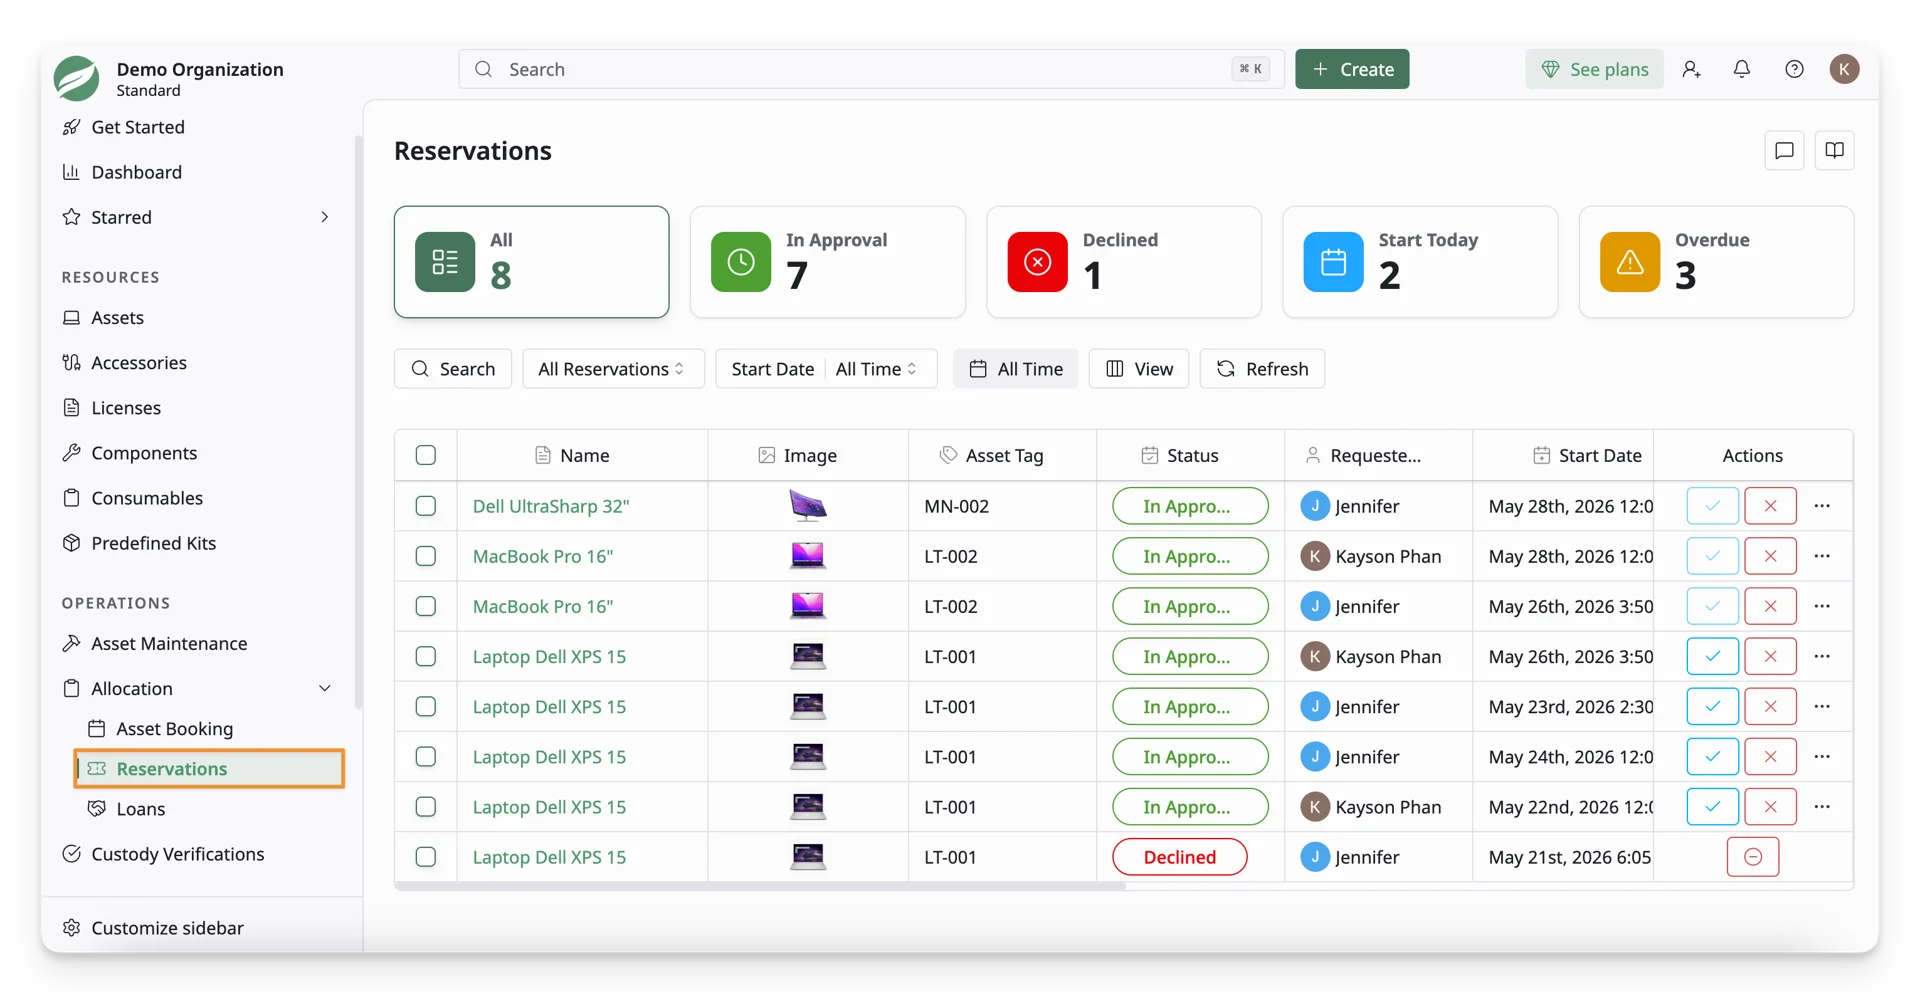
Only users with the Admin role or authorized users with Reservations permissions can manage reservation requests.
Depending on their assigned permissions, authorized users may be able to:
- Checkout reservations to users
- Decline reservation requests
- Remove reservation assignments
Reservation Categories
The Reservations page organizes asset booking requests into different status categories. These statuses help you quickly understand which requests need review, follow-up, or immediate action.
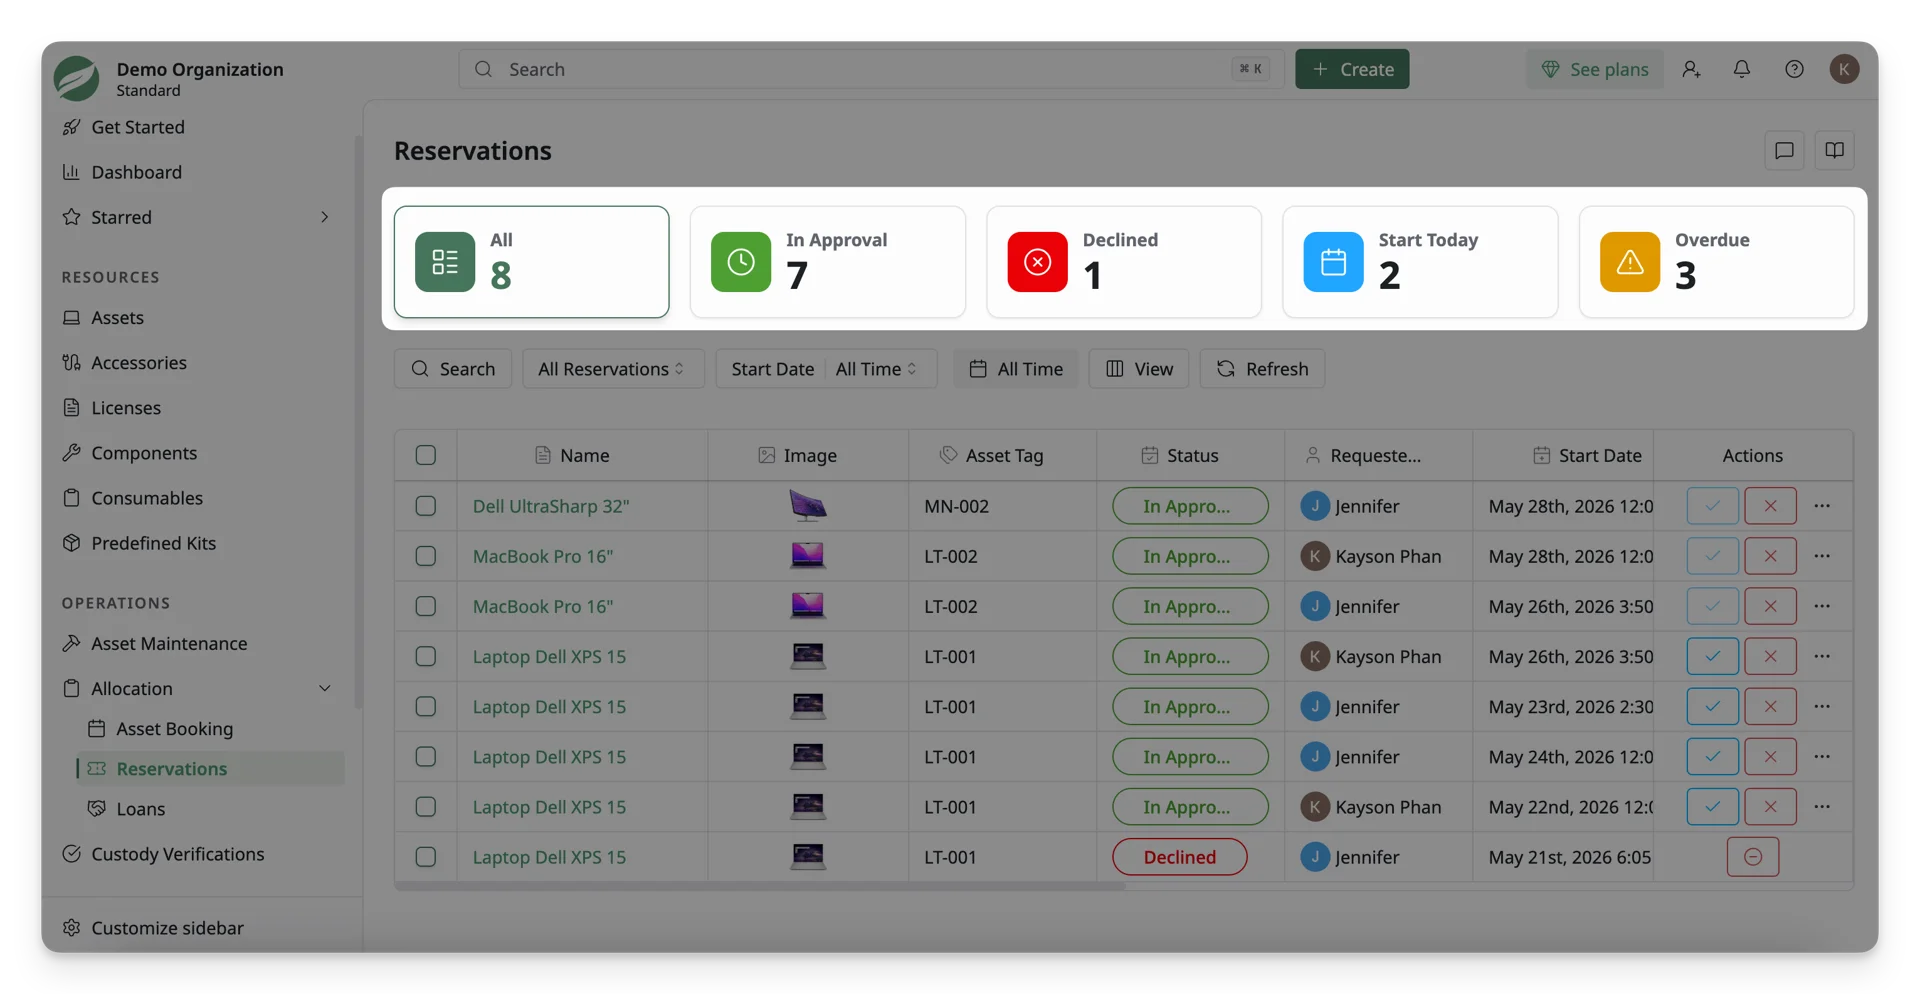
- All Reservations: shows the total number of reservation requests in the system. Use this to view all reservation records, regardless of their current status.
- In Approval: shows requests that are waiting for approval. These requests have been submitted through the Asset Booking System but have not yet been approved or declined.
- Declined: shows requests that have been rejected.
- Start Today: shows requests that are scheduled to begin today. Use this status to identify reservations that may need to be reviewed, approved, or checked out soon.
- Overdue: shows requests that have passed their due date. These requests may require immediate attention, especially if the asset has not been returned or the reservation has not been completed.
Use the Reservations Toolbar
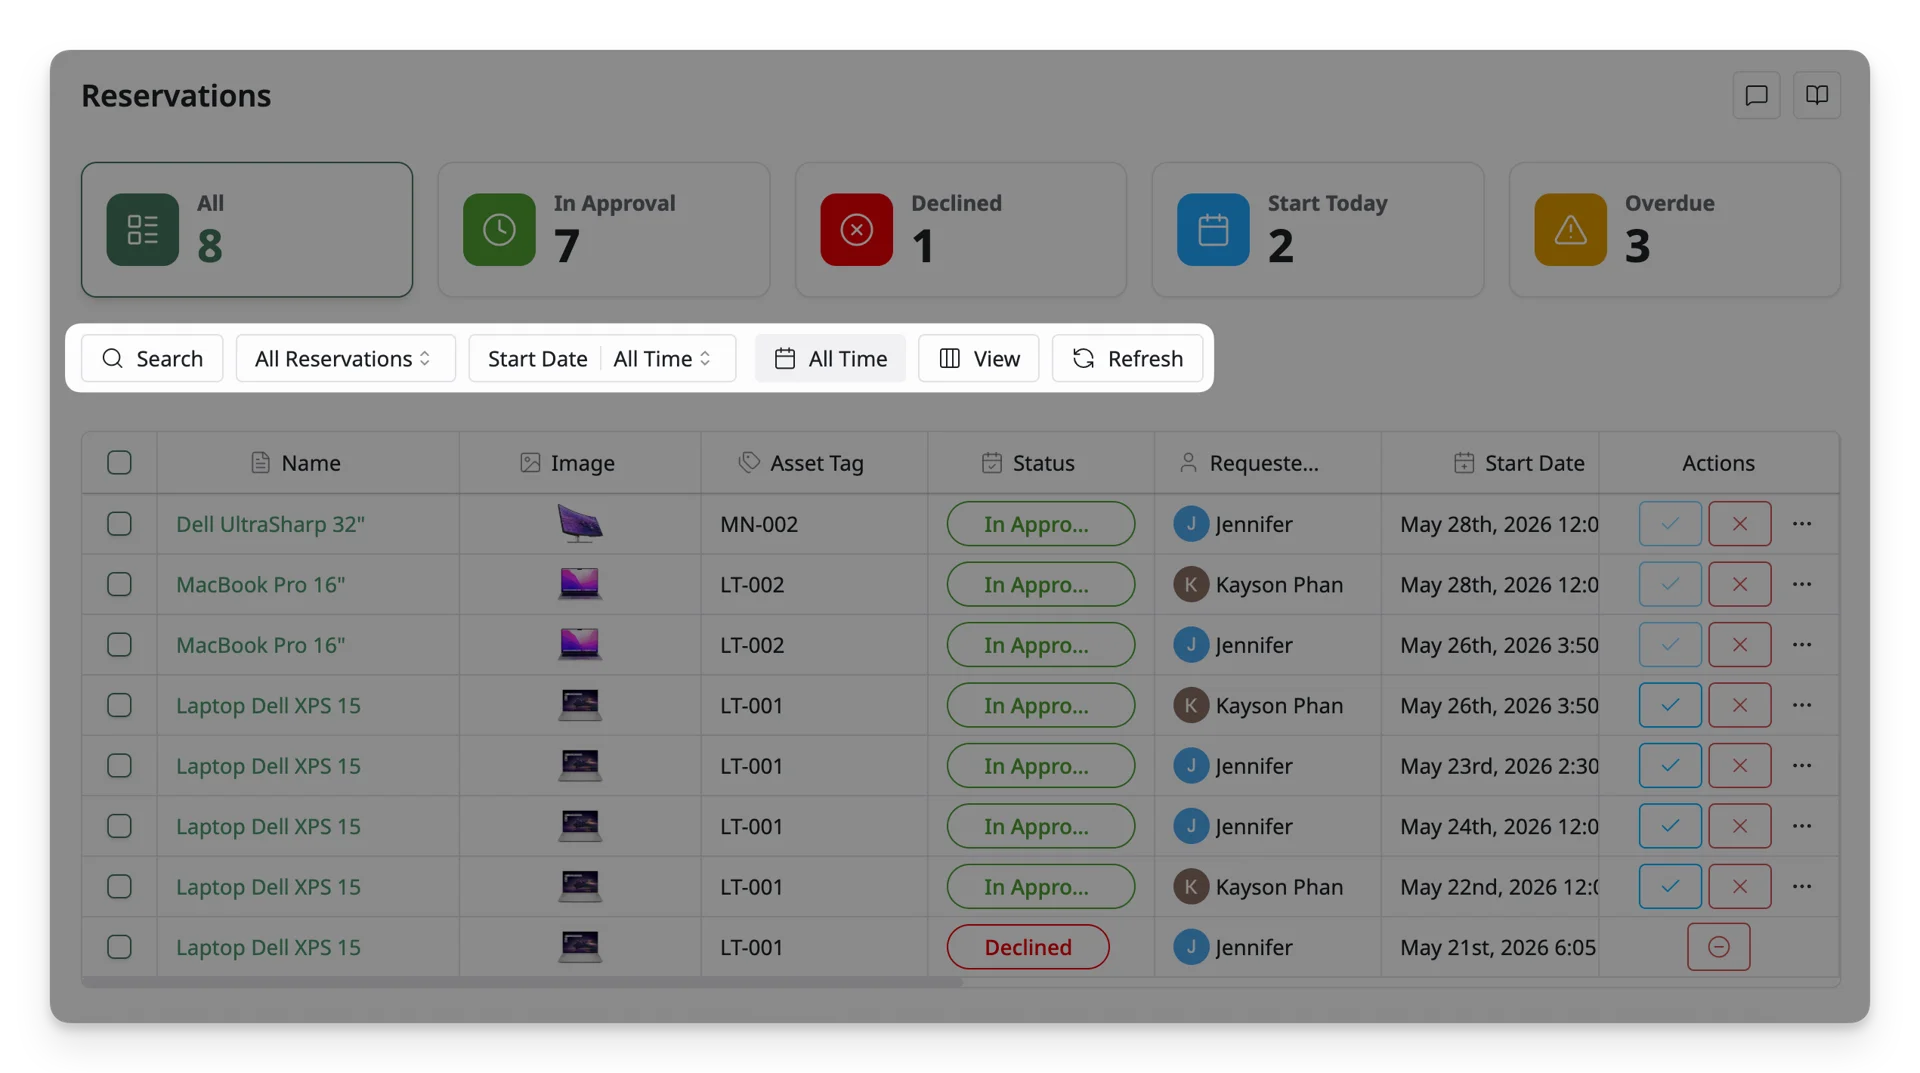
The toolbar at the top of the Reservations page helps you search, filter, customize, and refresh the reservation list. Use these tools to quickly find the booking requests you need to review or manage.
Search for Reservations
Use the Search field to find a specific asset reservation. You can search by Asset name or Asset tag. This is useful when you want to quickly locate a specific booking request.
Filter Reservations by Status
Use the filter to view reservations by status, including:
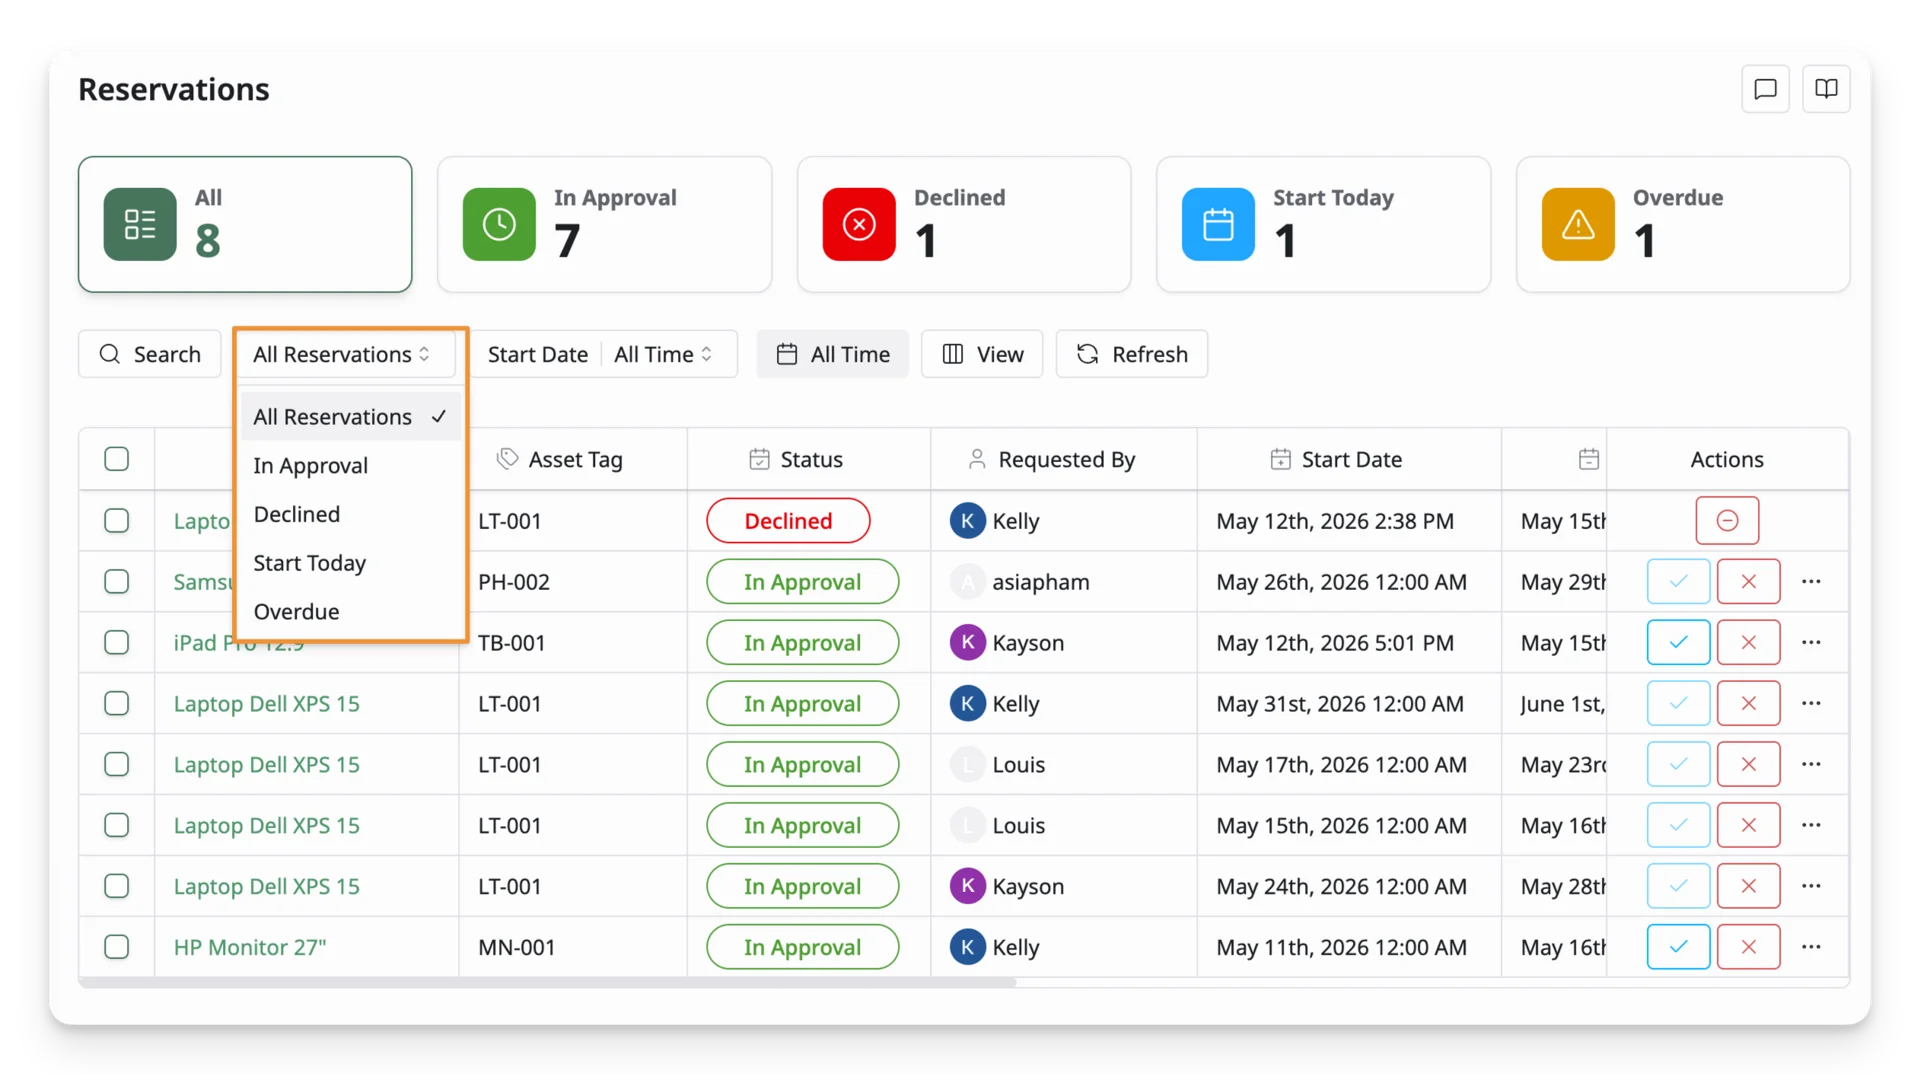
- All Reservations — displays all reservation requests.
- In Approval — displays requests that are waiting for your approval.
- Declined — displays requests that have been rejected.
- Start Today — displays requests scheduled to start today.
- Overdue — displays requests that have passed their due date.
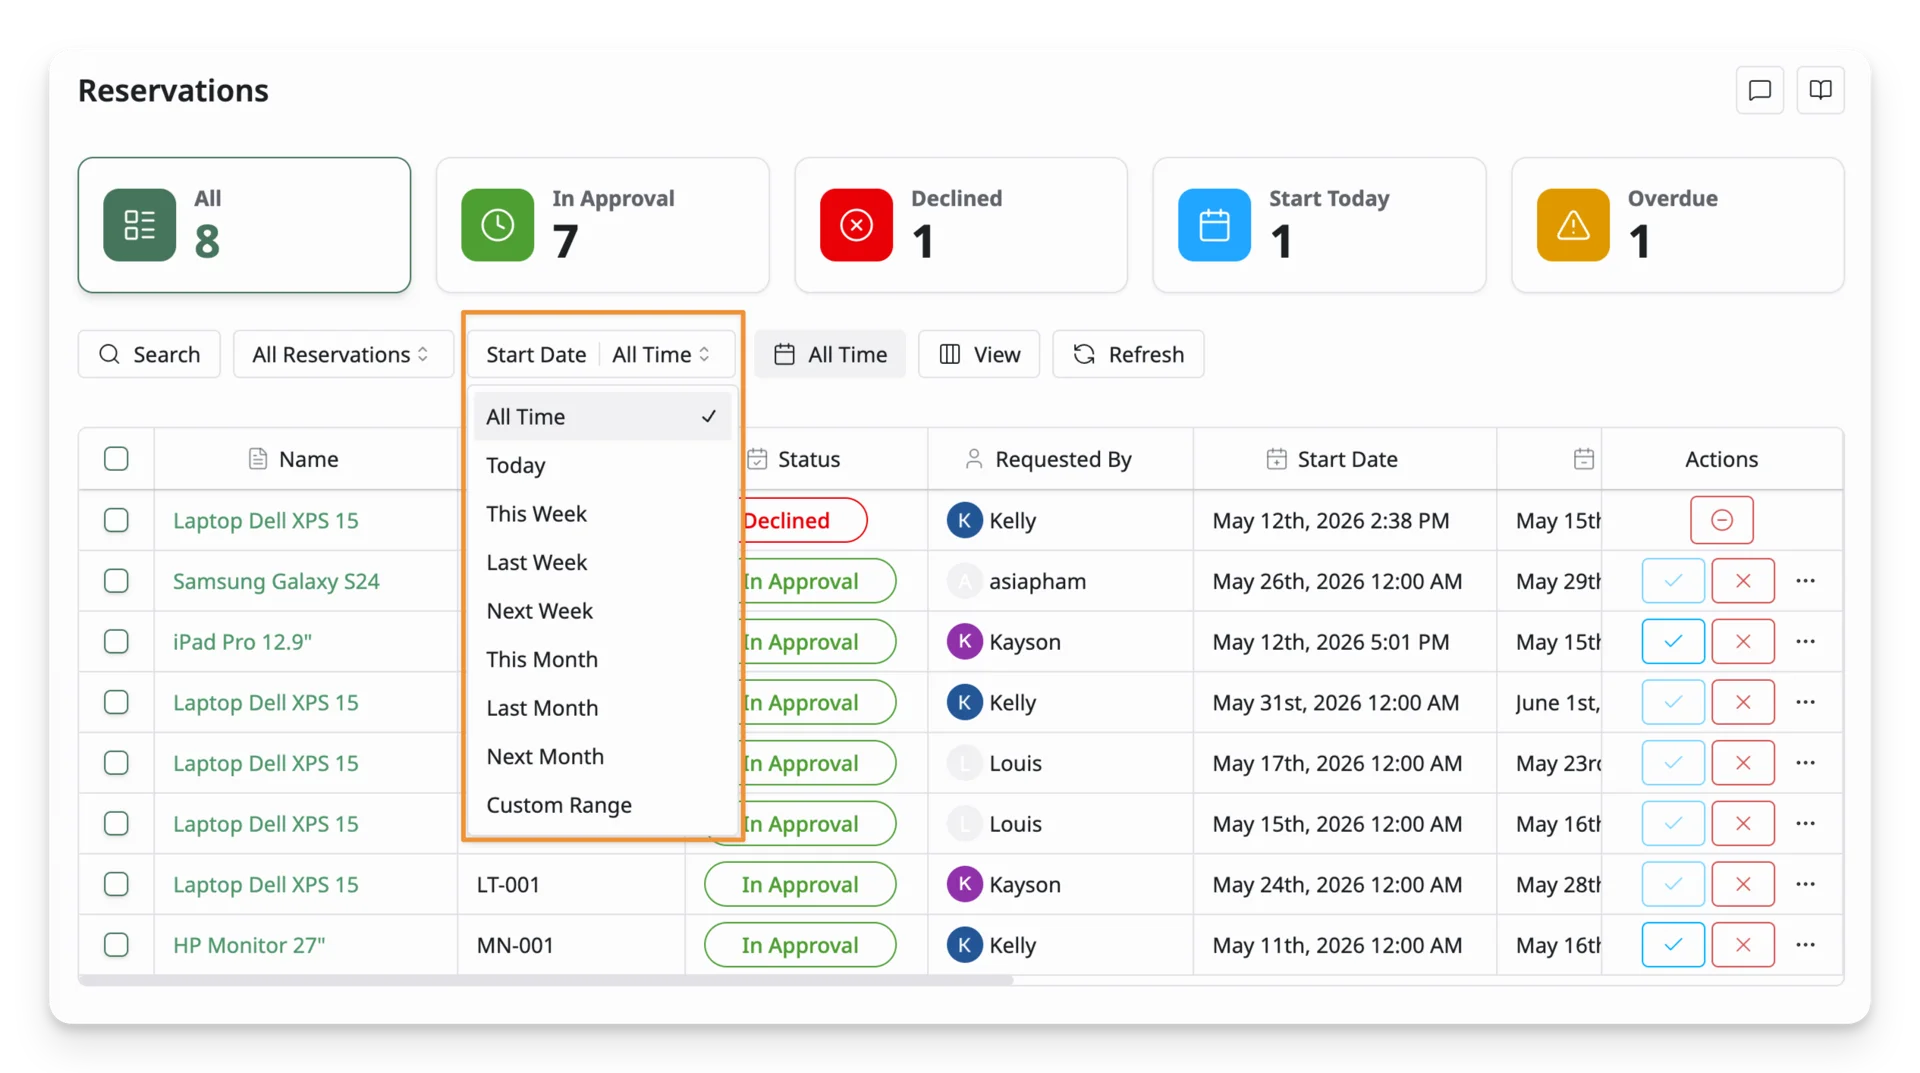
Filter Reservation by Start Date
Use the Start Date filter to find reservations by their scheduled start. You can select a time period to locate reservations within that range.
Customize the Table View
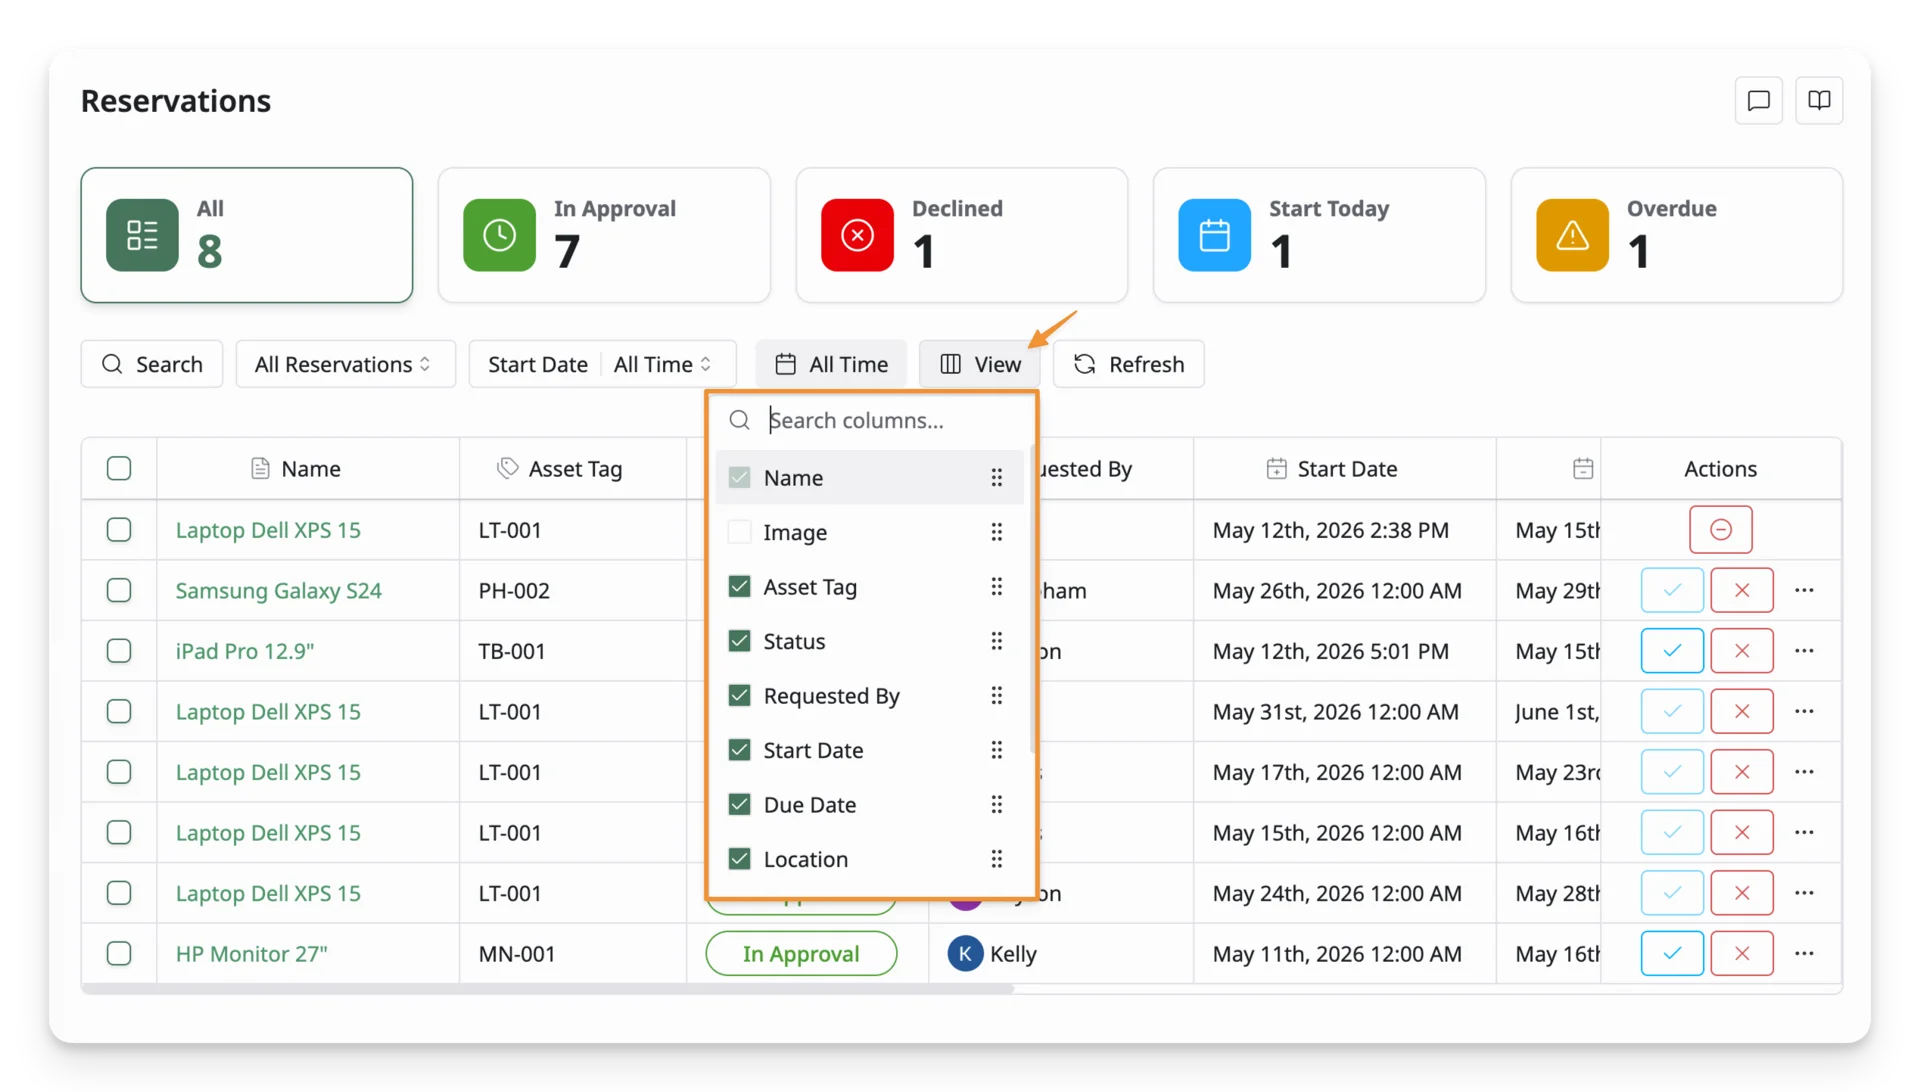
Click View to choose which columns are shown or reorder columns in the reservation list. Use this option to display only the information you need, such as asset details, requester, status, start date, or due date.
Refresh
Click Refresh to reload the reservation list. Use this when you want to see the latest reservation information, especially after a new request is submitted or after changes have been made.
Reservation Details
Each reservation entry shows the following information:
- Name: The name of the requested asset.
- Asset Tag: The unique identifier for the asset.
- Status: The current status of the request (In-approval, Declined, etc.).
- Requested By: The user who made the request.
- Start Date: The date the reservation is scheduled to begin.
- Due Date: The date the reservation is scheduled to end.
Approve an Asset Reservation
Follow these steps to approve an asset reservation and assign the asset to the requested user:
-
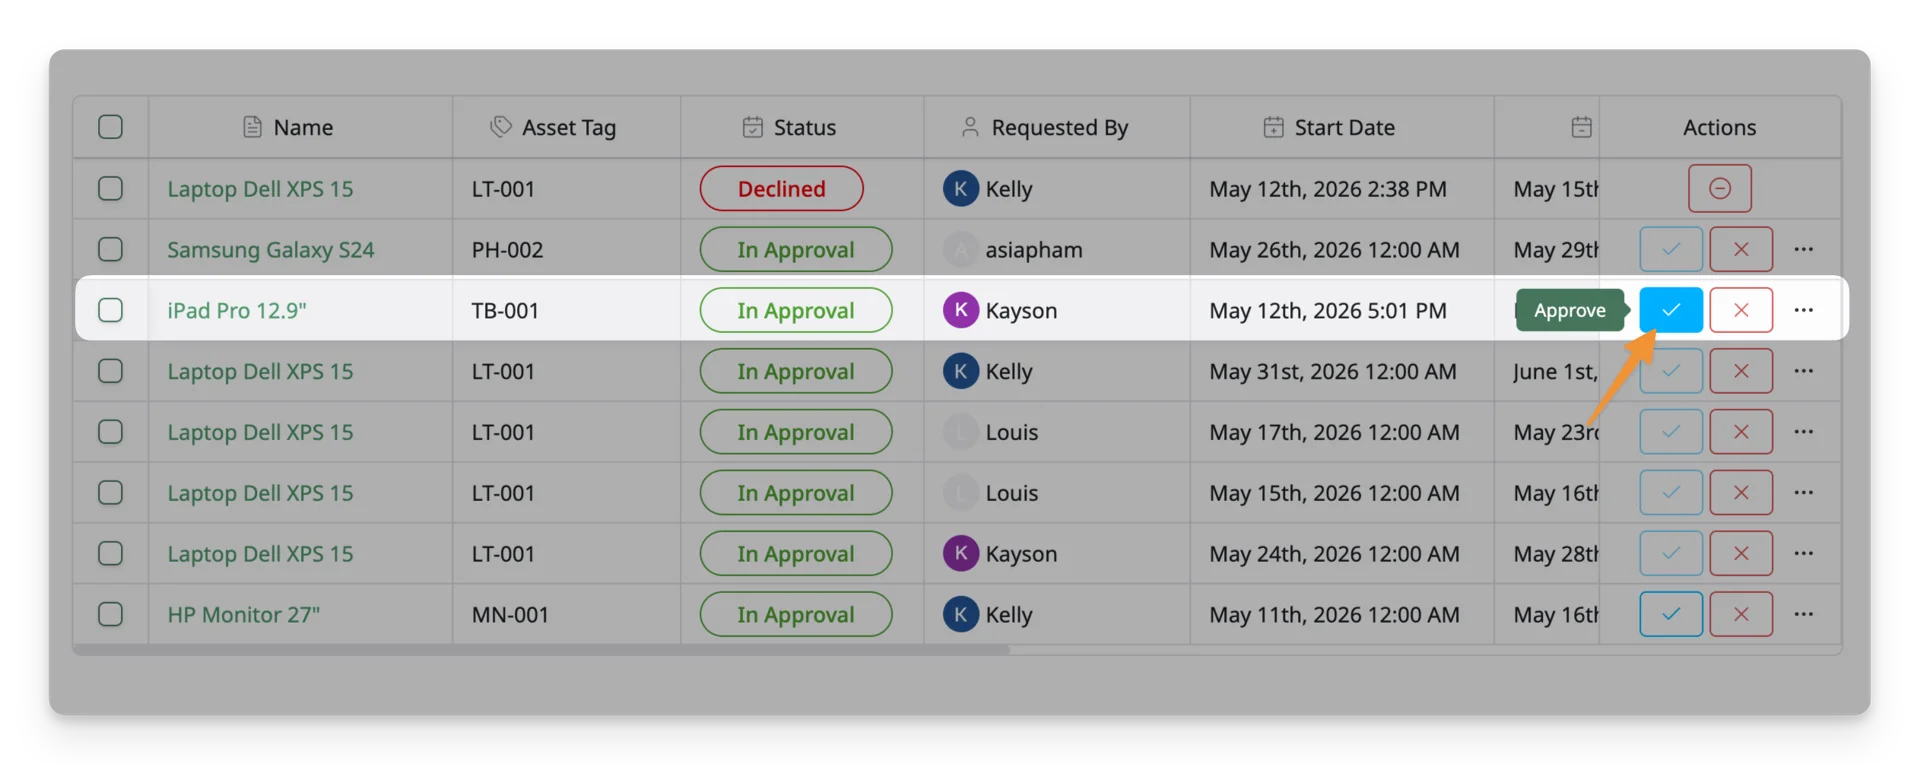
Find the reservation you want to approve on the Reservations page. You can use the In Approval status filter to view requests that are waiting for approval.
-
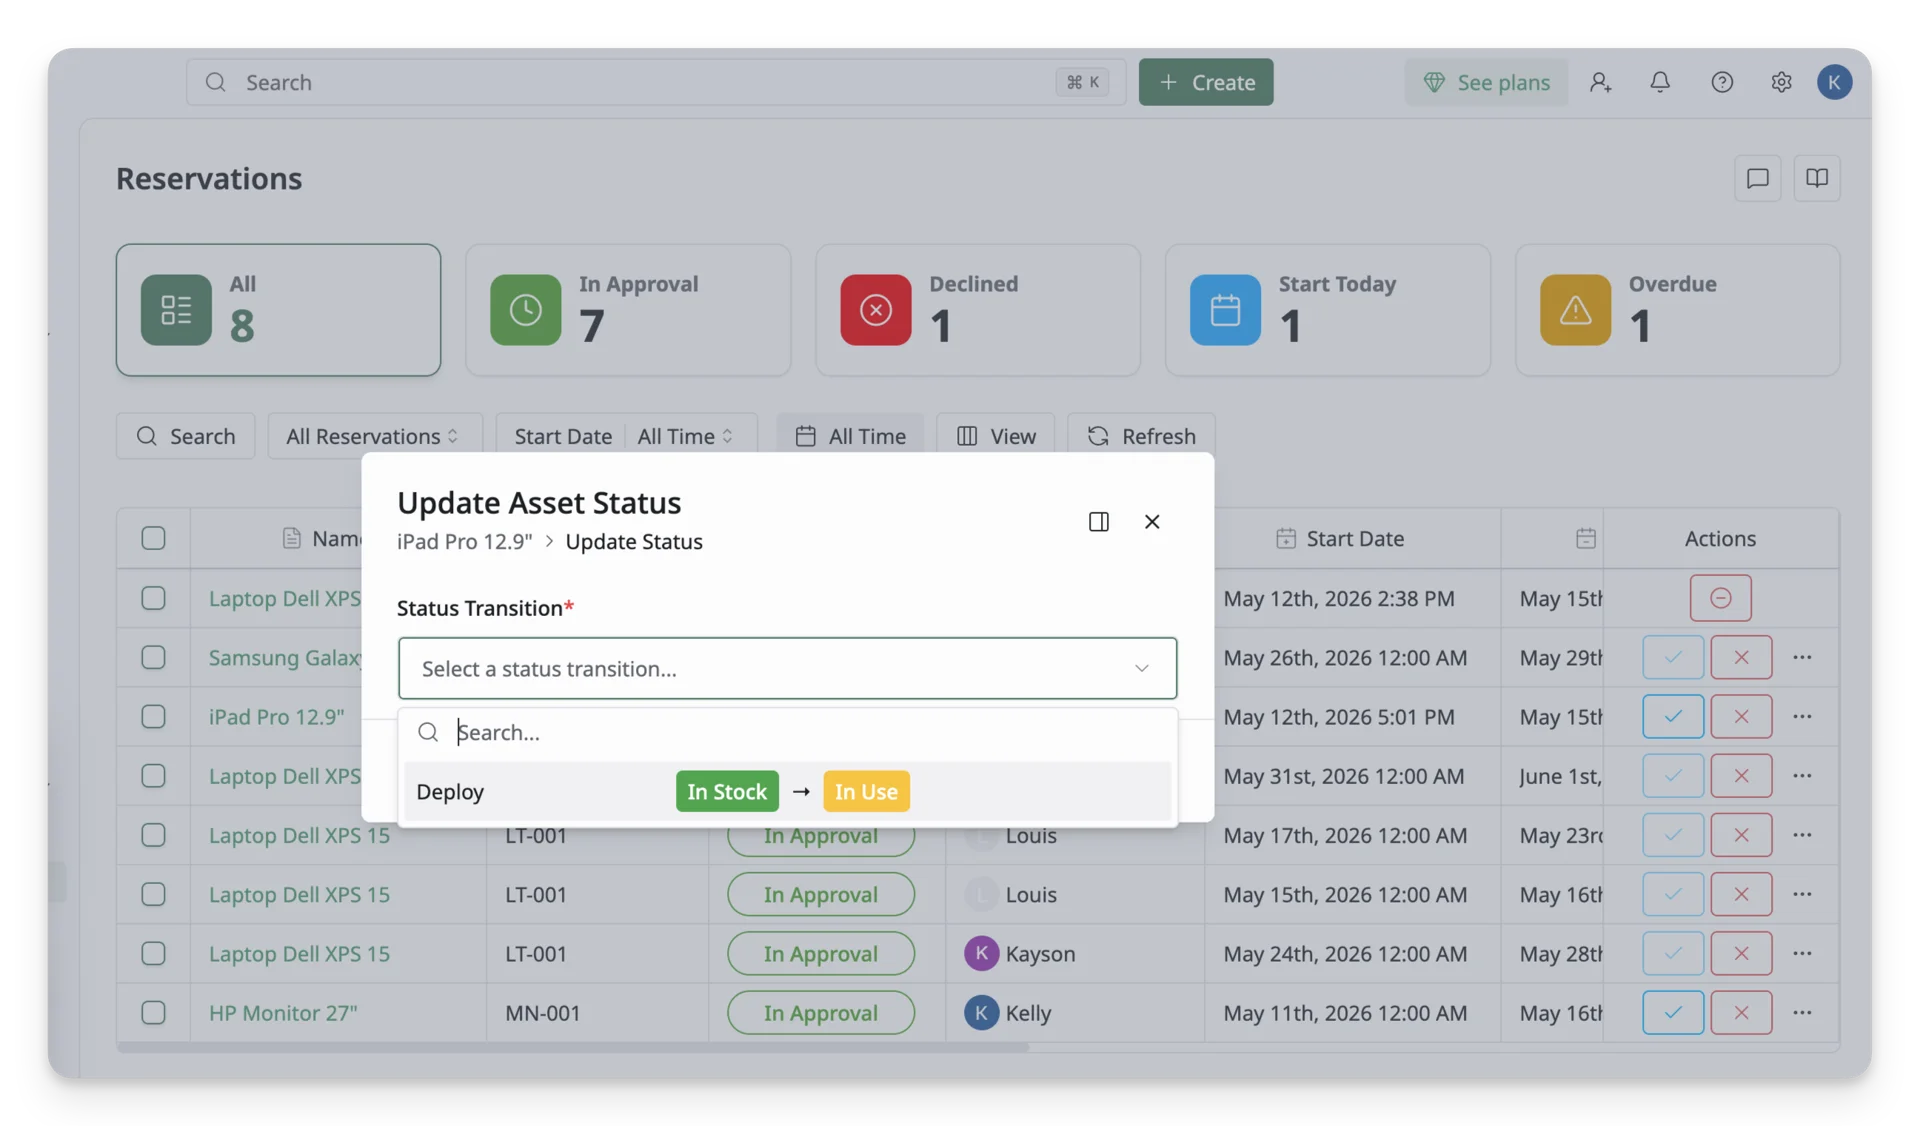
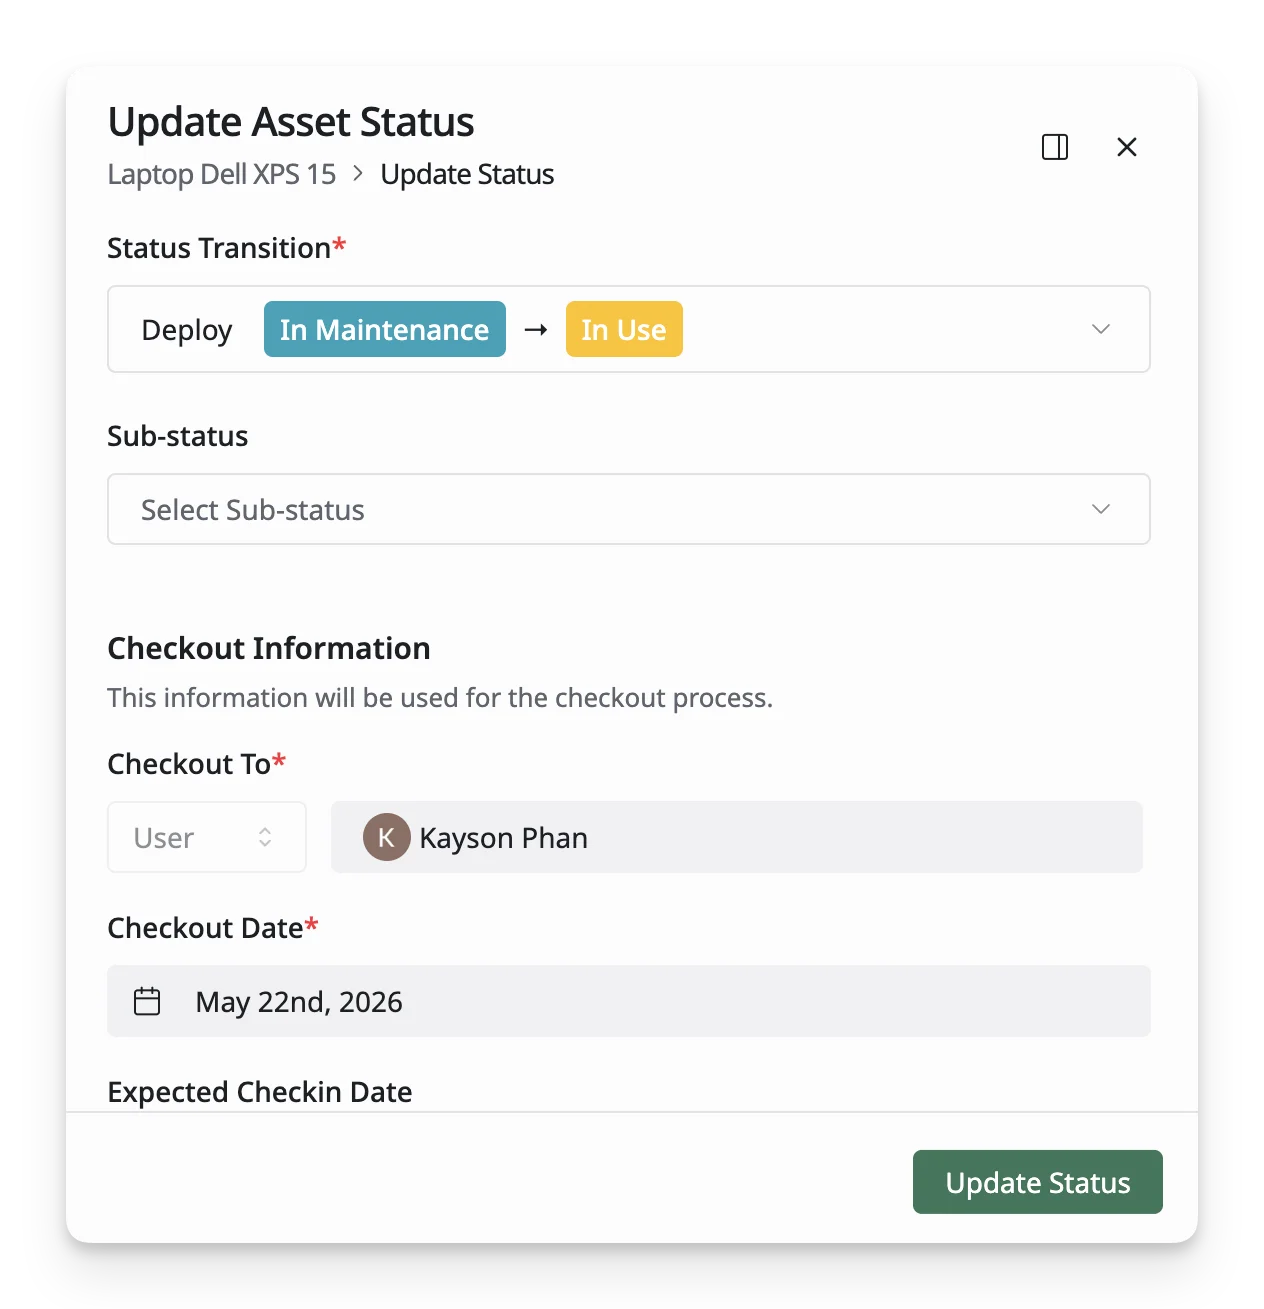
Click the Approve button in the Actions column. This opens the Update Asset Status panel.
-
Select a Status Transition. Choose a transition that includes a checkout rule. This allows the asset to be checked out and assigned to the user who requested the reservation. For example, the asset may move from In Stock to In Use.
-
Review the checkout information.
- Checkout To — the user who requested the asset.
- Checkout Date — the date the asset is checked out.
- Expected Check-in Date — the expected return date.
-
Click Update Status to confirm. Once updated, the asset status changes, the asset is assigned to the requested user, and the reservation is approved.
The approval window controls when an approved reservation can be checked out to the requested user. AssetLoom uses a 4-hour approval window to help ensure assets are checked out close to their scheduled booking time.
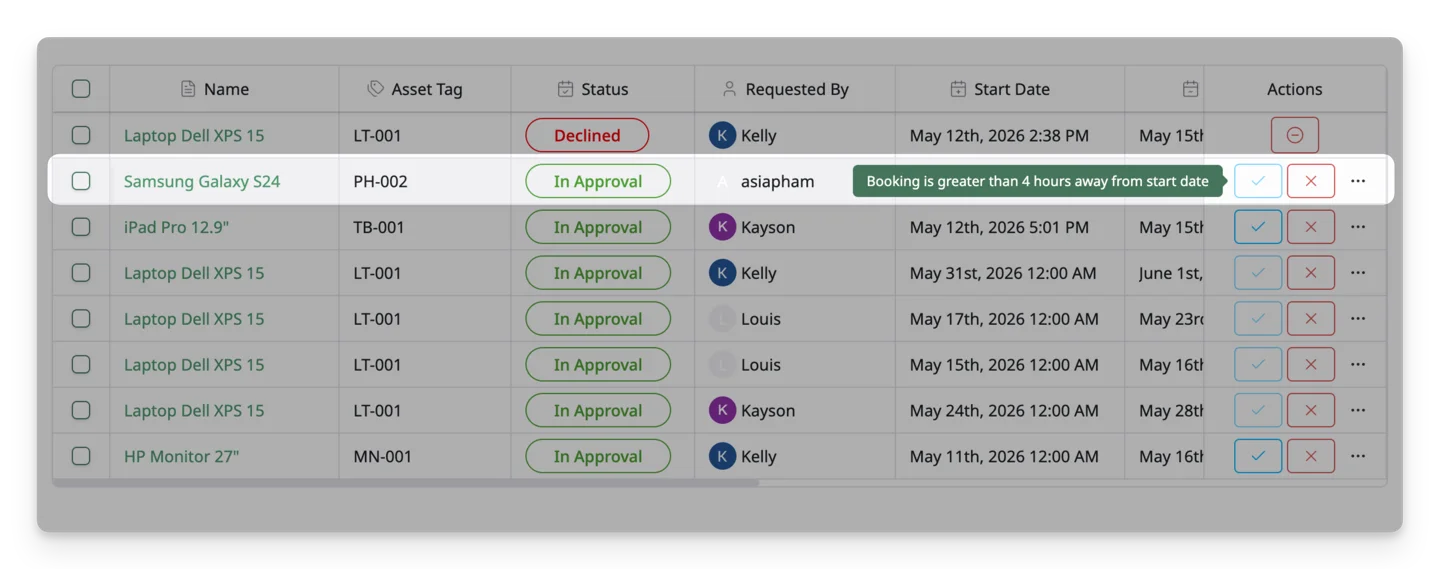
How the 4-Hour Approval Window Works
- If the reservation is scheduled to start within the next 4 hours, you can approve the reservation and check out the asset.
- If the reservation is scheduled to start more than 4 hours later, the asset cannot be checked out yet.
- The Approve action becomes available when the reservation is within the 4-hour checkout window.
Example
If a reservation starts at 8:00 PM, the asset can be checked out from 4:00 PM onward.
Before 4:00 PM, the reservation is outside the checkout window and cannot be checked out yet.
Decline an Asset Reservation
Use the Decline action when a booking request should not be approved.
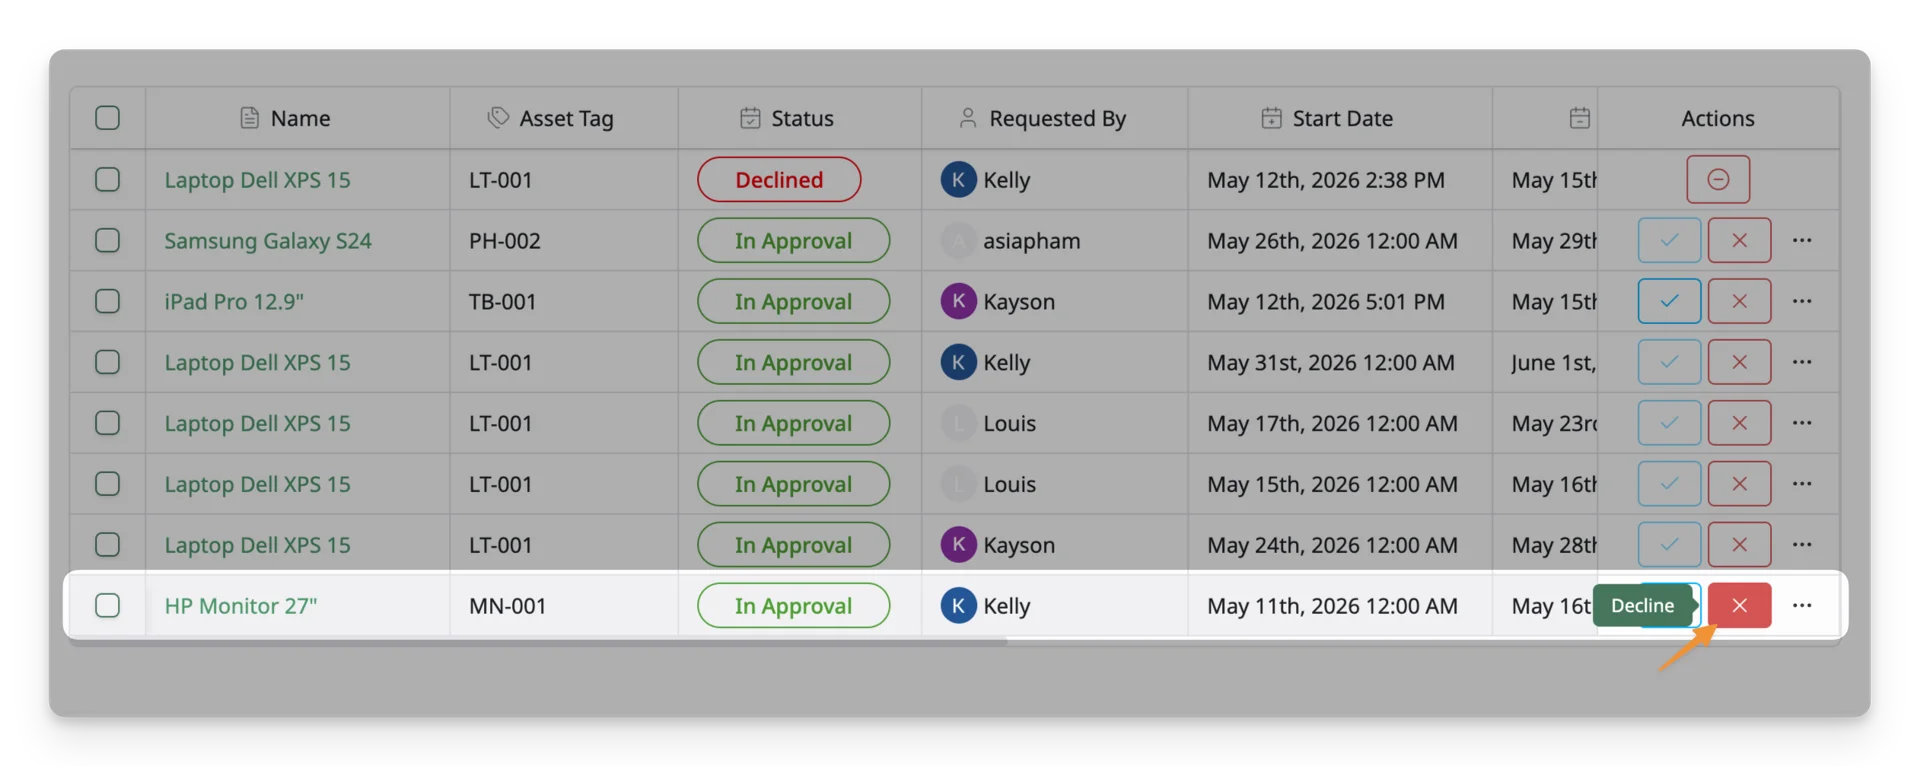
To decline an asset reservation:
- Find the reservation you want to decline on the Reservations page and click the Decline button in the Actions column.
- In the Decline Booking confirmation window, review the asset name to make sure you are declining the correct request. Select Remove booking after decline if you want to remove the booking record after it is declined.
- Click Yes to confirm the decline.
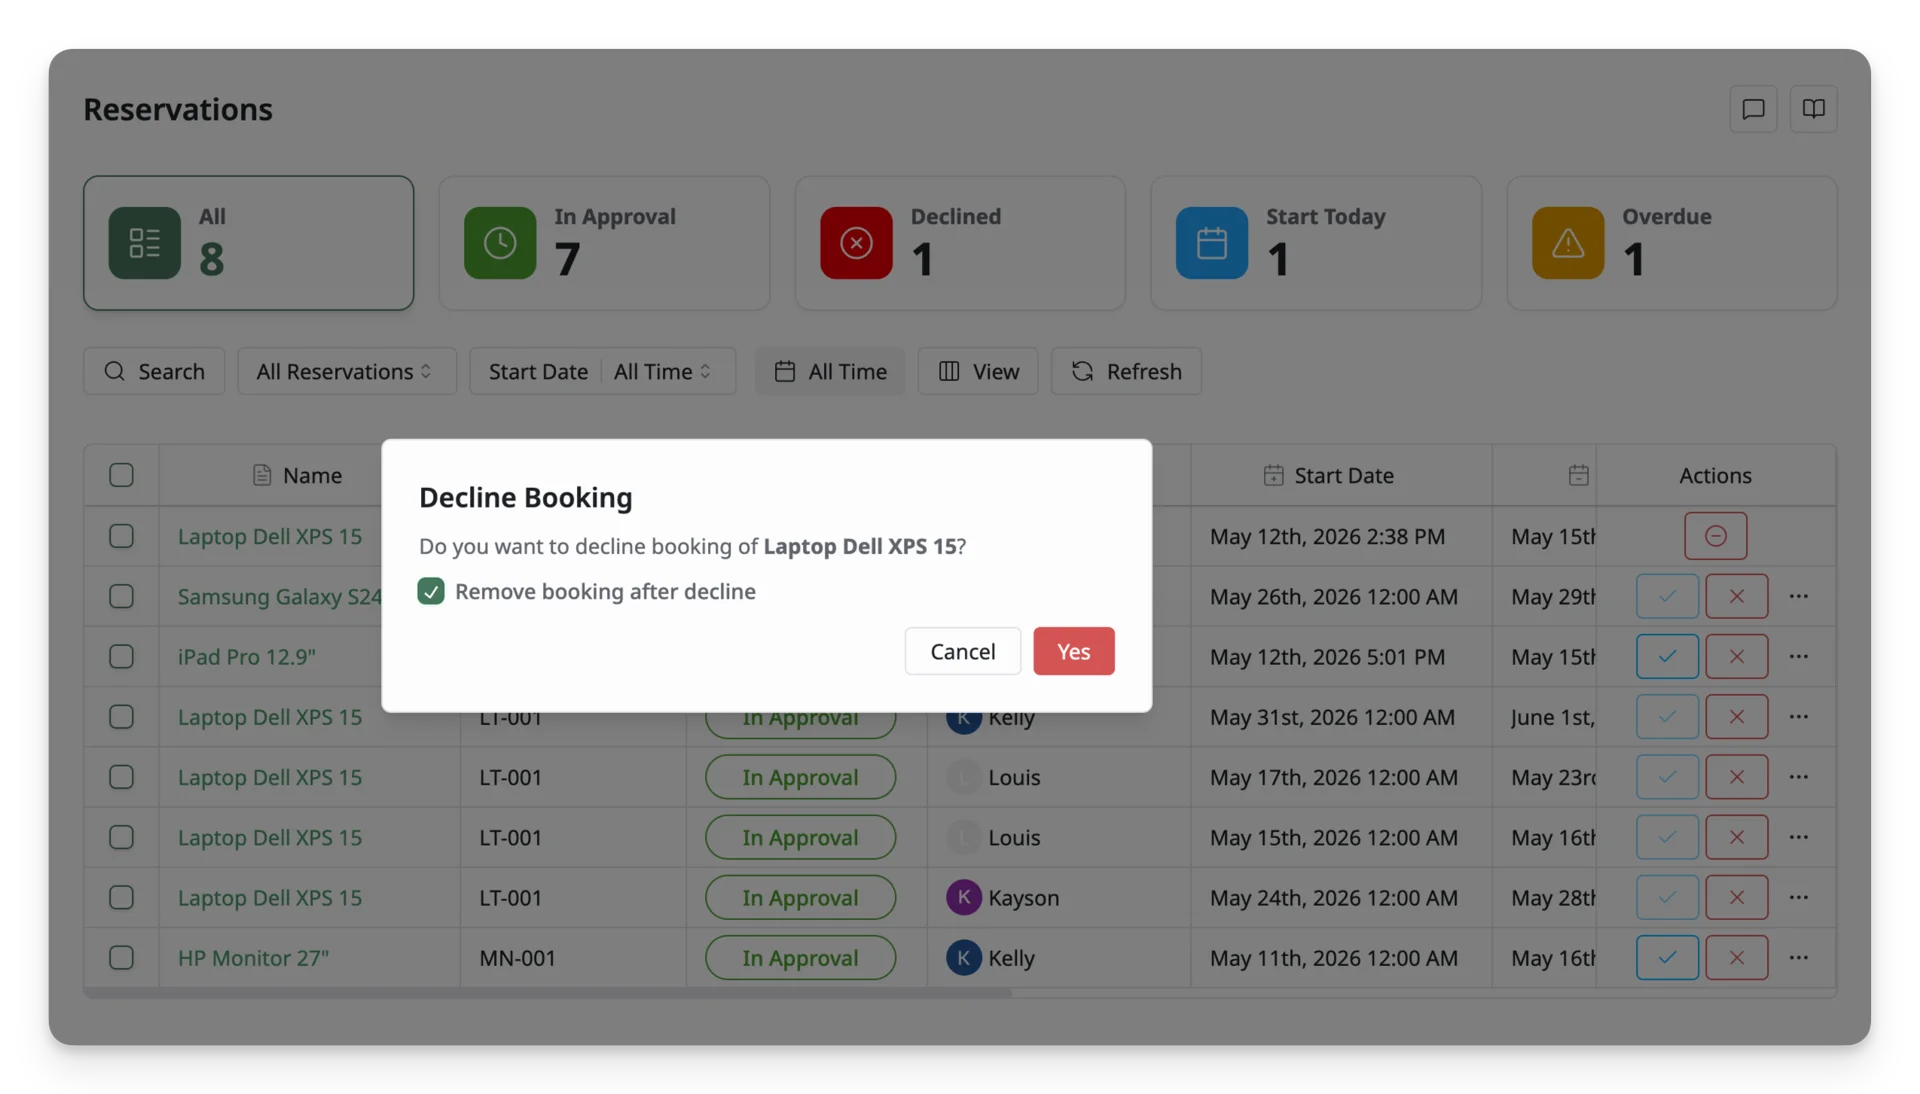
Once confirmed, the reservation status changes to Declined. If Remove booking after decline is selected, the booking will also be removed from the reservation list.
The requester will receive an email notification letting them know that their reservation has been declined.
Bulk Actions
Bulk Actions allow you to manage multiple reservation requests at the same time. To use bulk actions:
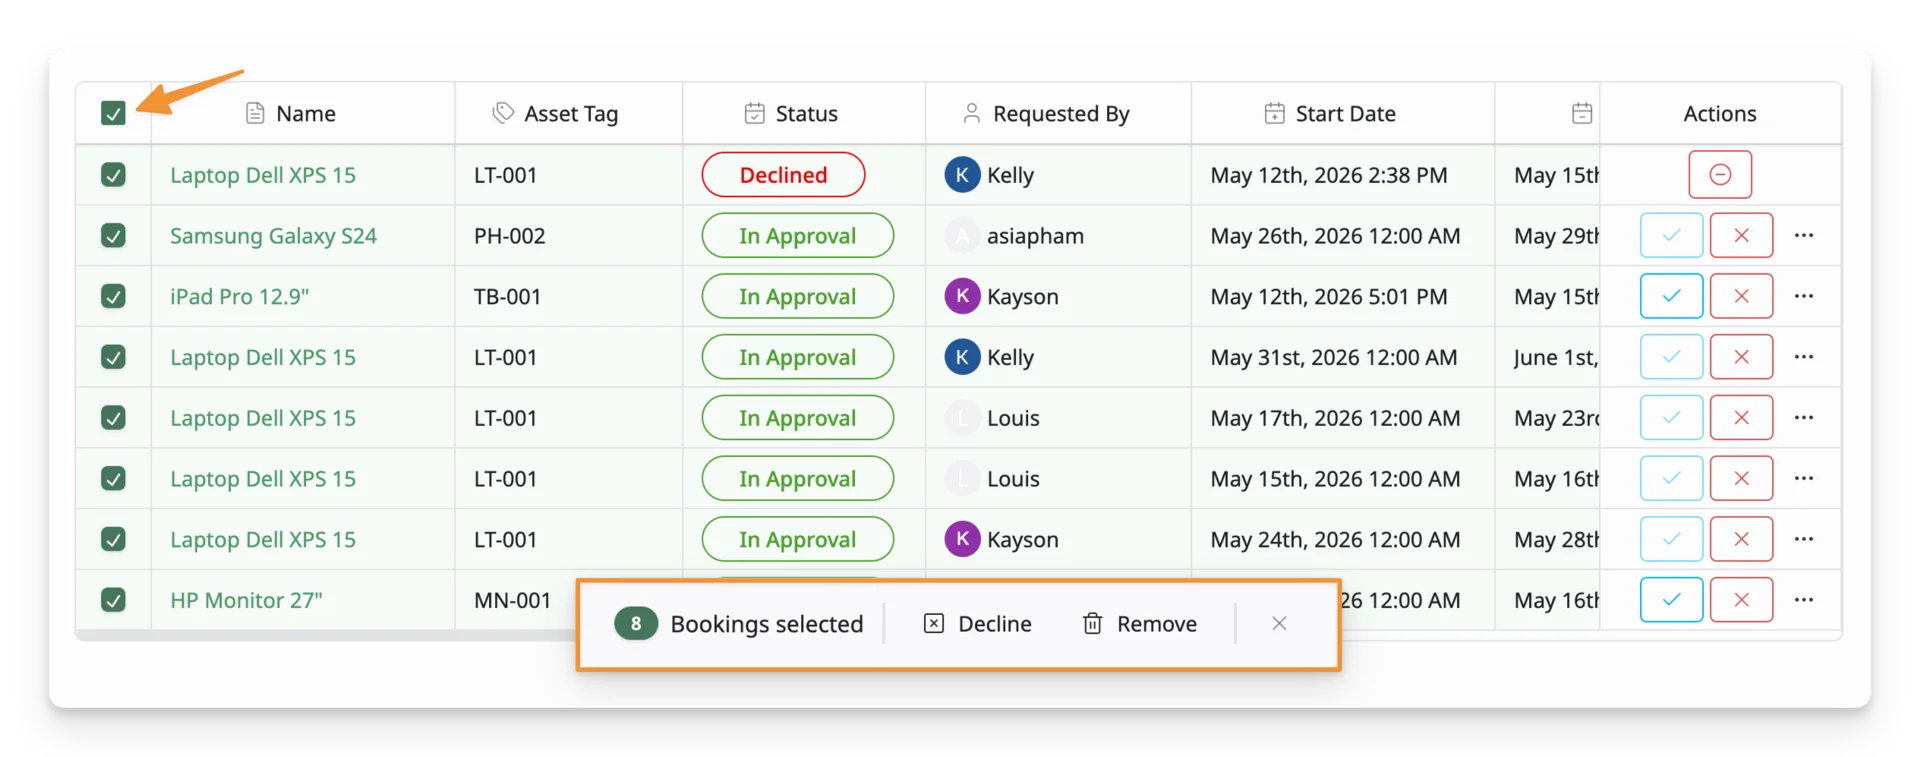
- Select the checkbox beside each reservation you want to manage.
- After selecting one or more reservations, the bulk action bar appears at the bottom of the table.
- Choose the action you want to apply:
- Decline — decline the selected reservation requests.
- Remove — remove the selected reservation records.
- Confirm the action if prompted.
Bulk actions are useful when you need to decline or remove several reservation requests at once instead of updating each reservation individually.
Once a reservation is approved or declined, email notifications are sent to the relevant users.
- If the reservation is approved, the requester and admin will receive an email notification confirming the approval.
- If the reservation is declined, the requester and admin will receive an email notification confirming the decline.
Email notification preferences can be updated at any time in Notification Settings.
Edit an Asset Reservation
Use Edit when you need to update the details of an existing booking request.
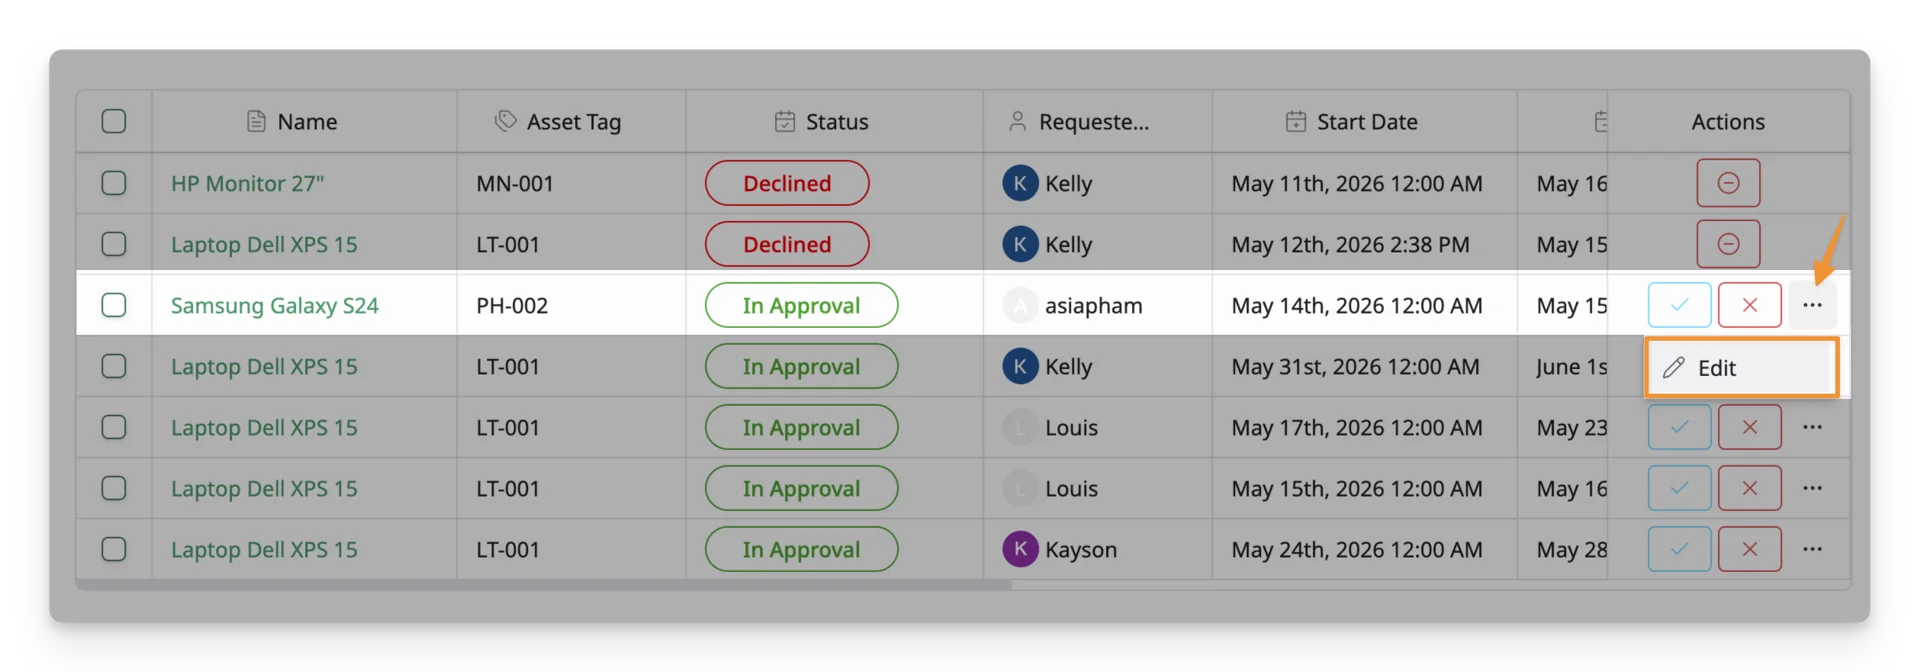
To edit a reservation:
- Find the reservation you want to update on the Reservations page and click the More Options button (…) in the Actions column.
- Select Edit.
- The Edit Booking page opens with the existing reservation details.
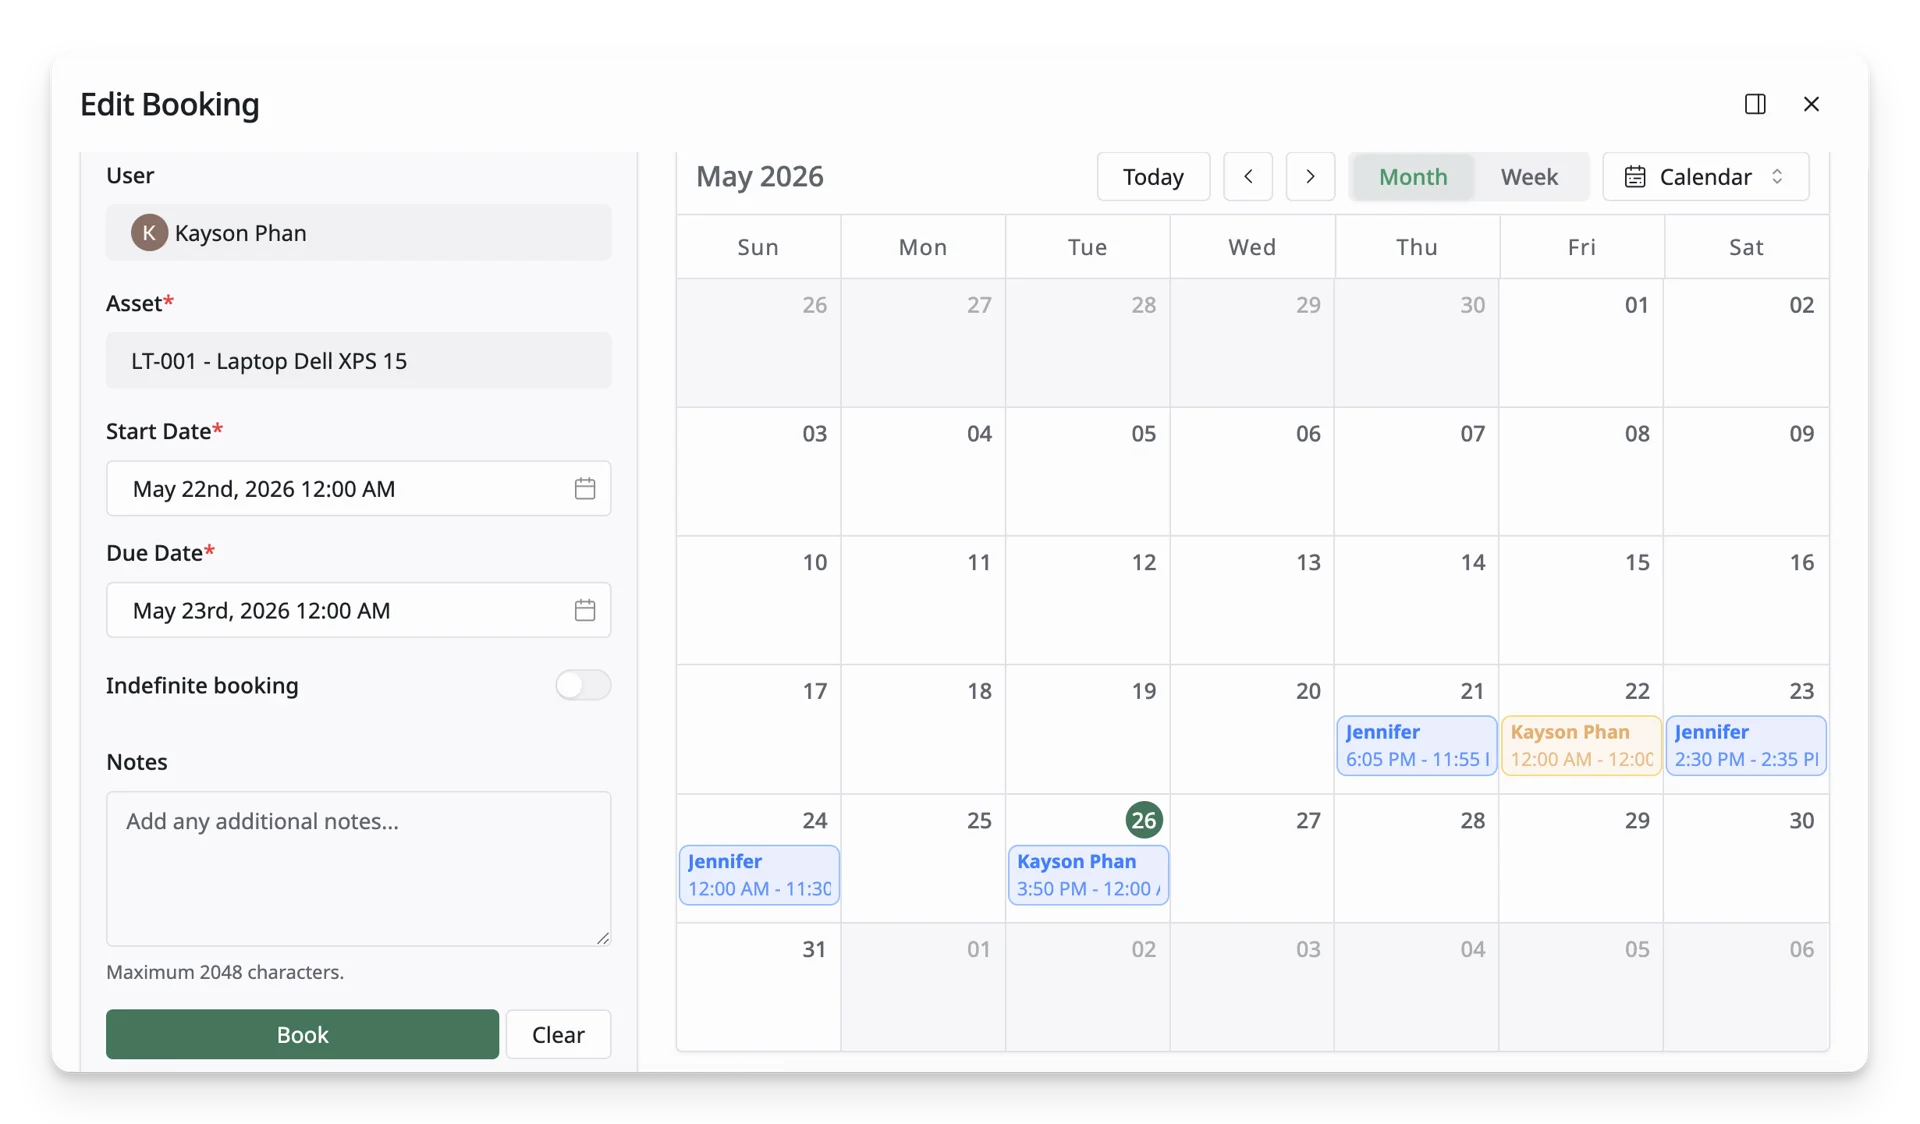
- Update the booking details as needed. You can:
- Change the Start Date and/or the Due Date
- Add or update Notes
- Enable or disable Indefinite booking
- You can also adjust the booking time range by dragging on the calendar.
- Click Book to save the updated reservation.
Once saved, the reservation is updated with the new booking details.